Apple Pay Not Working? Here’s How You Can Fix It (14 Quick Fixes)

Apple Pay has made it easy to carry and store your digital money. You don’t need to carry all your debit/credit cards in your wallet anymore and worry about theft. You can simply upload them to Apple Pay and make online payments by simply scanning QR codes with your iPhone.
Apple Pay is a safe and easy way to make/accept digital payments. But it can be a problem when your Apple Pay stops working.
Despite being a powerful application, many users have complained that Apple Pay has suddenly stopped working for them. However, the good thing is that Apple Pay not working is a fixable problem in many cases. In this post, some super easy fixes that can help you make Apple Pay work for you are explained in detail.
Before we discuss Apple Pay not working fixes, we suggest you get a reliable tool like Minitool Mobile Recovery to backup your iPhone content. It is always safe to backup your data before taking drastic steps like factory resetting your iPhone.
Let’s dig in.
14 Apple Pay Not Working Quick Fixes
“Apple Pay not working” is not an uncommon problem. This problem can occur due to many reasons, such as a low iPhone battery, a faulty digital terminal, an issue with a particular debit or credit card, etc.
So, if you use the right method, you can quickly fix the Apple Pay not working on your device. Here’s how you can do that:
Fix 1. Confirm that the business accepts Apple Pay
First of all, ensure that the business accepts Apple Pay payments. If it does, but still, Apple Pay is not working, a particular terminal might not be working at the moment. So, ask the business if you can use another terminal to make the payment. Once you find a terminal that works for you, keep it turned on for the future.
Fix 2. Select your card manually
Normally, when you bring your Apple Pay near the terminal, the app will automatically select your default card. But if Apple Pay doesn’t automatically load your card, you have to manually select it. To do so:
Step 1. Launch Apple Pay on your iPhone.
Step 2. Tap on the card you want to use.
Step 3. Bring your iPhone near the sale terminal.
Step 4. If the terminal is working, you will be able to complete the transaction smoothly.
Fix 3. Check your phone battery
If your phone’s battery is low, it can also impact the functionality of Apple Pay. Usually, when Apple devices’ battery is lower than 20%, it will activate the Low Battery Mode. This, in return, will shut down apps that consume high power. Thus, you can simply charge your phone to fix the Apple Pay not working problem.
Fix 4. Refresh the app
Some temporary glitches can be easily fixed by fully closing Apple Pay and then relaunching it. This fix will easily fix all the broken connections and small system errors.
Fix 5. Check Apple Pay status
Apple Pay is an online service regulated by Apple. Mostly, Apple Pay has a high uptime and completes a transaction in no time. But, sometimes, Apple’s servers might be down for maintenance or some other purpose that can impact the functions of Apple Pay.
So, you can go to Apple’s System Status page and check whether the sign next to the Apple Pay & Wallet is green or red. The green signal means everything is fine at Apple’s end and Apple Pay not working issue is related to something else.
Fix 6. Restart your phone
The good old solution to fix most mobile phone-related issues is restarting your device. This will clear temporary caches and refresh your phone’s memory, which can fix several system glitches. It will take a couple of minutes to restart the phone and backup your data. So, leave your phone alone for a few minutes to complete the process.
You can restart your latest iPhones by holding the lock button till the Apple logo appears.
Fix 7. Remove and add the card again
If you have added multiple debit and credit cards to your Apple Pay account, and only one of the cards is not working, this solution will help you. Simply remove the problematic card from your account and again add it. That’s because sometimes, a card is not properly stored, which can create access problems. You can remove and add a card this way on Apple Pay:
Step 1. Open the Settings app on your phone.
Step 2. Tap Wallet & Apple Pay.
Step 3. Under the Payment Cards section, tap on the card which is not working properly. After that, tap on the Remove This Card and confirm your choice.
Step 4. Restart your phone and go back to Settings > Wallet & Apple Pay again.
Step 5. In the Payment Cards section, tap on the Add Card and follow the on-screen instructions to insert the same card into your Apple Pay account.
Fix 8. Sign out and sign in to your Apple ID
It is possible that you are not properly logged into your Apple ID, or there’s some other Apple ID error that’s blocking your Apple Pay features. Thus, you can just sign out and sign in to your Apple ID to fix the Apple Pay not working glitch. Simply follow these steps:
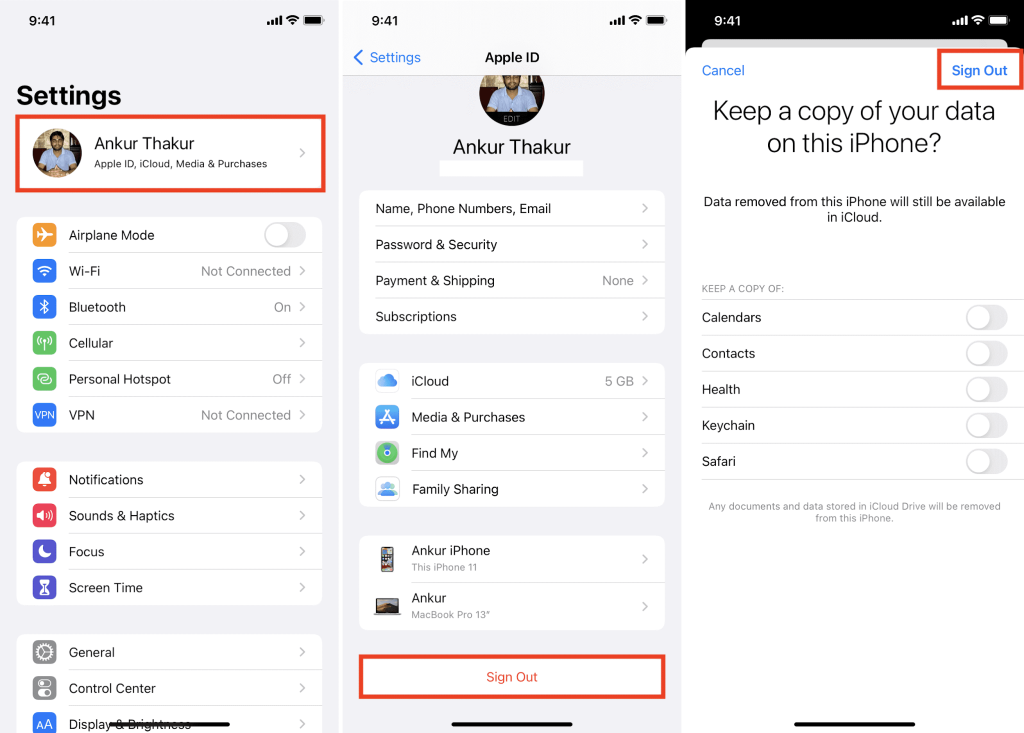
Step 1. Make sure to note down your Apple ID and password before beginning the process. Go to Settings and tap on your name on the top of your screen.
Step 2. Scroll to the bottom of your screen and tap on the Sign Out button. Confirm your action.
Step 3. Restart your phone.
Step 4. Go back to the Settings and sign in to your Apple ID. Now, open the Apple Pay app and make a transaction to check if the error is fixed.
Fix 9. Remove the phone case
If you are using heavy-duty shockproof cases to protect your phone, it might interfere with the NFC communications that Apple Pay relies upon. Also, metallic and bulky materials made in phone cases can cause Apple Pay not working problem.
So, the best fix is to remove your phone case and then try to bring Apple Pay close to the sales terminal. You should get a new phone case that will not block Apple Pay communication with terminals if it’s working.
Fix 10. Always select the credit card
This might sound odd, but selecting the debit card as your payment mode on Apple Pay will not work. You should always select a credit card to make glitch-free payments on Apple Pay. Even if you are using a debit card, select the credit card to make a smooth transaction.
Fix 11. Go to your Apple Pay settings
It is a good idea to check your Apple Pay settings once to ensure that everything is in the right order. For this, simply go to the Settings and Wallet & Apple Pay to run through all the settings.

Fix 12. Call your bank
If you have no luck by far, your credit or debit card might be the problem. So, give a call to your bank to make sure your cards are not expired or overdue for payment.
Fix 13. Factory reset your phone
This is the hardest solution to fix the Apple Pay not working problem. In this approach, you will take your iPhone to the position you have first ordered it. That means all your mobile data will be removed after a factory reset.
Therefore, we highly recommend iPhone users backup their data using third-party tools so that they can easily restore their data after a factory reset. To factory reset your iPhone, go to Settings > General > Transfer or Reset iPhone. Tap Erase All Content and Settings.
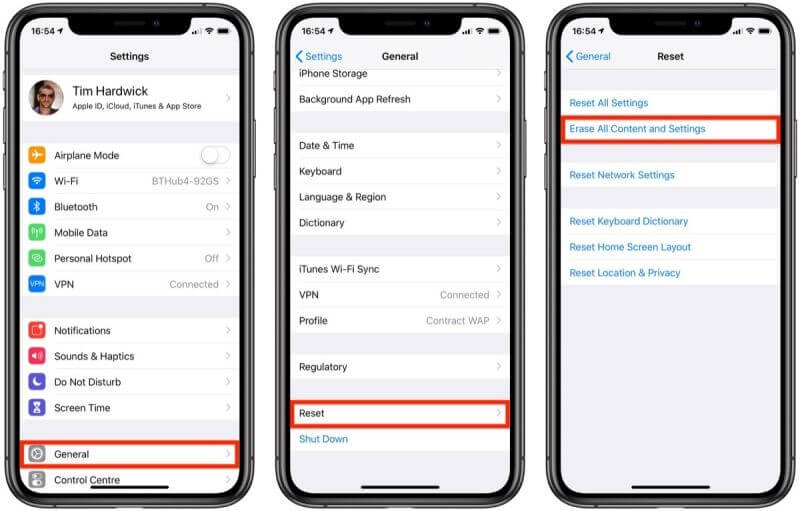
After that, you have to re-add your cards to Apple Pay and try to make a transaction. Once Apple Pay is working on your device, you can easily restore all your data using a data recovery tool.
Fix 14. Contact Apple customer support
Finally, if none of the above methods worked for you, simply contact Apple customer care support to fix the issue. Here, the problem might be with your phone that Apple can fix or replace for you.
If your device is under the Apple manufacturing guarantee, you should visit your nearest Apple Store to get your phone fixed for free.
Parting Thoughts
Apple Pay or other digital wallet apps are going to revolutionize the money market in the future. Therefore, no matter how much you resist these applications, you have to use them in the future. So, don’t hesitate to use Apple Pay or any other digital wallet applications.
As you have explored 14 easy methods to fix the Apple Pay not working problem, you can now easily operate the app on your iPhone. So, if you find these tips helpful, do share this article with your friends and follow us on social media for more informative guides articles.
Popular Post


Recent Post

Troubleshooting Guide: How To Fix Copy And Paste Not Working On Windows 10/11
Fix the copy and paste not working issue on Windows 10/11 hassle-free with this comprehensive guide. Here you’ll find effective tried and tested methods that can troubleshoot and permanently resolve the problem.

How to Force Quit on Windows 11 and Windows 10
Encountering unresponsive programs or frozen applications on our Windows devices can be a frustrating experience. When a program hangs or stops responding, it can disrupt our workflow and hinder productivity. This is where the ability to force quit a program comes in handy. Here, we will explore different methods to force quit on Windows 11 […]

How to Enable Secure Boot Windows 11 and Windows 10
One of the key features that can significantly enhance the security of your Windows operating system is Secure Boot. By enabling Secure Boot on your Windows 11 or Windows 10 system, you can protect your device against malware and unauthorized operating systems. Benefits of Enabling Secure Boot in Windows 11 And 10 1. Protection Against […]

How to Change Administrator on Windows 10 and Windows 11
In Windows operating systems, the administrator account holds the highest level of privileges and control over the system. Sometimes, you may need to change the administrator account for various reasons such as security, ownership transfer, or simply to give someone else access to the system. Here, we will explore different methods to change the administrator […]

How to Open BIOS Windows 11 and Windows 10
Here are the best ways to Open BIOS Windows 11 and Windows 10. These steps are very easy.

How to Convert HEIC to JPG on Windows 11 and Windows 10
Learn the best ways to convert HEIC to JPG on Windows and Windows 10 computers.

How to Fix Valorant not uninstalling Windows 11 – Remove Valorant Completely
Online gaming has become increasingly popular, with many gamers enjoying multiplayer games. One such game that has gained a significant following is Valorant. However, like any software, Valorant is not immune to technical issues, and one common problem that players encounter is the difficulty in uninstalling the game, particularly on the Windows 11 operating system. […]
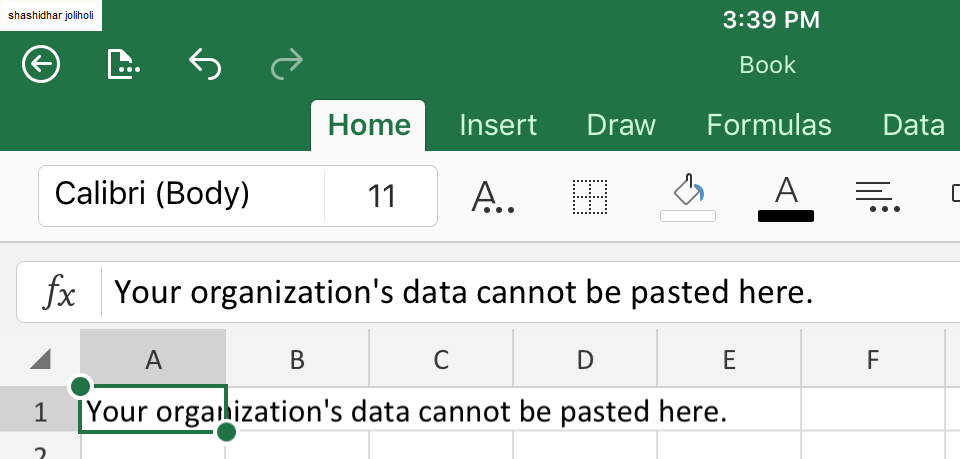
Your Organization’s Data Cannot Be Pasted Here: 7 Ways to Fix It
Encountering the “Your organization’s data cannot be pasted here” error can be frustrating, but armed with the right knowledge and troubleshooting steps, you can quickly overcome this hurdle.
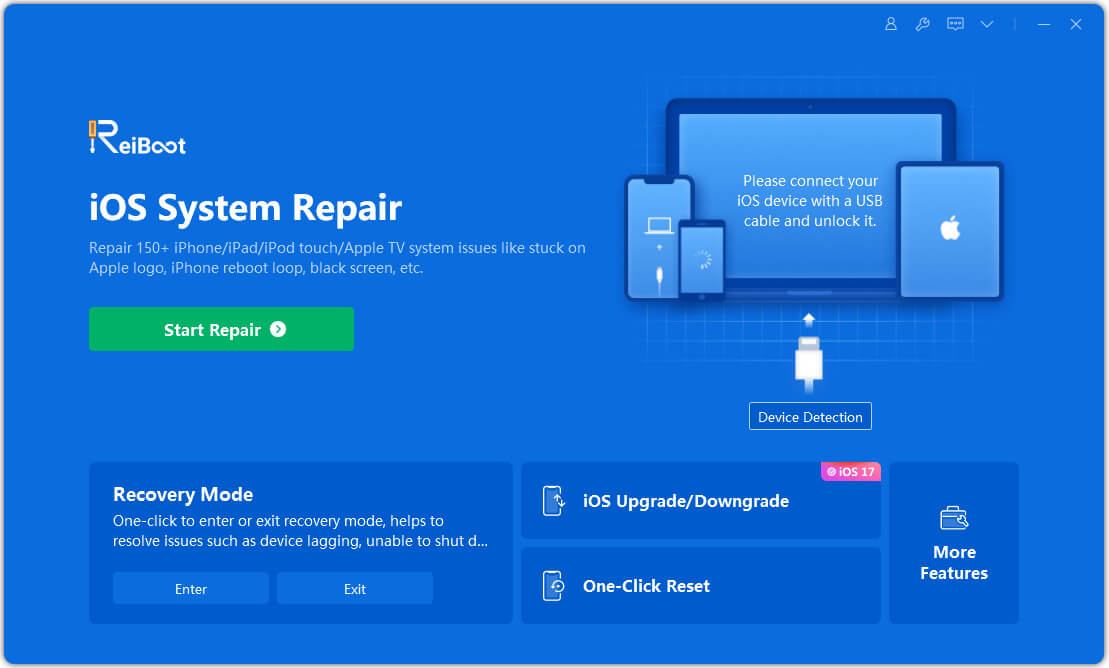
Tenorshare Reiboot Review 2024 [Fully Unbiased]
Read The Complete Unbiased Review of Tenorshare Reiboot
How to Factory Reset Dell Laptop Without Password: Quick Solutions
Factory resetting a Dell laptop can be a useful solution in various scenarios, such as when you want to sell your laptop, encounter system issues, or simply want to start fresh. However, one common challenge users face is the need to reset their laptops without a password. Here, we will explore some quick solutions to factory […]

