How to Fix “Cannot Verify Server Identity” on Your iPhone or iPad?
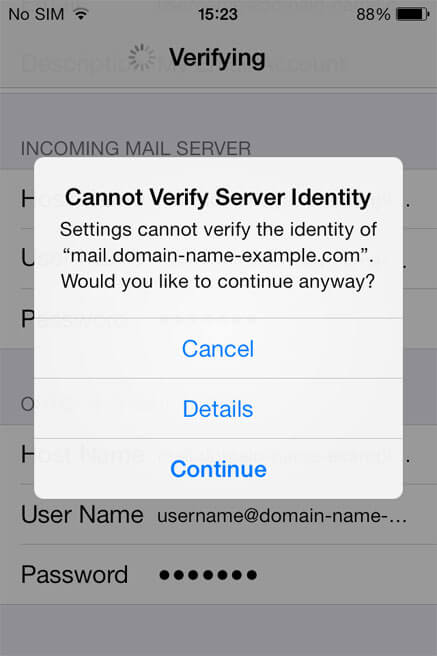
Does your iPhone display the “cannot verify server identity” warning message? You are not alone, though.
Because of rigorous mail server verification, the iPhone mail software occasionally generates this error. Due to this problem, you can’t send or receive emails on your iPhone.
This article will identify the underlying cause of the cannot verify server identity iPhone issue and provide a permanent solution.
Why I Encountered the Cannot Verify Server Identity iPhone or iPad Error?
You must study more about SSL certificates to comprehend the underlying reason for this problem. It is a code that aids in confirming who owns which website. Additionally, SSL examines the company’s dependability.
On the iPhone, an untrusted server is typically blamed for the “cannot verify server identity” issue. However, iOS flaws and incorrect email settings could occasionally be blameable. Creating a new email account frequently also causes this problem. SSL verification happens each time a new email account is added.
Let’s consider a solution to the problem.
7 Solutions to Fix “Cannot Verify Server Identity” on Your iPhone or iPad
The Apple Mail app is excellent and easy to use on iPhone or iPad. But, many users have reported on the Apple Community that they see a “cannot verify server identity” message when they try to send an email.
Apple has no official solution to fix the error. But, iOS experts and tech nerds like TC have dug into the problem and found some effective solutions. So, to support over 1.2 billion iPhone users, we recommend the following solutions to fix the cannot verify server identity iPhone or iPad error:
Solution 1. Switch or Configure Your Internet Connection
An alternative internet connection or a connection reset are the first things you can try. Your local internet connection may have become problematic even though your device and the mail server may both be functioning normally.
Most connection problems with an Internet Service Provider (ISP) can be fixed by unplugging, waiting for a little, and reconnecting. If your router and modem are separate devices, turn them off, wait a few seconds, and then switch them back on. Consider resetting your network connection on-device as well for a brand-new starting point.
Solution 2. Configure Date and Time Settings
The Mail app’s ability to connect to the server can also be hampered by incorrect date and time settings on your device. Therefore, the app can stop you from sending emails. However, you can configure the iPhone to utilize the network-provided date and time rather than manually setting them. This is how to go about it:
Step 1. Open the Settings app on your iPad or iPhone and select General.

Step 2. Select Date & Time and turn on the automatic setting checkbox next to it.
Solution 3. Remove & Re-add Your Email Account
You can delete the account in question and add it again if you only see the cannot verify server identity error with a specific mail account. This is the procedure:
Step 1. Tap the Settings app on your device and select Mail by scrolling down.
Step 2. Select the email account you’re having trouble with under Accounts.
Step 3. Select “Delete Account” from the menu. When a prompt pops up, choose Delete Account.
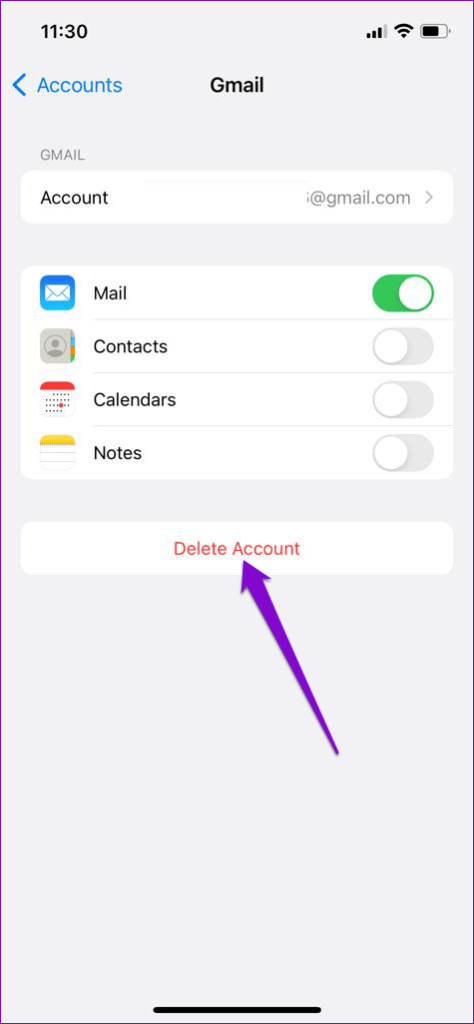
Return to the Accounts tab and choose Add Account to log in using your account. This must fix the problem.
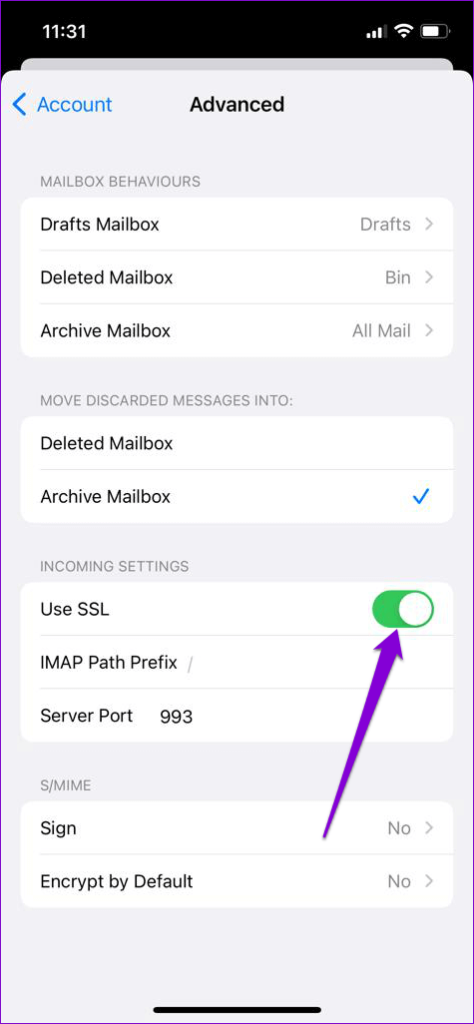
Solution 4. Disable SSL Encryption
The connection between the Mail app and the server is encrypted thanks to SSL (or Secure Socket Layer) technology. You can encounter a ‘Cannot Verify Server Identity’ problem on your iPhone if there is a discrepancy between the SSL certificates on your phone and one on the server. For the time being, you might try turning off SSL encryption to see whether the error, as mentioned earlier, disappears. How? Read on.
A warning, please. Your emails become vulnerable to attacks if SSL is disabled. Your login and password would be visible in plaintext to anyone on the same network as you if someone were to intercept the messages.
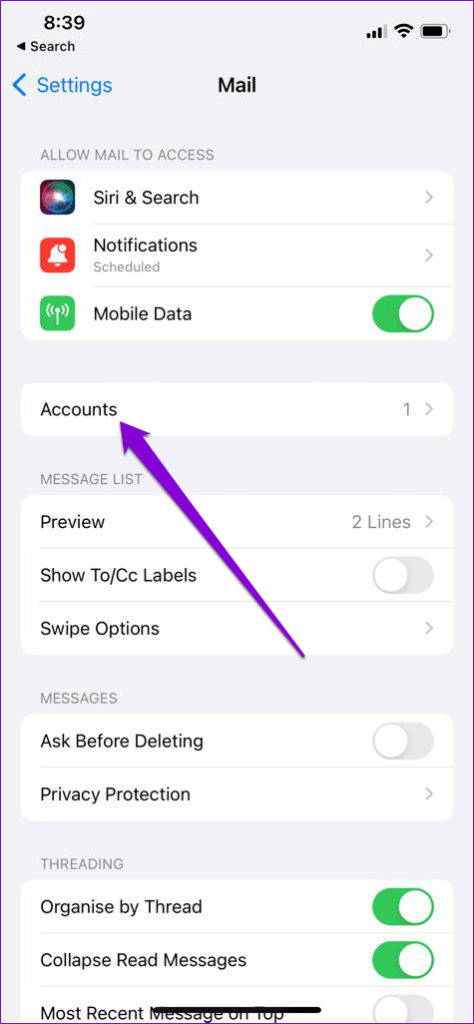
Step 1. Open the Settings app and select Mail by scrolling down.
Step 2. Select the problematic email account under Accounts.
Step 3. Tap the email address at the top.
Step 4. Select Advanced and turn the Use SSL switch off.
Solution 5. Update Your iOS
By this time, a flaw in the Mail app or iOS is probably to blame if the “Cannot Verify Server Identity” warning is still bothering you. In that scenario, you ought to immediately install any upcoming iOS updates. The Mail app on your iPhone will also be updated as a result.
Open the Settings menu and select General to see whether there are any upcoming iOS updates. Next, choose Software Update.
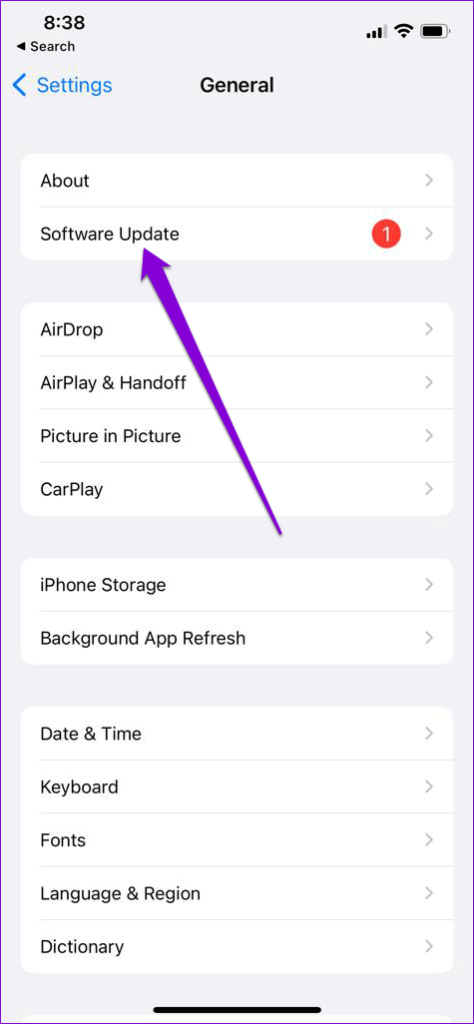
Update your iOS device, then check to see if the issue recurs.
Solution 6. Close the Mail App
iOS and iPadOS are aggressive in storing an app’s memory state in long-term storage. As a result, your Mail app might not be closed in months or even years.
Swipe up from the bottom of your home screen until you see the app carousel. Swipe right until you find the mail app, then swipe up to kill it. Then reopen it to check if it fixed the problem.
Solution 7. Restart Your Device
Restarting your device is a general troubleshooting tip, but it is something that a surprising percentage of people overlook while experiencing issues with their technology.
If you’ve never shut off your iPhone or iPad before, just hold the volume up and side button and release it when you see “Slide to power off,” then move the slider to the right until the device goes off. Then, hold the side button to switch your device back on.
Cool Tips & Tricks to Use the Mail App
Despite the cannot verify server identity errors, the Mail app is an excellent application for sending and receiving emails. There you can find many great features in the Mail app, such as:
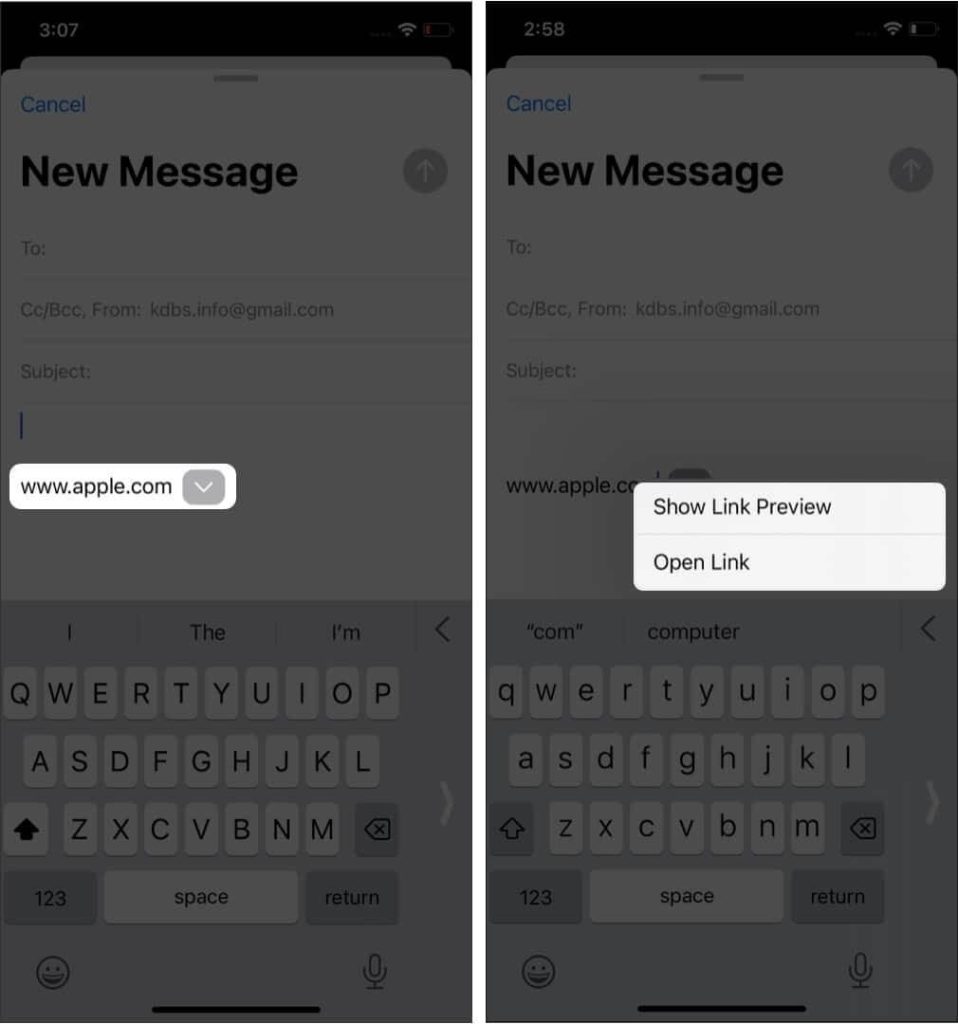
Rich links
Apple has added rich links to Mail. Even if you’re unfamiliar with its name, you’ve already encountered this function in Messages. Without clicking the link, rich links give you a sneak peek of the website or material that has been delivered to you.
Schedule emails
The ability to schedule emails for a later time is a feature that consumers frequently ask for. For example, sometimes you write an email but decide to send it later to ensure the recipient is accessible to read and answer.
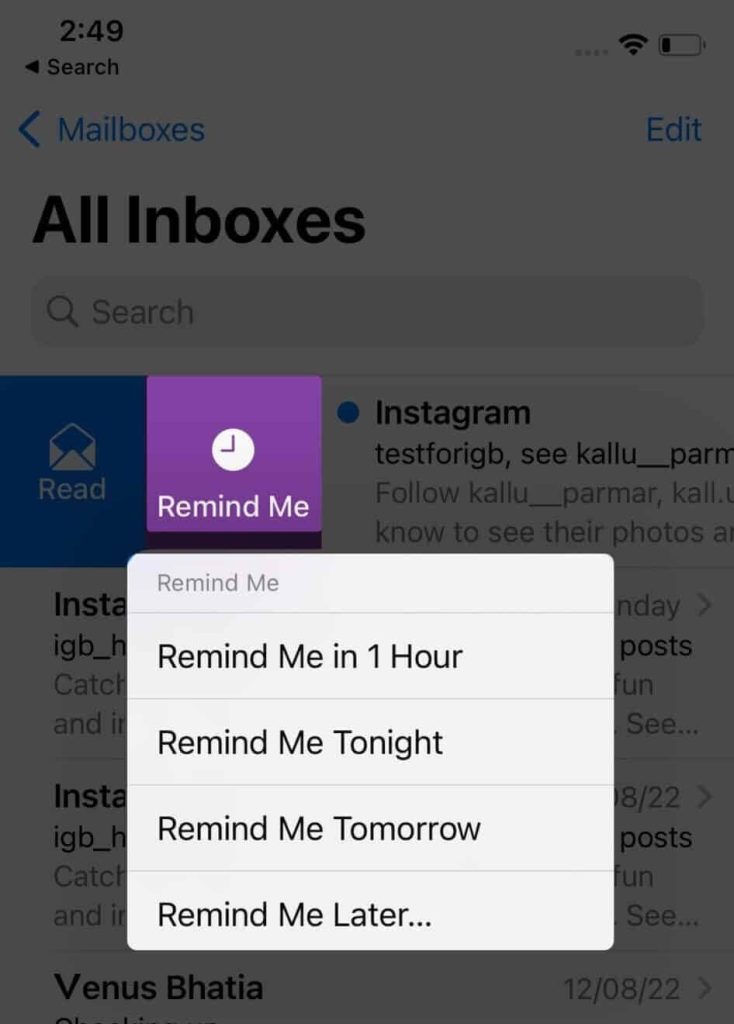
Remind to read later
You can now ask Mail to remind you to read an email later when you have the time and attention. Select the email you want to be reminded about, then swipe to the right to accomplish this. Select Remind Me in 1 Hour, Remind Me Tonight, or Remind Me Tomorrow by tapping the Remind Me button. If you wish to schedule it for a specific time and day, choose to Remind Me Later.
Manage multiple accounts together
Add an account to the Mail app by going to iPhone Settings > Mail > Accounts > Add Account. You can easily add several email accounts to your iPhone. After adding additional accounts, you can designate one of your added email accounts as the default account. The Mail app will open with the standard email “From” section when you tap an email from a website or app.
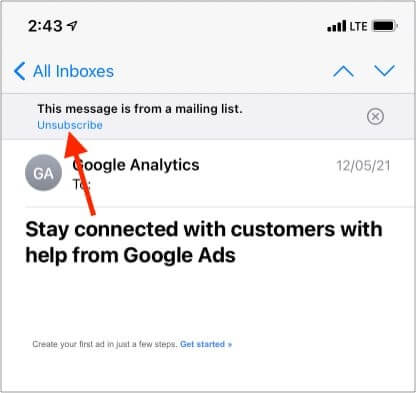
Easy unsubscribe
Several emails will include an unsubscribe link that will allow you to simply remove yourself from the mailing list. Tap Unsubscribe and confirm the confirmation popup.
Just You Mail App Easily!
There you have it, people! We have shared how to fix cannot verify server identity iPhone error and use the Mail app. So, you can now easily send or receive emails on your iPhone or iPad. But, if you get stuck somewhere, you can jot it down in the comments or check other iOS guides here.
Popular Post


Recent Post
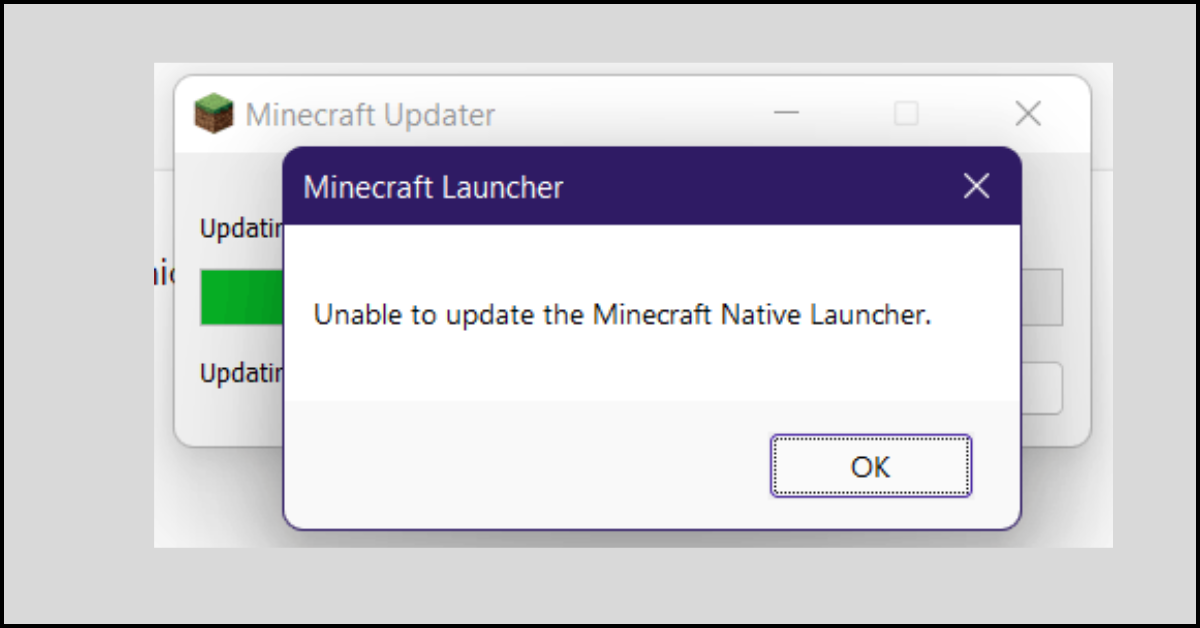
How to Fix Unable to update the Minecraft Native Launcher Windows 11
The “Unable to update the Minecraft Native Launcher” issue can be frustrating. However, there are many ways to fix it. Here, we will discuss some effective ways to fix this problem.

Troubleshooting Guide: How To Fix Copy And Paste Not Working On Windows 10/11
Fix the copy and paste not working issue on Windows 10/11 hassle-free with this comprehensive guide. Here you’ll find effective tried and tested methods that can troubleshoot and permanently resolve the problem.

How to Force Quit on Windows 11 and Windows 10
Encountering unresponsive programs or frozen applications on our Windows devices can be a frustrating experience. When a program hangs or stops responding, it can disrupt our workflow and hinder productivity. This is where the ability to force quit a program comes in handy. Here, we will explore different methods to force quit on Windows 11 […]

How to Enable Secure Boot Windows 11 and Windows 10
One of the key features that can significantly enhance the security of your Windows operating system is Secure Boot. By enabling Secure Boot on your Windows 11 or Windows 10 system, you can protect your device against malware and unauthorized operating systems. Benefits of Enabling Secure Boot in Windows 11 And 10 1. Protection Against […]

How to Change Administrator on Windows 10 and Windows 11
In Windows operating systems, the administrator account holds the highest level of privileges and control over the system. Sometimes, you may need to change the administrator account for various reasons such as security, ownership transfer, or simply to give someone else access to the system. Here, we will explore different methods to change the administrator […]

How to Open BIOS Windows 11 and Windows 10
Here are the best ways to Open BIOS Windows 11 and Windows 10. These steps are very easy.

How to Convert HEIC to JPG on Windows 11 and Windows 10
Learn the best ways to convert HEIC to JPG on Windows and Windows 10 computers.

How to Fix Valorant not uninstalling Windows 11 – Remove Valorant Completely
Online gaming has become increasingly popular, with many gamers enjoying multiplayer games. One such game that has gained a significant following is Valorant. However, like any software, Valorant is not immune to technical issues, and one common problem that players encounter is the difficulty in uninstalling the game, particularly on the Windows 11 operating system. […]
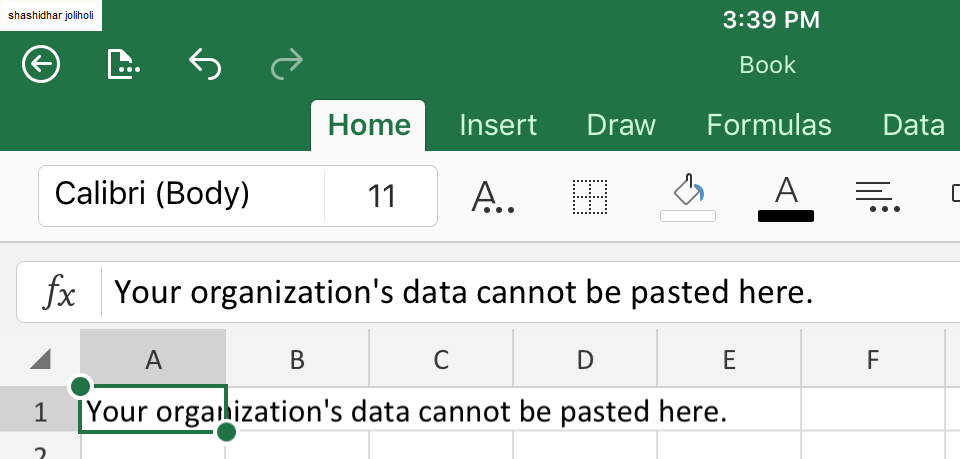
Your Organization’s Data Cannot Be Pasted Here: 7 Ways to Fix It
Encountering the “Your organization’s data cannot be pasted here” error can be frustrating, but armed with the right knowledge and troubleshooting steps, you can quickly overcome this hurdle.
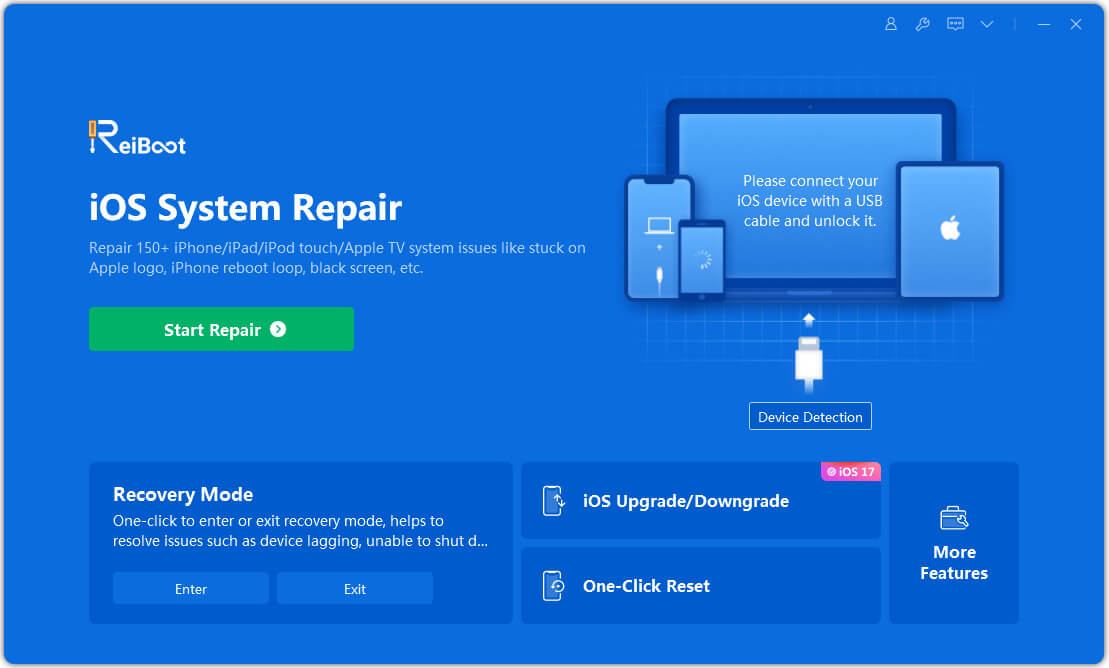
Tenorshare Reiboot Review 2024 [Fully Unbiased]
Read The Complete Unbiased Review of Tenorshare Reiboot

