How to Fix WiFi Adapter Not Working Windows 11,10?

Last updated on April 8th, 2024 at 6:57 pm
New system modifications are in place on Windows 10 and 11 for OS optimization. Many of the previous functionalities are still available in these versions, but particular issues like “WiFi adapter not working” can occur. This results in faulty network connections, data loss, or OS crashes.
Best Ways to Fix WiFi Adapter Not Working in Windows 10/11
Multiple methods can affectively rectify the WiFi adapter not working Windows 10 or 11 issue. We tried out each method for specific problems to understand the best possible techniques. Here, we have compiled the top fixes for the error.
Fix 1: Quick Upgrade of the Windows software
One of the best ways to rectify the WiFi Adapter connection issue is to troubleshoot the system. The adapter may not have the good operational capability because of outdated OS.
How to fix this?
Step 1: Restart your PC and your router. Or, you can keep your power cable unplugged from the connected router for a few minutes.
Step 2: Upgrade the Windows 10/11 OS to its currently available version.
Step 3: Try to attach the adapter again.
Fix 2: Update the WiFi Adapter
One of the best methods to fix the WiFi adapter not working prompt is to upgrade the WiFi adapter directly. For example, WiFi 6 AX200 is an efficient WiFi adapter type that works well with Linux and 64-bit Windows 10/11 software. Update the version if it does not operate after you connect it to the Windows PC.
How to fix this?
Step 1: Access the download page for Intel on its official site.
Step 2: Search for this WiFi adapter type.
Step 3: Download the most recent version available.
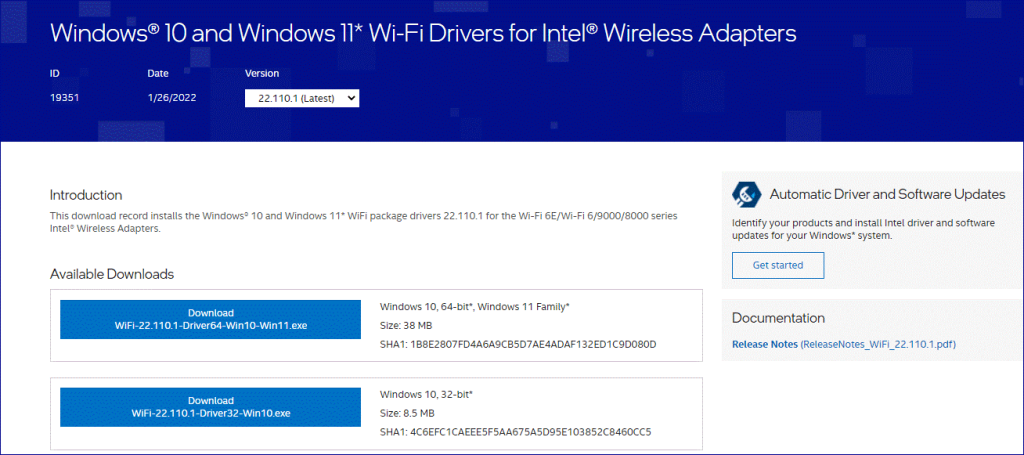
Step 4: On the .exe file that appears, double-click your cursor. This would install the software.
Fix 3: Uninstallation and Re-installation of the Network Adapter
If you see the “WiFi adapter not working” windows 10 or 11 prompt, you can uninstall the driver. Then, reinstall the current operational adapter again on Windows 11 or Windows 10 model.
How to fix this?
Step 1: Press the keys Win + X on your keyboard.
Step 2: Then, select the “Device Manager” option.
Step 3: Out of the next options, select Network Adapter. If you are working with the WiFi 5 AX200 adapter, right-click on top of it. Then, press the “Uninstall Device” option.
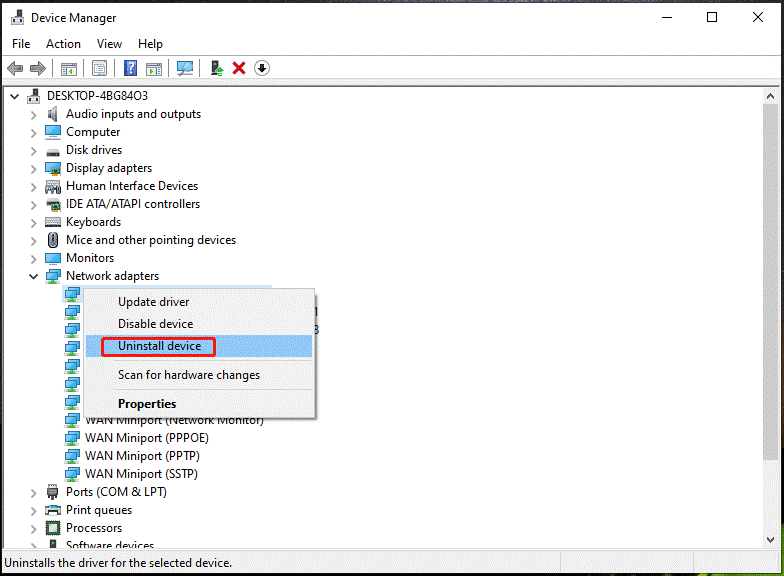
Step 4: A pop-up window will appear. Check the tick mark on the “Delete the Driver Software for this Device” option > Uninstall.
Step 5: Restart the PC system.
Step 6: Windows OS would try to automatically search and then reinstall the driver you uninstalled on the network adapter.
Fix 4: Disable Your Metered Connection
One of the common problems that cause the ‘WiFi adapter not working” prompt is a low internet plan. Otherwise, users working with a portable WiFi device that they rented also notice this error.
In these cases, it is important to mark the network connection on the device as “Metered”; this prevents apps from using the WiFi connection if they reach the set limit. Disabling it should work.
How to fix this?
Step 1: Click on the Win + I keys on your keyboard to open your Settings. Select the tab
“Network & Internet” and choose WiFi.
Step 2: Open the Properties information about your chosen Network connection.
Step 3: You would see a switch near the option for Metered Connection. Toggle it off.
Fix 5: Reset the System Network Settings
If you reboot your Windows 10 or Windows 11 PC and it does not work, you can reset the active Network settings on the device. This technique would remove every active network adapter from the system. Plus, it would reset the settings of your network to default.
How to fix this?
Step 1: Press the Windows key and the ‘I’ key together. This would open the Settings tab on your device.
Step 2: Access the tab for Network & Internet from the left-hand side menu. Then, open the “Advanced Network Settings” option.
Step 3: Click on More and then choose the “Network Reset” option.
Step 4: On the next page, you should click your cursor on “Reset Now” available beside the “Network Reset” term.
Step 5: Wait a few minutes till the process completes. Then, reboot the PC system and check your system for the issue.
Fix 6: Use Troubleshooter Settings on Windows 10 and 11
There are multiple integrated troubleshooters in both Windows 10 and 11 versions. They find and search for the different issues in the system OS and provide direct steps to rectify the problem.
How to fix this in Windows 11?
Step 1: Open the Windows 11 Taskbar and click on the top of the “Search” icon.
Step 2: In the given field, type in “Troubleshoot settings” and then click on the Enter button.

Step 3: Select the “Other Troubleshooters” option.
Step 4: You will see several options under the “Most Frequent” list on the page. Click on the “Run” button beside Internet Connections.
Step 5: Wait some time for the process to complete and check if the “WiFi adapter not working” still code comes up.
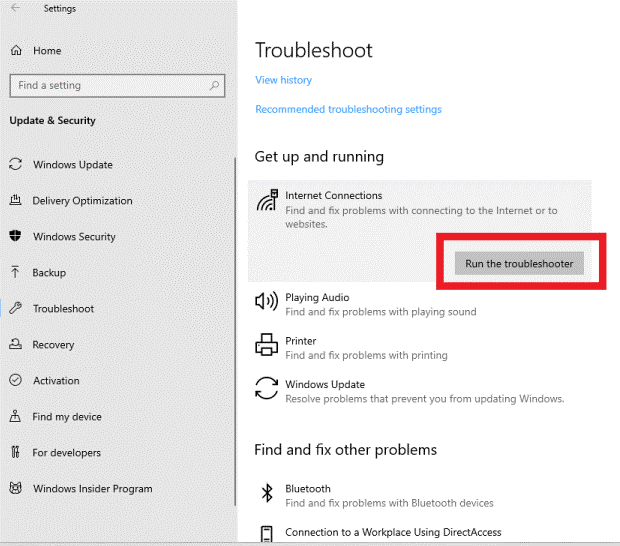
How to fix this on Windows 10?
Step 1: Press on the keys Win + I to access the Settings menu when you see the WiFi adapter not working Windows 10 prompt.
Step 2: Press on the “Update & Security” option and then select the “Troubleshoot” option.
Step 3: You will see Internet Connections on the right-hand side panel of the window. Click the option “Run the Troubleshooter”.
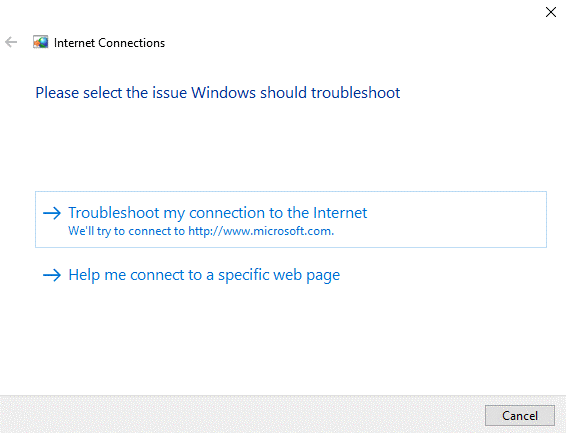
Step 4: Wait for this process to find the main problem with the internet connection error. Choose the main connection problem. Follow the next steps as directed.
Step 5: After the process completes, completely restart the PC.
Fix 7: Flush DNS of the PC
Errors in the WiFi adapter on Windows 10 or 11 can occur due to connection problems between the WiFi network and the internet. In this case, you should flush the Domain Name System or DNS to renew the connection.
How to fix this?
Step 1: Right-click your cursor at the Start Menu for a menu to appear. Choose the “Windows Terminal (Admin)” option.

Step 2: Type the following codes and run the commands one after another.
netsh winsock reset
netsh int ip reset
ipconfig /release
ipconfig /renew
ipconfig /flushdns
Step 3: Then, restart the system to activate the command changes. Check if the internet connection is working as necessary.
Fix 8: Resolve the Issue with Modifications in the Registry Editor and Command Prompt
In case of the “WiFi adapter not working” Windows 10 prompt, sometimes the users cannot see all the available WiFi options when they open Settings. You can run CMD prompts and also run codes on the system registry editor.
How to fix this?
Step 1: Open the search bar on your Windows 10 OS from the Taskbar. For accessing the command prompt in the form of administrator, type “cmd” in the Search field.
Step 2: A window would appear with the “Run as Administrator” option on the right panel. Click on it.
Step 3: Copy the next command and check on the “Enter” button.
netcfg –s n
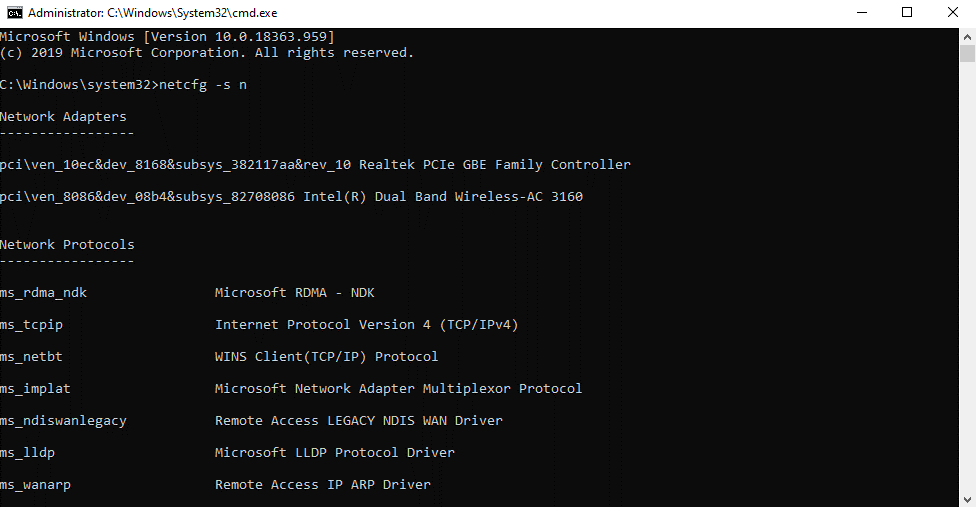
Step 4: Multiple choices appear in a list form on the next screen, like network adapters, network services, network protocols, and network clients. Search for the DNI_DNE code. If this is present, that signifies that there is an issue.
Step 5: Type the next command under the available command prompt one by one.
reg delete HKCR\CLSID\{988248f3-a1ad-49bf-9170-676cbbc36ba3} /f
netcfg -v -u dni_dne
Step 6: If the “error 0x80004002” code appears next, you should access the registry editor next.
Step 7: Press the keys Win + R on the keyword to open the “Run” dialog box.
Here, type the term “regedit” to access the Registry Editor window.
Step 8: Search through the registry and select the path:
HKEY_CLASSES_ROOT\CLSID\{988248f3-a1ad-49bf-9170-676cbbc36ba3}
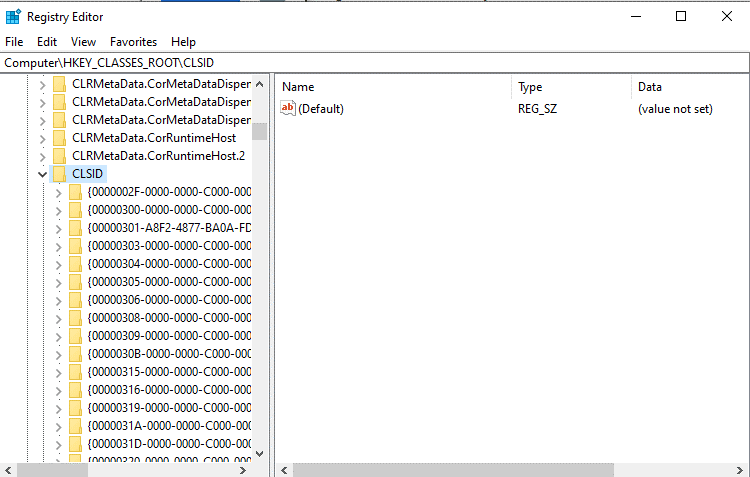
Step 9: Check for the “DNI_DNE” code. If it is present, delete it from the list.
Step 10: Restart the PC. Turn the WiFi on. Check if this works.
Fix 9: Use Control Panel to Modify the Network Mode
You can adapt the network mode on your PC to resolve the WiFi adapter not working problem. This is accessible through the Control Panel on Windows 10 and is a suitable method to try if the WiFi connection is not switching on.
How to fix this?
Step 1: Choose the Search icon from beside the Windows icon on your Taskbar. Type “Control Panel” in the Search field and click on the Open option on the right side.
Step 2: Press on the “Network and Sharing Center” option.
Step 3: On the left side panel, choose the Change Adapter Settings option and click on it.
Step 4: Find the WiFi network you are using and right-click your cursor on top of it. Choose Properties.
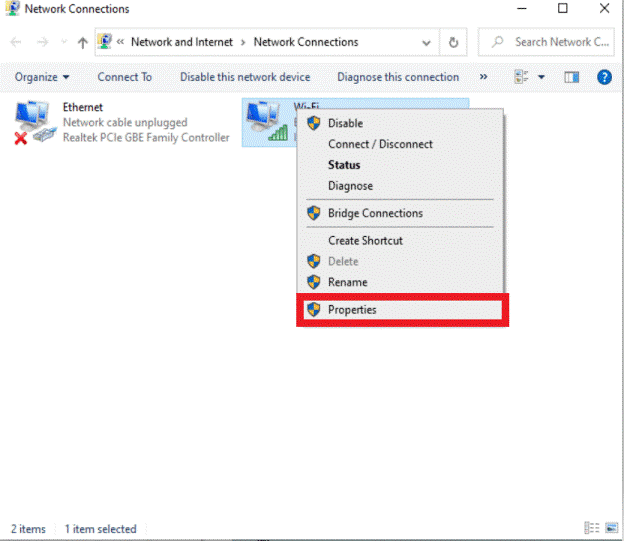
Step 5: On the next window, click on Configure.
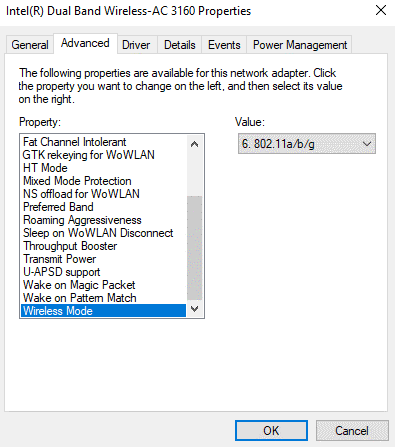
Step 6: The Advanced tab will appear. Select the Wireless Mode option.
Step 7: Adjust the mode available on the router you are using. There is a dropdown menu for the Value that you can change. Then, click on the “OK” button.
Conclusion
The error of WiFi connectivity is possible in Windows 10 and 11, but with the methods mentioned above, the problem is fixable. Carefully check the system’s current condition and understand the main problem area before using the right steps.
Go through our other posts on various software-related topics if you found this helpful.
Popular Post


Recent Post
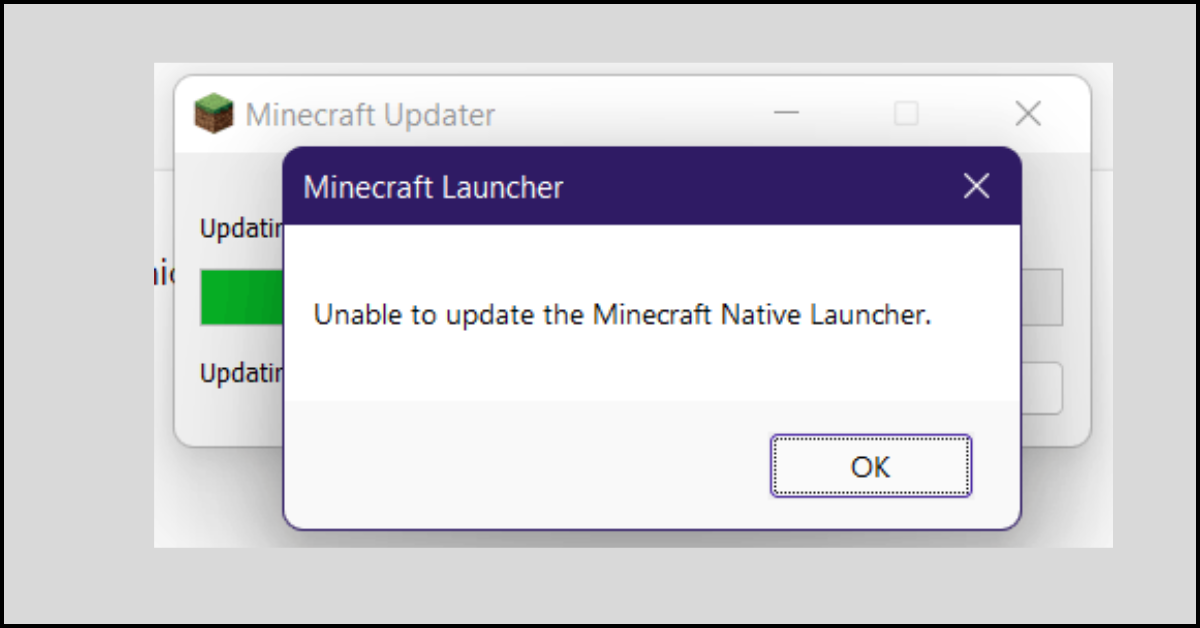
How to Fix Unable to update the Minecraft Native Launcher Windows 11
The “Unable to update the Minecraft Native Launcher” issue can be frustrating. However, there are many ways to fix it. Here, we will discuss some effective ways to fix this problem.

Troubleshooting Guide: How To Fix Copy And Paste Not Working On Windows 10/11
Fix the copy and paste not working issue on Windows 10/11 hassle-free with this comprehensive guide. Here you’ll find effective tried and tested methods that can troubleshoot and permanently resolve the problem.
How to Force Quit on Windows 11 and Windows 10
Encountering unresponsive programs or frozen applications on our Windows devices can be a frustrating experience. When a program hangs or stops responding, it can disrupt our workflow and hinder productivity. This is where the ability to force quit a program comes in handy. Here, we will explore different methods to force quit on Windows 11 […]

How to Enable Secure Boot Windows 11 and Windows 10
One of the key features that can significantly enhance the security of your Windows operating system is Secure Boot. By enabling Secure Boot on your Windows 11 or Windows 10 system, you can protect your device against malware and unauthorized operating systems. Benefits of Enabling Secure Boot in Windows 11 And 10 1. Protection Against […]

How to Change Administrator on Windows 10 and Windows 11
In Windows operating systems, the administrator account holds the highest level of privileges and control over the system. Sometimes, you may need to change the administrator account for various reasons such as security, ownership transfer, or simply to give someone else access to the system. Here, we will explore different methods to change the administrator […]

How to Open BIOS Windows 11 and Windows 10
Here are the best ways to Open BIOS Windows 11 and Windows 10. These steps are very easy.

How to Convert HEIC to JPG on Windows 11 and Windows 10
Learn the best ways to convert HEIC to JPG on Windows and Windows 10 computers.

How to Fix Valorant not uninstalling Windows 11 – Remove Valorant Completely
Online gaming has become increasingly popular, with many gamers enjoying multiplayer games. One such game that has gained a significant following is Valorant. However, like any software, Valorant is not immune to technical issues, and one common problem that players encounter is the difficulty in uninstalling the game, particularly on the Windows 11 operating system. […]
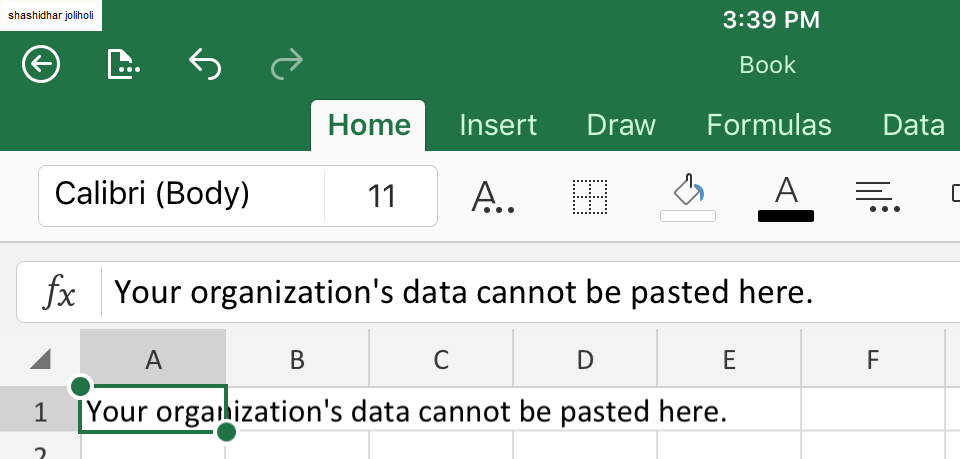
Your Organization’s Data Cannot Be Pasted Here: 7 Ways to Fix It
Encountering the “Your organization’s data cannot be pasted here” error can be frustrating, but armed with the right knowledge and troubleshooting steps, you can quickly overcome this hurdle.
Tenorshare Reiboot Review 2024 [Fully Unbiased]
Read The Complete Unbiased Review of Tenorshare Reiboot

