How To Clear Windows Update Cache In Windows 11 [2026]

Last updated on February 18th, 2026 at 5:58 am
Windows 11 stores update files in a cache folder. This cache helps speed up future updates. But sometimes this cache causes problems. You may face slow updates or failed downloads. Learning to clear Windows update cache can fix these issues.
Many users are unaware of the Windows update cache, which is tucked away within the system files. Over time, this cache can grow significantly as outdated update files accumulate and consume valuable disk space. These files may eventually become corrupted, and when that happens, clearing the Windows update cache can help resolve related issues.
Clearing the Windows update cache is a simple process. This guide walks you through multiple techniques, each tailored to specific scenarios. You’ll discover when and how to apply each method, gaining the confidence to handle update cache issues like a seasoned pro.
Part 1: What is Windows Update Cache?
The Windows update cache is a storage folder. Windows keeps the downloaded update files here. The system uses these files to install updates faster. The cache folder is called “SoftwareDistribution”. It lives in your Windows folder.
When Windows downloads an update, it first stores the necessary files in a cache. These files remain there until the update is installed. Even after installation, some leftover files persist. Gradually, this cache accumulates outdated update data—a typical and expected behavior in Windows 11.
The cache serves a good purpose most of the time. It makes updates faster and more reliable. But problems can occur when files get corrupted. Clearing the Windows update cache removes these bad files. This lets Windows download fresh files and work properly.
Part 2: Why Delete Windows Update Cache: Top Reasons
You should delete Windows update cache when facing update problems. Here are the main reasons to clear this cache:
- Updates fail to install – Corrupt cache files block new updates from installing properly
- Slow download speeds – Old cache files can interfere with new download processes
- Error messages appear – Windows shows error codes when cache files are damaged
- Disk space is low – The cache can grow very large and eat up storage space
- Updates get stuck – Downloads freeze or hang due to corrupted cache data
- System runs slowly – Large cache folders can slow down overall system performance
- Repeated download attempts – Windows keeps trying to download the same files over and over
- Clean installation needed – Fresh cache helps ensure clean update installations
Part 3: How to Clear Windows Update Cache in Windows 11
Method 1: Using Windows Services
This method stops the Windows Update service first. Then you delete Windows update cache files safely. It’s the most reliable way to clear Windows update cache. The service must be stopped before deleting files. This prevents Windows from using cache files during deletion.
Use this method when updates fail repeatedly. It works best for general cache problems. This is the safest approach for most users. The method works on all Windows 11 versions. Most computer repair shops use this exact process.
When to choose this method:
- Updates keep failing with error messages
- If you are looking for a secure way to clear the Windows update cache
- Other methods haven’t worked for you
Steps:
- Press the Windows + R keys together. Type “services.msc” and press Enter. Find “Windows Update” in the list. Right-click it and select “Stop“.
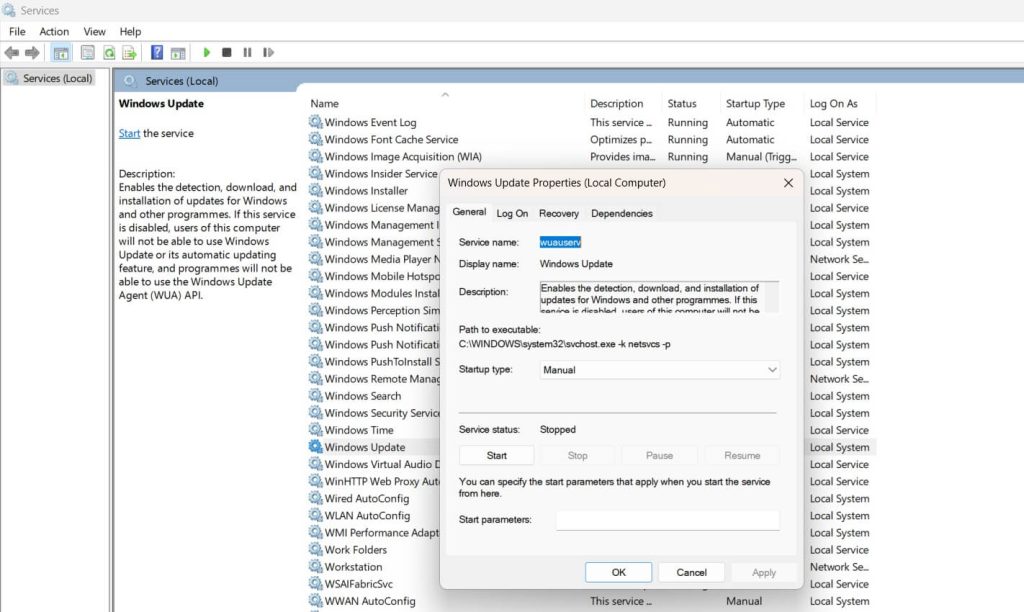
- Open File Explorer and go to C:\Windows. Find the SoftwareDistribution folder. Delete all contents inside this folder. Go back to Services and start Windows Update again.
Method 2: Using Command Prompt
Command Prompt lets you clear Windows update cache quickly. This method uses commands to stop services and delete files. It’s faster than the manual method above. The commands work automatically without clicking through menus.
Choose this method if you like using commands. It works well for experienced users. The process is automated and efficient. You can run these commands on multiple computers. IT professionals often use this approach for batch clearing.
When to choose this method:
- You’re comfortable using Command Prompt
- You want to clear the Windows update cache quickly
- You need to fix multiple computers
Steps:
- Press the Windows + X keys together. Select “Windows Terminal (Admin)” from the menu. Type this command: net stop wuauserv. Press Enter and wait for the service to stop.

- Type: rd /s /q C:\Windows\SoftwareDistribution. Press Enter to delete the Windows update cache. Type: net start wuauserv. Press Enter.
Method 3: Using Windows Storage Sense
Storage Sense can automatically clear Windows update cache. This built-in tool removes old update files safely. It’s the easiest method for beginners. The tool runs in the background without user input. Windows 11 includes this feature by default.
Choose Storage Sense for automatic cache management. It runs in the background regularly without manual work. This prevents cache problems before they start. You can set it to clean cache monthly. The tool also cleans other temporary files automatically.
When to choose this method:
- You want automatic cache cleaning
- You’re new to Windows 11
- You prefer built-in Windows tools
Steps:
- Open the Settings app (Windows + I). Click on “System” in the left sidebar. Select “Storage” from the options. Click “Configure Storage Sense or run it now“. Toggle “Storage Sense” to On.
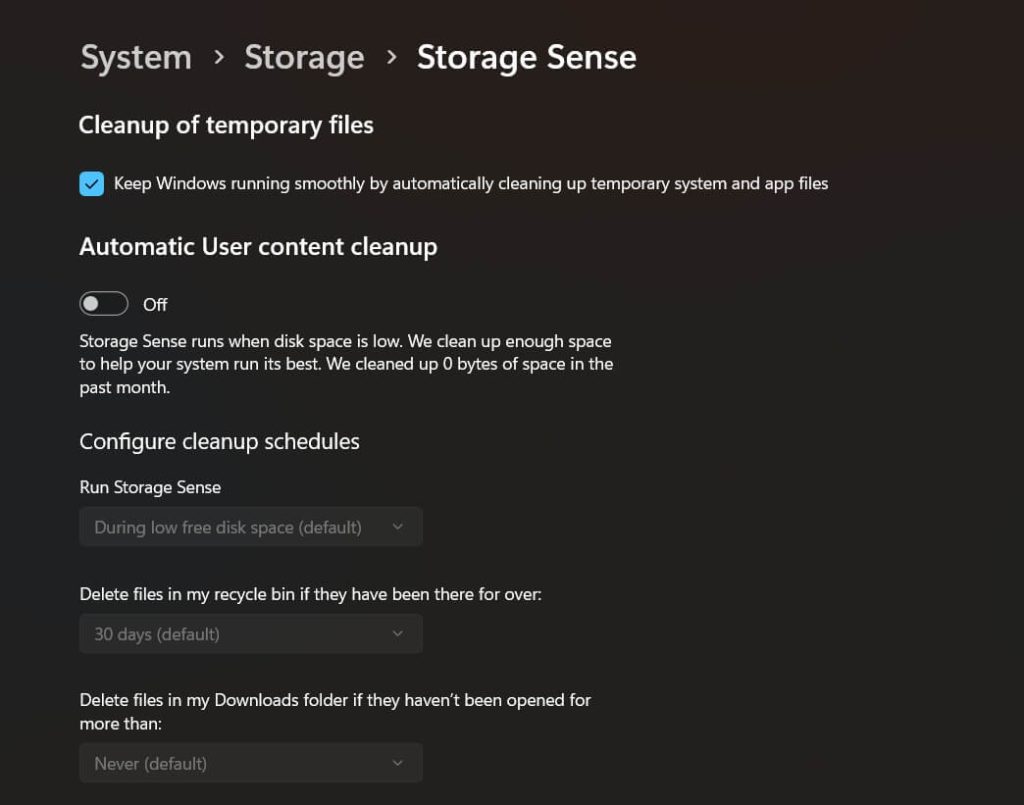
- Click “Configure Storage Sense”. Check “Delete previous versions of Windows”. Click “Clean now” to clear the Windows update cache.
Method 4: Using the Disk Cleanup Tool
Disk Cleanup is a classic Windows tool. It can delete Windows update cache files safely. The tool shows you how much space you’ll save. You can see file sizes before deleting anything. This helps you make informed decisions about cache clearing.
For targeted cache removal, Disk Cleanup is a handy tool. It lets you selectively pick which files to delete, making it ideal for quickly reclaiming disk space. The interface clearly categorizes different file types, giving you full control over the cleanup process.
When to choose this method:
- You want to see file sizes before deleting
- Disk space is very low on your computer
- You prefer traditional Windows tools
Steps:
- Press the Windows + R keys together. Type “cleanmgr” and press Enter. Select your main drive (usually C:). Wait for the scan to complete.
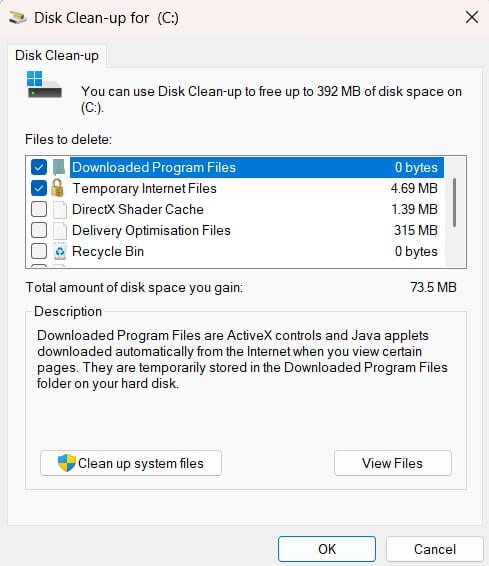
Image name: how-to-clear-windows-update-cache-in-windows-11-05.jpg
Image alt:
- Check the “Windows Update Cleanup” option. Click OK to delete the Windows update cache. Confirm deletion when prompted
Part 4: Pro Tips to Clear Windows Update Cache
Regular cache maintenance keeps Windows 11 running smoothly. These tips help you manage the Windows update cache better:
- Schedule regular cleanups – Clear Windows update cache monthly to prevent buildup
- Monitor cache size – Check SoftwareDistribution folder size weekly for growth
- Use Storage Sense automation – Let Windows automatically delete Windows update cache
- Restart after clearing – Always reboot your computer after clearing cache files
- Check available space – Ensure you have enough free space before clearing cache
- Create system restore point – Make a backup before you clear Windows update cache
- Run Windows Update immediately – Test updates right after clearing cache
- Keep Windows Defender active – Scan for malware that might corrupt update cache
Author’s Tip
I recommend using the Services method first when you need to clear Windows update cache. It’s the safest approach and works in most situations. This method gives you full control over the process. You can see exactly what files you’re removing.
For regular maintenance, enable Storage Sense with automatic settings. This prevents cache problems before they happen. Your computer will delete the Windows update cache automatically. You won’t need to remember to do it manually. This keeps your system running smoothly without extra work.
Conclusion
Clearing Windows update cache fixes many common update problems. You now know different methods to delete Windows update cache. Each method works for different situations and skill levels.
Regular cache maintenance prevents future issues. Don’t wait for problems to appear. Clear Windows update cache monthly as part of system maintenance. This keeps your Windows 11 computer running smoothly.
Remember to restart your computer after clearing cache files. This ensures Windows recognizes the changes. Your next update should download and install faster. If problems continue, try a different method to clear Windows update cache.
FAQs
Q: Is it safe to clear Windows update cache in Windows 11?
Yes, it’s completely safe to clear Windows update cache in Windows 11. Windows automatically recreates the cache when needed. The system downloads fresh update files after you delete Windows update cache. Microsoft designed Windows to handle cache clearing without problems. Your computer won’t break or lose important data. However, you should stop the Windows Update service first before clearing cache files. This prevents conflicts during the deletion process.
Q: How often should I delete Windows update cache?
You should delete Windows update cache once per month for regular maintenance. Clear it immediately if updates fail or show error messages. The cache grows larger over time as Windows downloads more updates. Monthly cleaning prevents the folder from becoming too large. If you use your computer heavily, consider clearing cache every two weeks. Users who rarely update can clear Windows update cache every two months. Watch for update problems as a sign you need to clear cache sooner.
Q: Will clearing Windows update cache delete my installed programs?
No, clearing Windows update cache won’t delete your installed programs or personal files. The cache only contains downloaded update files, not your applications or data. When you delete Windows update cache, you remove temporary installation files. Your installed software, documents, and settings remain untouched. Windows will simply download fresh update files when needed. This process is similar to emptying your browser’s download folder – it doesn’t affect your installed programs.
Popular Post
Recent Post
How To Clear Cache Memory On Windows 11/10 [2026]
Learn how to clear cache memory on Windows 11/10 using safe built-in methods to improve speed, free space, and maintain smooth system performance.

Windows Installer Cleanup Utility: Complete Review And Alternatives
Detailed review of Windows Installer Cleanup Utility, reasons for removal, risks, and safer modern alternatives explained clearly.
How To Clean Junk Files On Windows 11/10
Learn how to clean junk files on Windows 11 and 10 using safe, simple steps to boost speed and free storage space effectively.

Clearing App Cache Data on Windows 11/10: Complete Guide
Learn how to safely clear app cache on Windows 11 and 10 to fix slow apps, free disk space, and improve overall system performance.
How To Clean Up System Files On Windows 11/10: Complete Guide
Explore a step-by-step guide explaining how Windows users can safely remove unnecessary system data using built-in tools.
How To Clean a Laptop Fan Without Opening [2026 Guide]
Learn how to clean a laptop fan without opening the device using safe steps, simple tools, and easy methods for better cooling.
How to Clear the Queue in the Printer Automatically in 2026
Learn how to clear the queue in the printer with simple steps. This easy guide explains why print jobs get stuck and how to fix them safely for smooth printing.
How To Clear Delivery Optimization Cache In Windows
Learn how to clear Delivery Optimization Cache in Windows safely and easily. This guide explains steps, precautions, benefits, and FAQs to free space and avoid update issues.
How To Clear Cache in Edge [Windows 11/10]: Latest Guide
Learn how to clear cache in Edge on Windows 11 and Windows 10. Step by step guide with precautions, FAQs, and tips to fix slow pages and errors.

Top 15 Questions About PC Cleaning and Their Answers
Learn safe and simple ways to clean your PC. This guide answers top questions, covers precautions, and gives advanced tips for better PC health and performance.
