Let’s Explore How To Trim Videos in Windows 11

Last updated on February 27th, 2026 at 9:49 am
Are you a video content creator or editor? Do you often post Stories, Reels or videos on your YouTube channel? If so, learning how to trim videos in Windows 11 will come in handy for you.
Windows 11, being a graphic-rich interface, lets you crop or trim videos without any third-party tools. So yes, you can trim videos without downloading any tool on Windows 11.
Besides built-in solutions, many awesome third-party tools are available to trim or edit videos in Windows 11. So, without any ado, let’s explore some native and non-native ways to trim Windows 11 videos.
How to Trim Videos in Windows 11 Without Third-party Tools
Here are the Windows 11 built-in solutions to trim and edit videos:
Solution 1. Trim Videos Using Video Editor
Video Editor is a built-in Windows 11 video editor. Editing videos with features like trim, merge, split or rotate is free and simple. In addition, you can change the video speed or create slow-motion videos with this tool. It is a part of Windows 11 Photos, so you can easily navigate it.
Here’s how to trim videos using the Video Editor app:
Step 1. Press Windows + S keys to open the Windows Search panel. Alternatively, you can click on the Search icon from the Taskbar.
Step 2. Type “video editor” to find the Video Editor app.

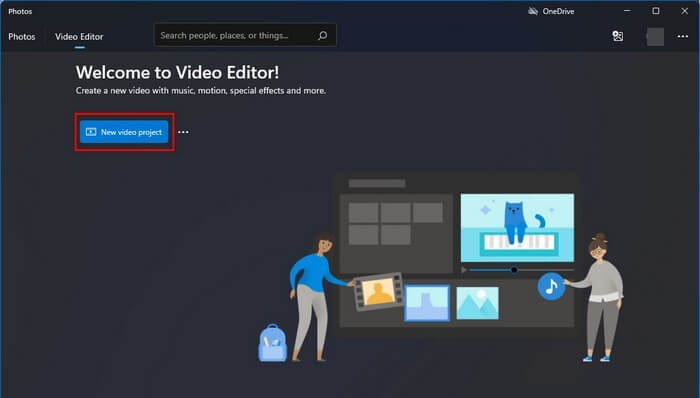
Step 3. On the Video Editor window, click on the New video project button.
Step 4. Give a name to your project, or you can skip this part.
Step 5. Under the Project library, click the Add button to upload a video clip from your computer or web. Alternatively, you can drag and drop video files on the project library.
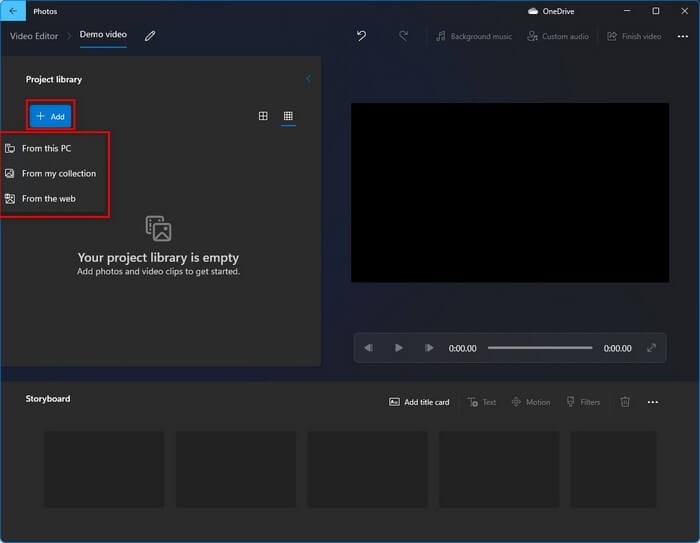
Step 6. After that, drag and drop the files on the storyboard.
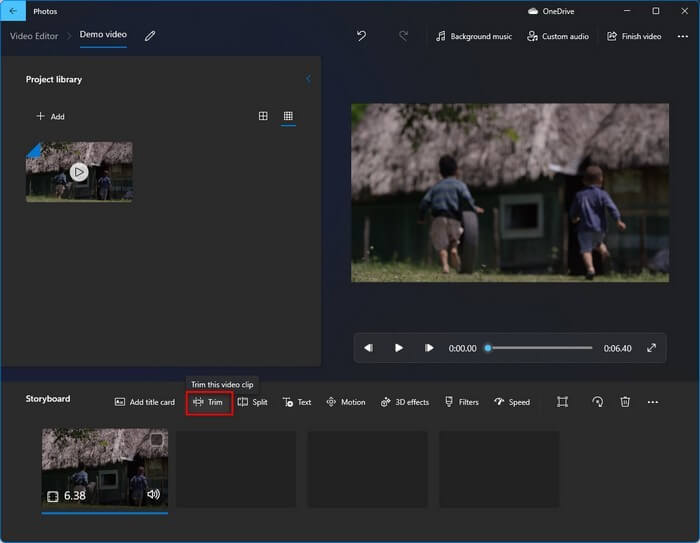
Step 7. Click on the Trim button.
Step 8. You must now drag the start and end sliders to crop your videos. The Blue area will show the end trimming result.
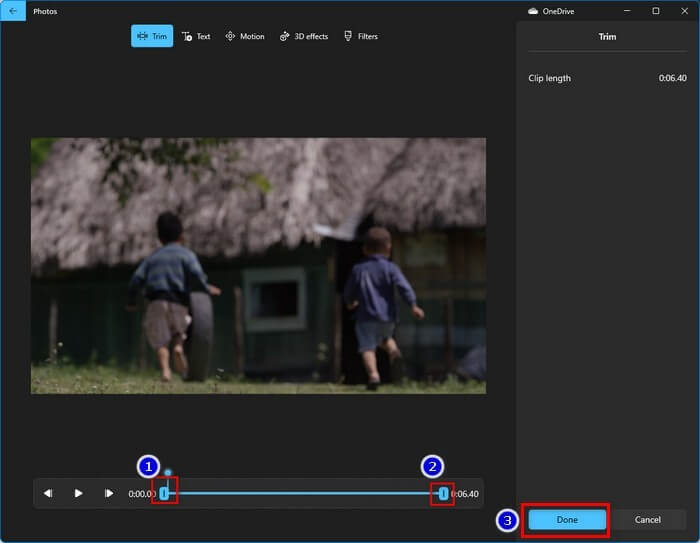
Step 9. Once you are satisfied with your video, click on the Done button.
Step 10. Click on the Finish video button to save your trimmed clip. You can select the Video quality and check the Use hardware-accelerated encoding option to complete the exporting process faster.
Step 11. Click on the Export button and wait for a few minutes.
Solution 2. Trim Videos Using Movies & TV App
The Movies & TV app on Windows 11 also has the video trim option. Follow these steps to trim videos in Windows 11 using the Movies & TV app:
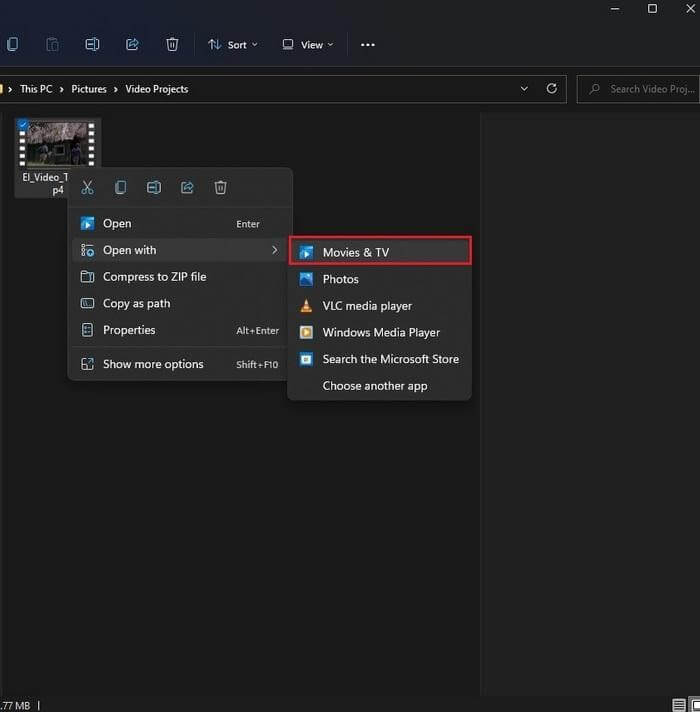
Step 1. Select a video clip > Right-click > Open with > Movies & TV.
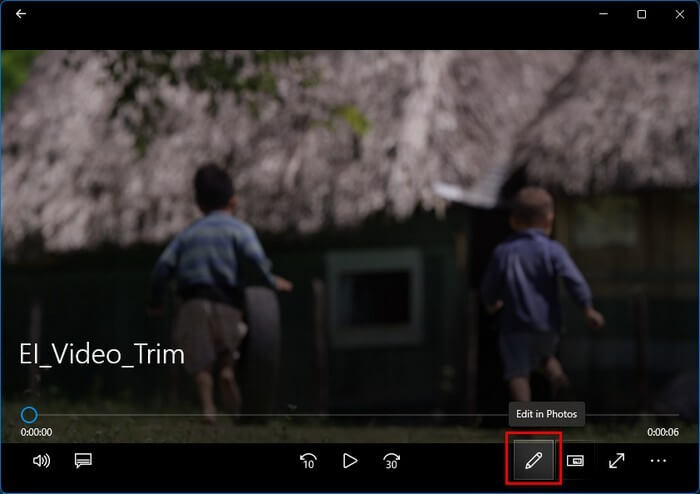
Step 2. Once the video opens with the Movies & TV app, click on the Edit in Photos button.
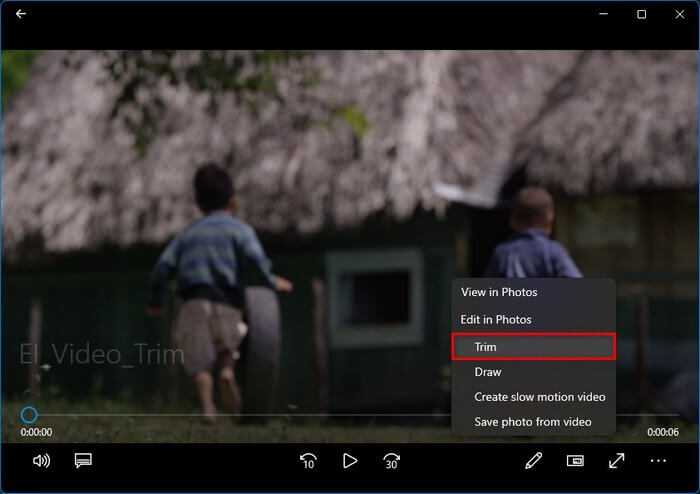
Step 3. Choose the Trim option to take the video to the trim screen.
Step 4. Now, adjust the start and end sliders to trim your video.

Step 5. Once you are done, press Ctrl + S to save the trimmed videos.
Solution 3. Trim Videos Using the Photos app
The simplest way to trim videos in Windows 11 is to use the classic Photos app. This method allows you to edit videos this way:
Step 1. Right-click on a video > Open with > Photos.
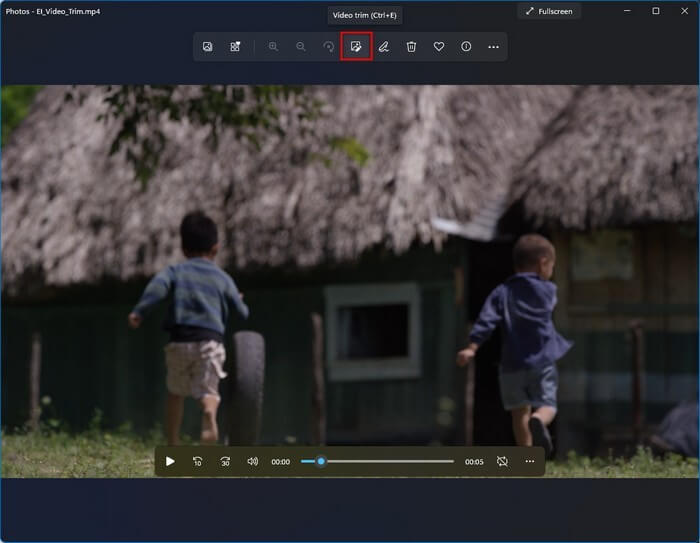
Step 2. Once the video opens in the Windows Photos app, click on the Video Trim button. Alternatively, you can press the Ctrl + E keys to open the video trim window.
Step 3. Position the start and end sliders to cut the video.
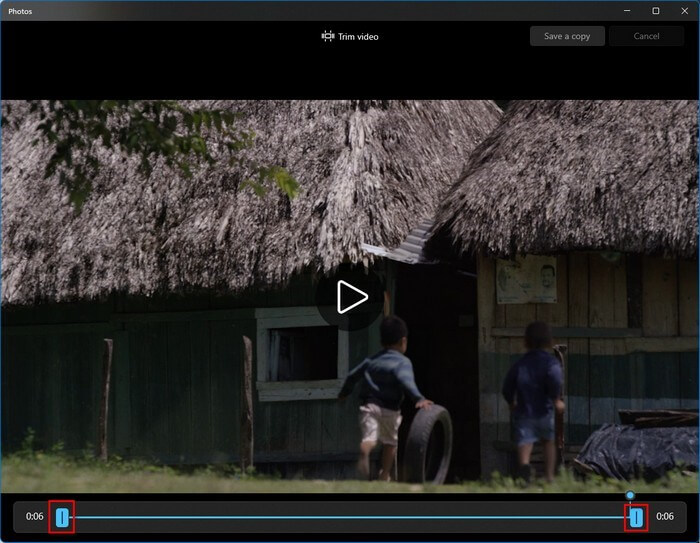
Step 4. Press Ctrl + S keys to save the edited video.
You can also use the Photos app to trim multiple videos in Windows 11 this way:
Step 1. Open the Photos app and click on the Select option from the upper-right corner.
Step 2. Select a video you want to trim. Then, click on the New option.
Step 3. Click on the New video project from the expanded options.
Step 4. Name the new project, and now the editor interface will load.
Step 5. Click on the Split option from the toolbar. Simply move the seeker to the parts where you want to split the video.
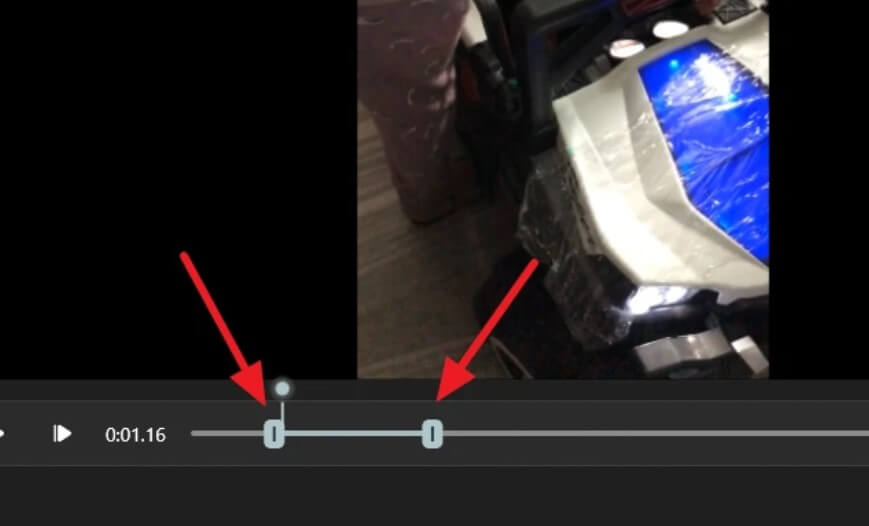
Step 6. You can see the duration for both clips that you have trimmed in the right pane.
Step 7. Once you are done trimming your video, click “Done”. You can continue the process until you trim your video’s unwanted parts.
Step 8. Click on the Finish Video, select the quality, and click on the Export to save your trimmed video.
How to Trim Videos in Windows 11 With Third-party Tools
Windows 11 built-in tools are perfect for simple video trimming. But if you want to trim multiple parts in a video and then merge them together, you need powerful third-party tools. Fortunately, there are several great Windows 11 video editors available, such as:
Solution 4. Trim Videos Using Clipchamp
Clipchamp is available as an inbox app on Windows 11 Insider devices. However, it will be available soon on all Windows 11 devices. You can search for Clipchamp in the search box, and if it is not available on your device, you can download it from the Microsoft Store.
Clipchamp is a full-fledged video editor that allows you to trim videos in Windows 11 as follows:
Step 1. Launch the Clipchamp app and click on the Create a Video button.
Step 2. Click on the “+” icon from the toolbar and then click Browse Files to upload a video from your computer. You can also drag and drop videos from cloud storage like Google Drive, OneDrive, etc.
Step 3. Go to your media, and your video will appear there.
Step 4. Drag and drop the thumbnail to add the start and end timeline.
Step 5. If you want to cut the middle section of the video, use the Split tool to split your video into two parts. And then, you can individually trim both parts.
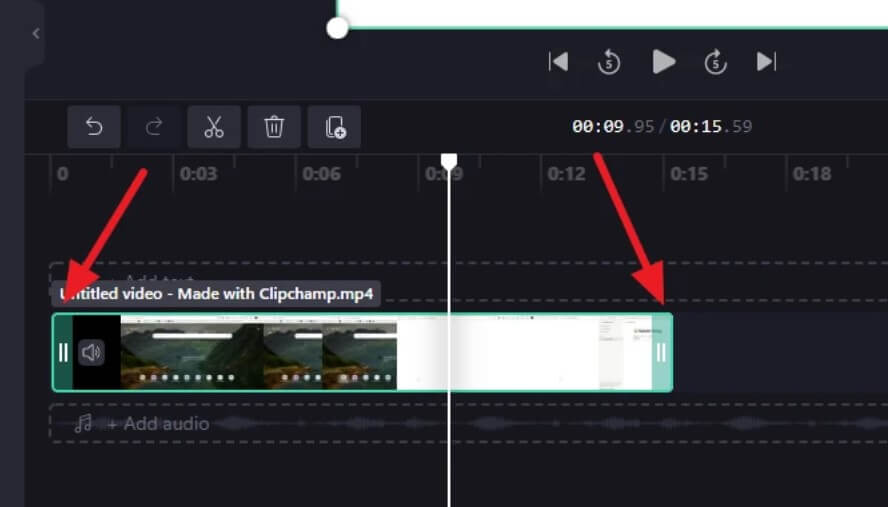
Step 6. Once you are done trimming videos, click on the Export button.
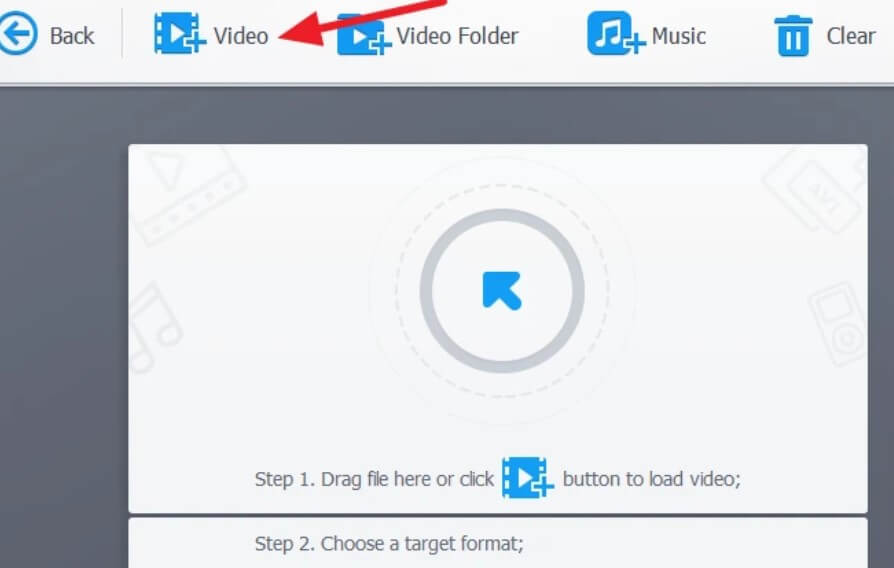
Solution 5. Trim Videos Using VideoProc
VideoProc is yet another easy video editor for Windows 11. The software has several advanced features for editing a video. But, trimming a video is a relatively simple process. Here’s how you can use the tool:
Step 1. Go to the VideoProc website to download it on your Windows 11 computer for free.
Step 2. Follow the on-screen instructions to install the software and launch the app.
Step 3. Click on the video from the main screen.
Step 4. Click the Video + icon and select the video you want to crop from your computer.
Step 5. After the video loads, click on the Crop button.
Step 6. Click on the checkbox to enable crop.
Step 7. Select the ratio to trim the video from the dropdown menu next to Preset.
Step 8. Drag the selection box on the Original thumbnail to crop the video. You can view crop results in the Preview thumbnail.
Step 9. Finally, click on the Auto Copy to retain 1:1 audio and video quality. And then, click on the Run to export the video.
Let’s Trim Videos Now!
There you have it, people! Now, you can trim videos on Windows 11 with or without third-party tools.
If you want to simply trim your video clips, the built-in Windows 11 features are perfect. But, if you want to edit multiple videos or merge them with advanced features, go for third-party tools.
That’s it for now! For more interesting guides and technical hacks, keep following this website on social networks.
Popular Post
Recent Post
How To Clear Cache Memory On Windows 11/10 [2026]
Learn how to clear cache memory on Windows 11/10 using safe built-in methods to improve speed, free space, and maintain smooth system performance.

Windows Installer Cleanup Utility: Complete Review And Alternatives
Detailed review of Windows Installer Cleanup Utility, reasons for removal, risks, and safer modern alternatives explained clearly.

How To Clean Junk Files On Windows 11/10
Learn how to clean junk files on Windows 11 and 10 using safe, simple steps to boost speed and free storage space effectively.

Clearing App Cache Data on Windows 11/10: Complete Guide
Learn how to safely clear app cache on Windows 11 and 10 to fix slow apps, free disk space, and improve overall system performance.

How To Clean Up System Files On Windows 11/10: Complete Guide
Explore a step-by-step guide explaining how Windows users can safely remove unnecessary system data using built-in tools.

How To Clean a Laptop Fan Without Opening [2026 Guide]
Learn how to clean a laptop fan without opening the device using safe steps, simple tools, and easy methods for better cooling.

How to Clear the Queue in the Printer Automatically in 2026
Learn how to clear the queue in the printer with simple steps. This easy guide explains why print jobs get stuck and how to fix them safely for smooth printing.

How To Clear Delivery Optimization Cache In Windows
Learn how to clear Delivery Optimization Cache in Windows safely and easily. This guide explains steps, precautions, benefits, and FAQs to free space and avoid update issues.
How To Clear Cache in Edge [Windows 11/10]: Latest Guide
Learn how to clear cache in Edge on Windows 11 and Windows 10. Step by step guide with precautions, FAQs, and tips to fix slow pages and errors.

Top 15 Questions About PC Cleaning and Their Answers
Learn safe and simple ways to clean your PC. This guide answers top questions, covers precautions, and gives advanced tips for better PC health and performance.
