How to Fix “Zoom Share Screen Not Working” on Windows 11
Zoom is the most important app today to conduct virtual meetings and share presentations. But unfortunately, Zoom is not a perfect video conferencing tool. Many users have complained about the error code 105035 while sharing the screen on Zoom.
The Zoom screen share not working is a pretty common and fixable problem. Often small issues like outdated Windows versions, an outdated Zoom app or an unstable network connection can cause screen sharing problems.
However, some of the issues are a bit deeper and require technical assistance. And that’s when you refer to this post to fix the Zoom screen not sharing. So, let’s dig in.
How to Fix Zoom Share Screen Not Working on Windows 11?
The Zoom share screen not working can be caused due to several reasons. Thus, we recommend you use the best fix according to your problem. However, if you don’t know what is causing Zoom screen share not to work on your computer, you can try all these solutions:
Solution 1. Optimize Zoom Settings
If you have recently changed your Zoom app settings or updated the app, you might need to reconfigure your settings to fix Zoom screen share not working on your PC. Follow these steps to configure Zoom app settings:
Step 1. Right-click on the Zoom icon from the Taskbar and select Exit. This will remove the temporary cache that might have been causing the problem.
Step 2. Now, relaunch the Zoom app and go to Settings from the top-right gear icon.
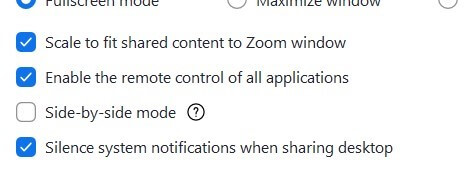
Step 3. Click on the Share Screen tab and check the option stating “Enable remote control of all applications.”
Step 4. Exit the app. Right-click on the Zoom icon and select Run as administrator.
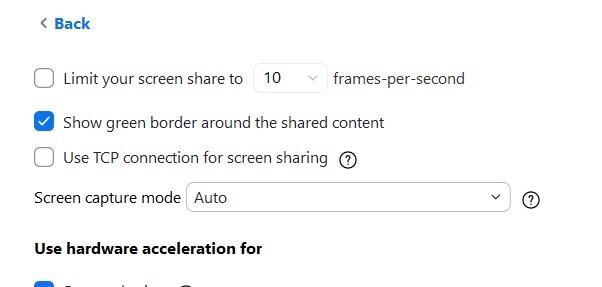
Step 5. Click on the Advanced options and select a value below them ten from the dropdown menu. Tick the “Limit your screen share to (_) frames-per-second” checkbox.
Step 6. Now, exit and relaunch the Zoom app to see if the screen share is working now.
Solution 2. Remove the Preferred Graphics Processor Settings
By default, Windows 11 has enabled automatic switching GPUs to save battery life. This may lead to Zoom screen share not working. Thus, you can disable this setting as follows:
Step 1. Press Windows + S keys to launch the Windows Search bar and type NVIDIA Control Panel.
Step 2. From the left pane, click on the Manage 3D settings.

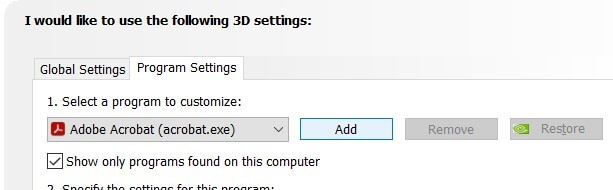
Step 3. Under the Program Settings tab, click on the Add.
Step 4. Go to Zoom’s installation directory.
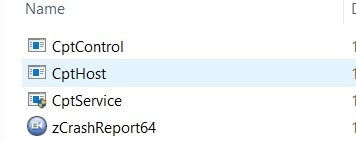
Step 5. Next, navigate to the Zoom > Bin Folder > .EXE > Open. Double-click on the CptHost.exe application to add the file.
Step 6. Go to the Manage 3D Settings window. There you will find the file you have just selected.
Step 7. Select “Integrated graphics” from the dropdown menu.
Step 8. Click on Apply to save all the changes.
Solution 3. Update Graphics Drivers
If you have an outdated graphics driver on your PC, it can trouble Zoom screen sharing. So, update your graphics drivers as follows to fix the issue:
Step 1. Press Windows + R keys to open the Run dialogue box.
Step 2. Type devmgmt.msc and press the OK button.

Step 3. Expand the Display adapters menu, and select Update Driver Software after right-clicking on the Graphics card name.
Step 4. Select Automatically to search for new driver software. Now, the latest drivers will be automatically installed on your computer.
However, you can use Driver Easy to automatically update your graphics driver. The software can scan your system and automatically update all the correct drivers.
Solution 4. Enable App Permissions
There is a possibility that you have not given camera and microphone usage permissions to Zoom. This can be the main reason for the problem. Thus, you can cross-check your app permissions to fix the Zoom screen share not working. So, check the settings as follows:
Step 1. Press Windows + I keys to open the Windows Settings.
Step 2. Select Privacy and navigate to the Camera settings under App permissions.
Step 3. Switch on these two options — “Allow access to this device’s camera” and “Allow apps to access your camera.”
Step 4. In addition, enable the “Allow desktop programs to access your camera” option. Repeat the process with the microphone settings.
Solution 5. Reinstall the Zoom app
In many cases, the Zoom app has not been installed properly. Or, the app is outdated, leading to a buggy interface. Thus, you can uninstall and reinstall the app to fix the issues related to the app. To do so:
Step 1. Press Windows + S, type Control Panel, and hit Enter.
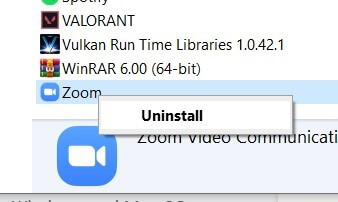
Step 2. Look for the Zoom app under the Installed Programs and Features, and then right-click on it and select Uninstall.
Step 3. Once the uninstallation process is done, go to the Microsoft Store and search for Zoom. After that, download and install it on your computer.
Solution 6. Ensure Participants’ Screen Sharing Is Enabled
If the Zoom meeting host has disabled the “Screen sharing by participants” for the meeting, you can not share your screen. So, you have to request a host to allow all participants to share their screens. If you are hosting the meeting, you can enable screen sharing for all participants as follows:
Step 1. Click on the Advanced Sharing Options next to the Share Screen button.
Step 2. Check the All Participants under the Who can share option.
Solution 7. Enable the Share Computer Sound Option
It is essential to check the Share Computer Sound option if your Zoom call is not working. Usually, this setting is turned off to eliminate interruptions from your computer. Here’s how you can activate this option:
Step 1. Click on the Share Screen icon and look for the Share Computer Sound.
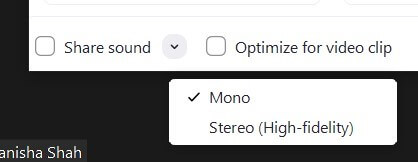
Step 2. If it is disabled, check the box next to it to enable the Share Computer Sound. Also, enable the Optimize Screen Sharing for Video Clip setting located next to the sound option.
Solution 8. Stop Zoom Call Before Screen Sharing
Zoom app’s performance totally depends on your internet speed. Thus, if you have a slow internet speed, first stop your Zoom video call and then share the screen. That’s because video conferencing consumes more bandwidth.
Simply select Share Screen from the bottom once you stop the video call. In addition, if you enter the Zoom room with the video already turned on, Zoom screen share will not work.
So, only activate audio while sharing a screen when your internet connection is not powerful enough.
Solution 9. Give All the Essential Permissions
Zoom might not share a screen when you have not given specific permissions to it. Screen sharing relies upon various resources, including screen recordings, audio, camera, microphone, etc.
Thus, check all the audio and video-related settings to ensure Zoom can easily initiate screen sharing.
Bottom Line
Zoom is an integral part of your personal and professional life. And screen sharing is extremely important to host webinars, make virtual presentations or simply share your personal information.
Thus, when the Zoom share screen is not working in Windows 11, don’t panic. Simply follow the solutions discussed in the post and easily share your screen.
Happy Zooming, people! And don’t forget to check other interesting guides on this website.
Popular Post
Recent Post

Advanced SystemCare: Tool To Clean Your PC
Your computer slows down over time. Files pile up, junk builds inside the system, and things start to feel sluggish. You open a browser, and it takes forever. Programs crash without warning. This is a sign that your PC needs a good cleanup. Many users ignore these signs. They think buying a new computer is […]

Top 10 PC Cleaning and Optimization Tools For Windows 11/10
Discover the best PC cleaning and optimization tools for Windows 11 and 10. Remove junk files, improve speed, and keep your PC healthy with trusted cleaners.

Clear Microsoft Teams Cache On Windows PC [Complete Guide]
Learn how to clear Teams cache on Windows PC with 3 easy methods. Fix slowdowns, glitches, and errors fast. A simple guide for every Windows 11 user.

How To Clear Browsing History on PC: Chrome, Edge, Firefox, Opera
Learn how to clear browsing history on PC across Chrome, Edge, Firefox, and Opera with easy steps, tips, pros, and FAQs.

Clear Cache and Cookies: Complete Guide For Windows 11/10
Learn how to clear cache and cookies on Windows 10 and 11. This complete guide covers Chrome, Edge, and Firefox with simple, step-by-step instructions for every user.

How To Clean PC Trackpad/Touchpad Without Damaging It
Learn how to clean PC trackpad and clean PC touchpad safely with simple steps. Improve performance, remove dirt, and keep your laptop surface smooth and responsive.

How To Clean Your GPU/Graphics Card [Complete Guide]
Introduction A graphics card is one of the most important parts of a computer. It handles visuals, gaming, video editing, and design work. Over time, dust builds up inside it. This dust blocks airflow and traps heat. When heat increases, performance drops. In some cases, the system may even crash. That is why learning how […]

How To Clean PC Power Supply Unit Safely Without Damaging
Follow simple, safe steps to clean your computer’s power supply unit. Improve cooling, reduce overheating, and protect your PC’s performance.

How To Clean a CPU Without Damaging It [Complete Guide]
Learn how to clean a CPU safely without damage. Follow simple steps, precautions, and methods to improve cooling, boost performance, and extend your computer’s life.

How To Clear Browser Cache On Windows 11/10 [Chrome, FireFox, Edge]
Learn how to clear browser cache on Windows 11 and 10. Follow simple steps to clean browser cache, fix slow browsing, and improve performance easily.
