Here’s How to Optimize Windows 11 For Gaming
Are you a hardcore gamer? Then, you must have purchased Windows 11 to experience dynamic gameplay and features.
Windows 11 is great for gaming purposes. But you must first optimize Windows 11 for gaming to play without interruption. This post will share some quick tips to optimize Windows 11 for a better experience.
So, let’s dig in.
Powerful Windows 11 Gaming Features
Microsoft has claimed that Windows 11 is a power machine. There are several advanced gaming features that Windows 11 offers, such as:
Xbox Game Pass
The Windows 10 Xbox app is replaced with a new Game Pass app that allows you to instantly buy, manage and remove games. It is easy to use as you are already familiar with the app. With this program, you will get benefits like EA Play, Xbox Live Gold and play across multiple devices using the cloud services.
Auto HDR
Windows 11 comes with auto HDR support. The feature automatically updates the color and lighting of your screen, resulting in high-quality and realistic graphics.
DirectStorage
DirectStorage is a great asset for gamers to download and install games. In addition, it enables you to play your games faster.
How to Optimize Windows 11 For Gaming
Since Microsoft has paid special attention to games in Windows 11. Thus, there are several options to optimize your Windows 11 for a better gaming experience and performance, such as:
Tip 1. Turn On the Game Mode
Windows 11 comes with a dedicated Gaming tab. This new setting allows you to set up your PC for a high gaming experience and features, such as:
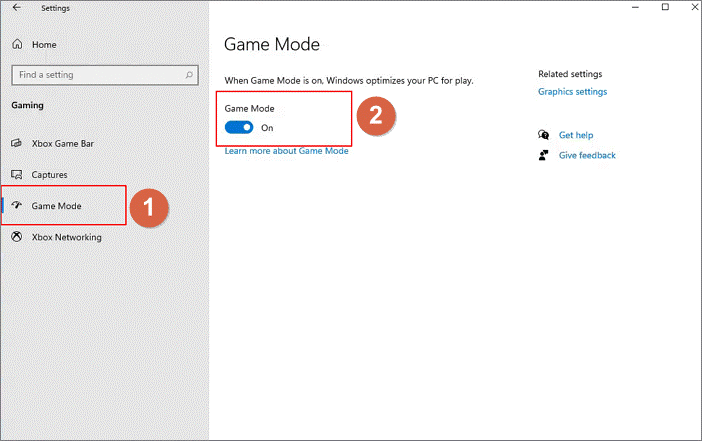
Step 1. Click on the Windows icon from the Taskbar and click to open the Settings.
Step 2. Go to Gaming > Game Mode from the left sidebar.
Step 3. Shift the toggle to turn On the Game Mode.
Tip 2. Disable the Nagle’s Algorithm
Nagle’s algorithm helps to improve the TCP/IP network’s efficiency. However, it can compromise your internet connection and ruin the online gaming experience. So, you can disable Nagle’s algorithm to optimize Windows 11 for better online gameplay. Here’s how to do it:
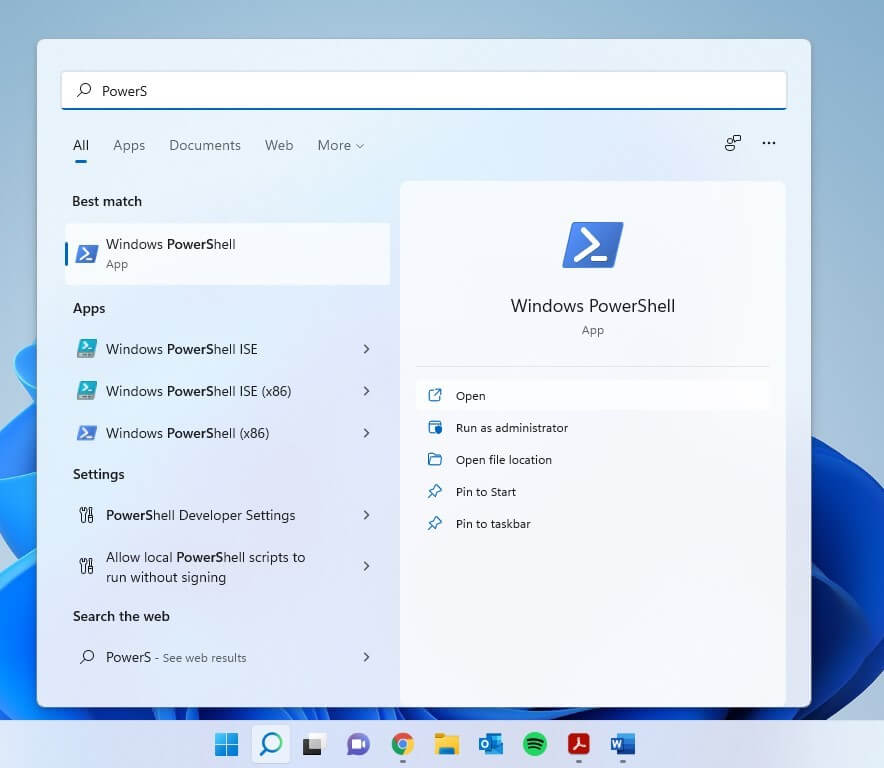
Step 1. Go to the search icon and type PowerShell.
Step 2. On the PowerShell window, type ipconfig and hit the Enter button.
Step 3. Look for IPv4 Address and note it down.
Step 4. Next, create a system restore point using the Registry editor to backup your data beforehand. Then, press Windows + R keys to open the Run command box.
Step 5. Type regedit and press Enter.
Step 6. Click Yes when a prompt asks Do you want to allow this app to make changes to your device?
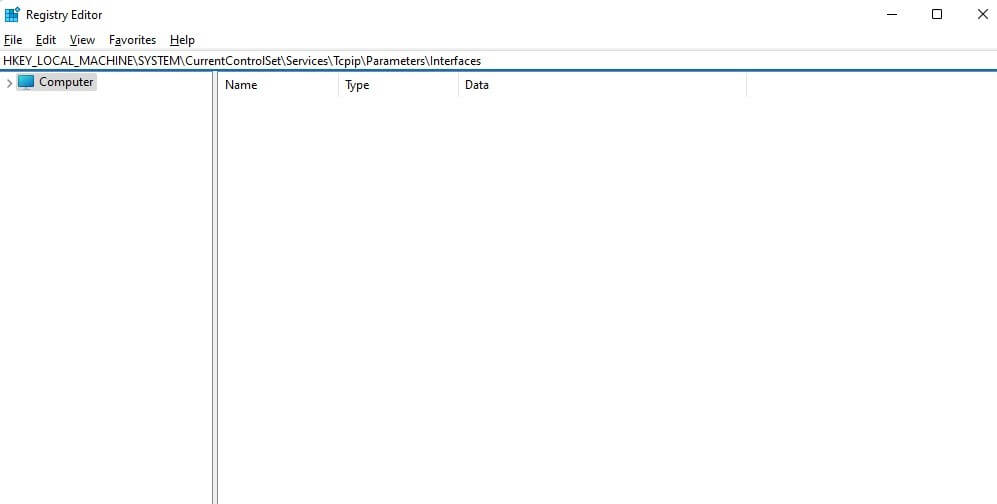
Step 7. Type the following command line in the address bar—
HKEY_LOCAL_MACHINE\SYSTEM\CurrentControlSet\Services\Tcpip\Parameters\Interfaces
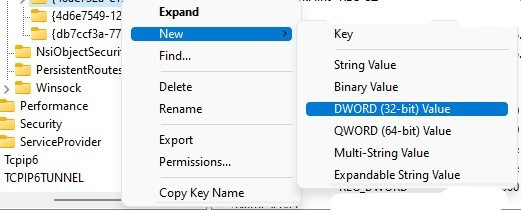
Step 8. From the left pane, locate the file that contains DhcpIPAddress.
Step 9. Right-click on the folder and select New > DWORD (32-bit) Value.
Step 10. Name the new folder as TcpAckFrequency and click OK.
Step 11. Create another DWORD (32-bit) Value and name it TCPNoDelay.
Step 12. Double-click on each folder and set the Value data as 1.
Tip 3. Change DNS Settings
The online gaming experience can also be boosted by tweaking DNS settings. It helps to load faster and more efficient to run a game. To do so:
Step 1. Use Windows + I keys to open the Settings.
Step 2. From the left pane, click on Network & Internet > Select Properties.
Step 3. Click on the Edit next to the DNS server assignment.
Step 4. From the dropdown menu, select Manual.
Step 5. Turn on the IPv4 toggle switch and enter the following DNS entries.
1.1.1.1
1.0.0.1
Step 6. Save the settings and restart your browser to enjoy smooth gaming sessions.
Tip 4. Disable Notifications
Random application notifications popping up here and there can ruin your gaming experience. Thus, disable notifications to optimize Windows 11 for uninterrupted gameplay as follows:
Step 1. Press Windows + I keys to launch the Settings app.
Step 2. From the right pane, select Focus Assist.
Step 3. Select Alarms only.
Step 4. Make sure the toggle next to When I’m playing a game is turned On.
Tip 5. Enhance Visuals
There is also a way to optimize Windows 11 for gaming by enhancing visuals as follows:
Step 1. Go to Settings > Type Performance and press the Enter button.
Step 2. From the right-pane, select the option saying Adjust the appearance and performance of Windows.
Step 3. Select Adjust for best performance from the new popup window.
Step 4. Click Apply > Advanced tab.
Step 5. Set the Adjust the best performance to Programs.
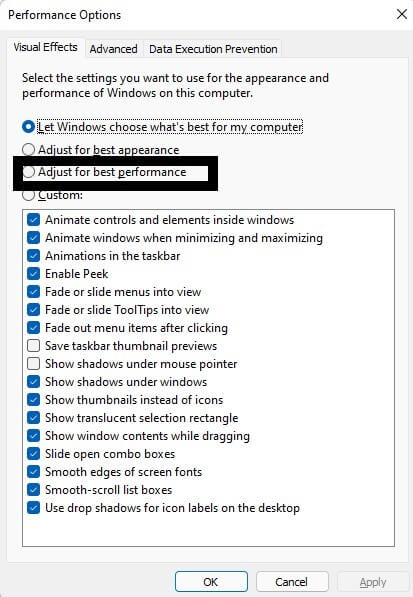
Step 6. Click Apply > OK to save the changes.
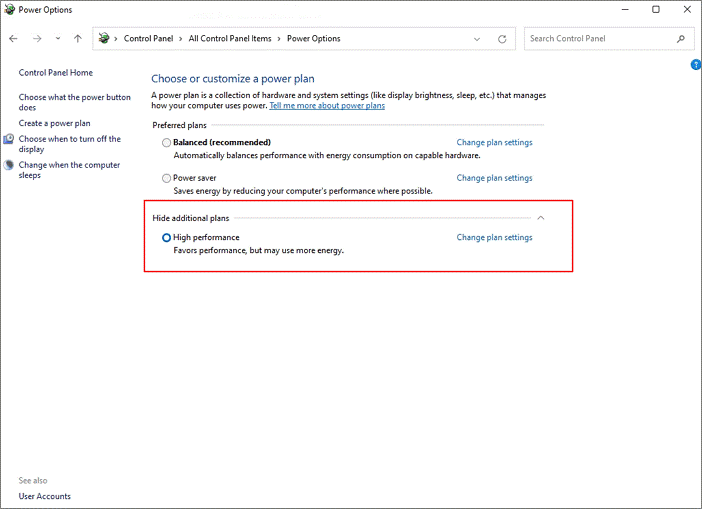
Tip 6. Tweak with Power Plan Settings
You can ruffle the Power Plan settings a bit to enhance the gaming experience in Windows 11. Here’s how to change Power Plan settings:
Step 1. Go to Settings > Power & battery.
Step 2. From the Power mode dropdown menu, select the Best performance option.
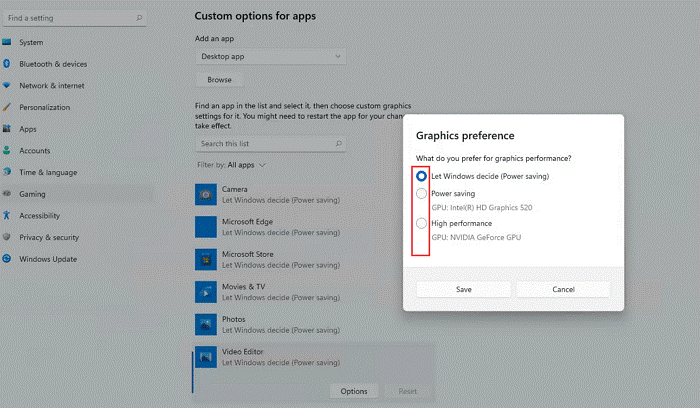
Tip 7. Use Per-App GPU Selection Settings
If you have a gaming laptop with two GPUs — iGPU and dGPU, you can decide which app can use which GPU. For this, follow these steps:
Step 1. Go to Settings > Gaming > Game Mode.
Step 2. Click on Graphics under the Related Settings.
Step 3. On the Graphics Performance page, select the GPU for your apps and add new apps to the list. By default, Windows 11 will automatically assign a GPU to each app that you can manually change.
Step 4. The Power Saving option must be allotted to the apps that don’t need graphics performance. You can set the High-Performance option for games and GPU-centric apps.
Tip 8. Use Dedicated NVIDIA and AMD GPU Software
NVIDIA and AMD GPU gaming laptop users can download NVIDIA’s GeForce Experience and AMD’s Radeon Software. This will allow you to change the graphics settings for each game and modify GPU performance.
Tip 9. Enhance C Drive Space
Another tip for optimizing Windows 11 for gaming is to expand your C drive space. Games can run slowly if your C drive is full because games need free space to render.
So, here you can use EaseUS Partition Master to extend the C drive. It is a powerful and simple tool to manage your disk partitions and spaces.
Follow these steps to extend a C drive with unallocated space:
Step 1. Right-click on the C drive and select Move/Resize.
Step 2. Drag the system partition end to the unallocated space to add it to your C drive. Click OK.
Step 3. Click Execute Operation > Apply to extend the C drive.
On the other hand, when you want to extend the C drive without unallocated space, follow these steps:
Step 1. Right-click on a big partition with enough free space on the system disk and choose Allocate Space.
Step 2. Select the drive at the Allocate Space From (*) To section. After that, drag the end of System C drive into the unallocated space. Click OK to confirm.
Step 3. Click on the Execute Operation; it will list down all the pending operations, and click Apply to save the changes and extend your C drive space.
Tip 10. Use Auto HDR

You can use the HDR to experience a bold and better game display. Anyone can easily spot the difference between SDR and HDR formats. If your monitor doesn’t support HDR, you can make a small investment to purchase one.
Parting Remarks
There you go, people! You have explored 10 easy ways to optimize your Windows 11 for gaming purposes. Be it a Game Mode or Auto HDR; there are several easy solutions to optimize your computer for gaming.
Now, let’s not wait anymore and optimize your PC for games. Meanwhile, do check out other Windows 11 guides only here.
Popular Post
Recent Post

Advanced SystemCare: Tool To Clean Your PC
Your computer slows down over time. Files pile up, junk builds inside the system, and things start to feel sluggish. You open a browser, and it takes forever. Programs crash without warning. This is a sign that your PC needs a good cleanup. Many users ignore these signs. They think buying a new computer is […]

Top 10 PC Cleaning and Optimization Tools For Windows 11/10
Discover the best PC cleaning and optimization tools for Windows 11 and 10. Remove junk files, improve speed, and keep your PC healthy with trusted cleaners.

Clear Microsoft Teams Cache On Windows PC [Complete Guide]
Learn how to clear Teams cache on Windows PC with 3 easy methods. Fix slowdowns, glitches, and errors fast. A simple guide for every Windows 11 user.

How To Clear Browsing History on PC: Chrome, Edge, Firefox, Opera
Learn how to clear browsing history on PC across Chrome, Edge, Firefox, and Opera with easy steps, tips, pros, and FAQs.

Clear Cache and Cookies: Complete Guide For Windows 11/10
Learn how to clear cache and cookies on Windows 10 and 11. This complete guide covers Chrome, Edge, and Firefox with simple, step-by-step instructions for every user.

How To Clean PC Trackpad/Touchpad Without Damaging It
Learn how to clean PC trackpad and clean PC touchpad safely with simple steps. Improve performance, remove dirt, and keep your laptop surface smooth and responsive.

How To Clean Your GPU/Graphics Card [Complete Guide]
Introduction A graphics card is one of the most important parts of a computer. It handles visuals, gaming, video editing, and design work. Over time, dust builds up inside it. This dust blocks airflow and traps heat. When heat increases, performance drops. In some cases, the system may even crash. That is why learning how […]

How To Clean PC Power Supply Unit Safely Without Damaging
Follow simple, safe steps to clean your computer’s power supply unit. Improve cooling, reduce overheating, and protect your PC’s performance.

How To Clean a CPU Without Damaging It [Complete Guide]
Learn how to clean a CPU safely without damage. Follow simple steps, precautions, and methods to improve cooling, boost performance, and extend your computer’s life.

How To Clear Browser Cache On Windows 11/10 [Chrome, FireFox, Edge]
Learn how to clear browser cache on Windows 11 and 10. Follow simple steps to clean browser cache, fix slow browsing, and improve performance easily.
