9 Simple Ways to Fix High CPU Usage in Chromium Browsers
Chromium-based web browsers are extremely popular today. It is a free and open-source web browser technology developed by Google.
Google Chrome is the best chromium-browser used across multiple devices. This technology has been now opted by pioneers like Microsoft and Opera.
Chromium browsers are fast, compatible and high performing compared to other web browsers. But there is a small problem with them. These browsers consume high CPU resources, leading to system slowdown or crashes.
Fortunately, there are ways to fix high CPU usage in chromium browsers. This guide will show you 9 easy ways to fix high CPU in chromium browsers, including Google Chrome. So, let’s get started.
Why Does Chromium Consume High CPU Resources?
Before fixing high CPU usage in chromium browsers, understand why these browsers use so much CPU power on your computer. Some of the common reasons are:
- The default chromium-based browsers are set up to use hardware acceleration and multiple threading
- Third-party extensions or services also contribute to utilizing high CPU usage
- Unoptimized JavaScript-based websites
- Problematic operating system
How to Fix High CPU Usage in Chromium Browsers?
Does your system freeze for a few minutes while browsing on your favorite chromium browser? Is your Google Chrome draining your laptop’s battery? Then, don’t panic about it and just follow these solutions to fix high CPU usage in Chromium browsers:
1. Disable Unnecessary Extensions
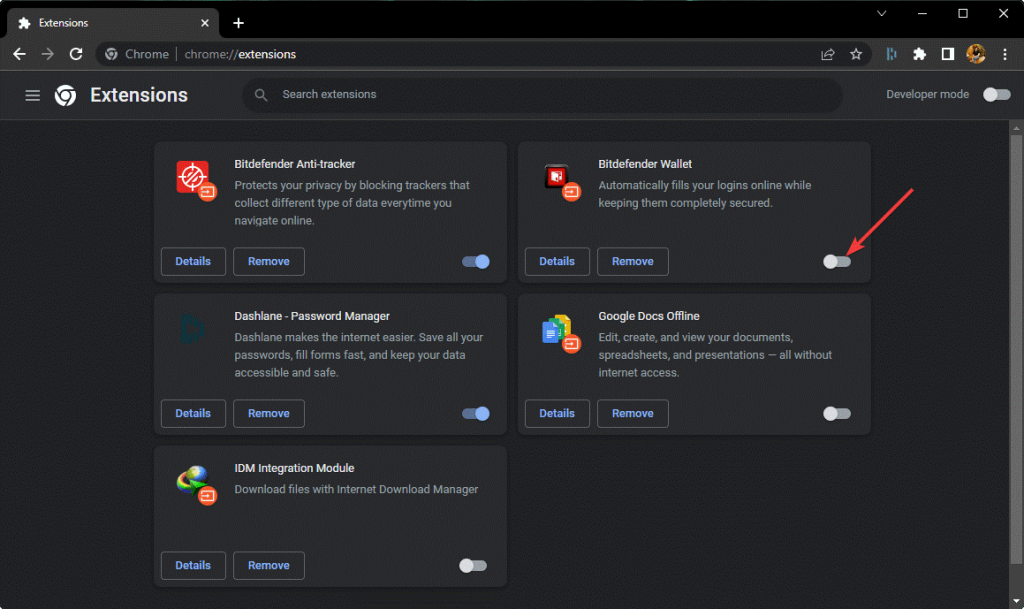
Each extension will use CPU power to run if you have installed several third-party extensions on your chromium-based browsers. This can increase pressure on CPU resources and exhaust them faster. Thus, we suggest disabling all the unwanted extensions for fast web browsing this way:
Step 1. Open your web browser.
Step 2. Tab on the Extensions icon and go to Manage extensions.
Step 3. Move the radio button next to the extension you want to disable.
2. Free Up C: Drive Space
If less than 2 GB of space is available in your C drive, freeing up space can help release the CPU. This will help to process tasks quicker and improve your PC’s performance as most important tools are stored in the C drive.
You can clear the disk cache and cookies to make room in the C drive. To do so:
Step 1. Launch your chromium-based web browser. After that, click on the three dots menu > More tools > Clear browsing data.
Step 2. Go to the Basic tab, set the Time range to All time and select all the checkboxes.
Step 3. Under the Advanced tab, set the Time range to All time. Choose the information you want to remove. Select the Cookies and other site data and Cached images and files.
Step 4. Click on the Clear data.
Step 5. Once the data is cleared, type chrome://restart in the URL bar, press Enter to restart Chrome and check if you have fixed high CPU usage in the chromium-browser.
3. Disable Hardware Acceleration and Background Tasks
Hardware acceleration is default enabled on chromium-based web browsers for better performance. However, this can pressure the CPU resources, leading to system crashes. So, following these steps, you can easily disable hardware acceleration and background tasks:
Step 1. Open Settings on your chromium-browser.
Step 2. Navigate to the System tab and switch off the toggle next to the Continue running background apps when the browser is closed.
Step 3. After that, disable the Use hardware acceleration button when available.
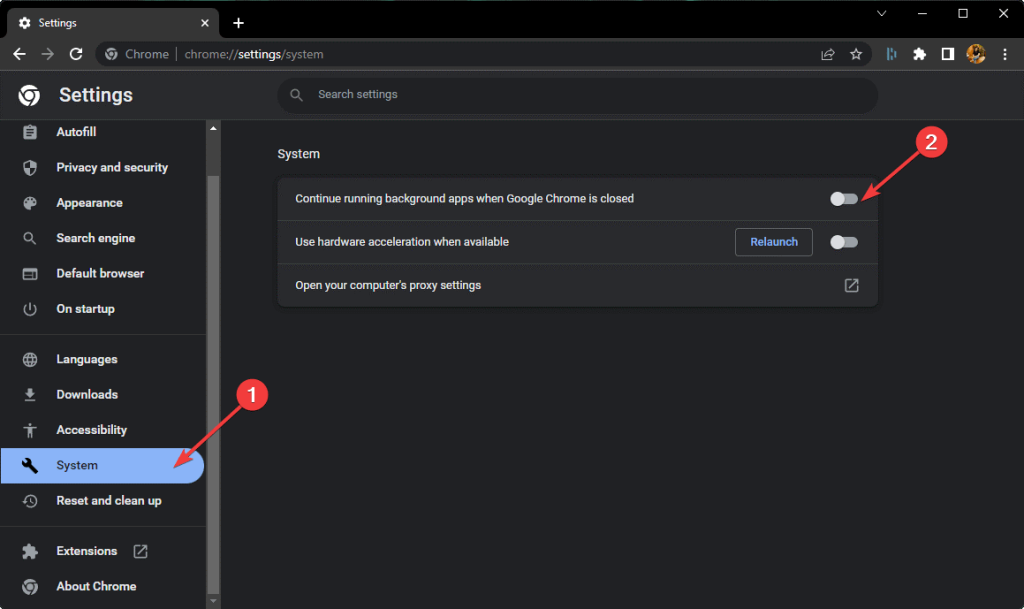
Step 4. Restart your browser and check if the problem is fixed now.
4. Use the Performance Boosting Extension
No, we are not contradicting our own point. It is essential to minimise extensions on your chromium browser. But some extensions can come in handy to fix high CPU usage in chromium browsers.

For instance, extensions like The Great Suspender Original kill inactive tabs and limit CPU usage. In addition, the extension has all the built-in features, so you don’t need to use any other extensions with it.
However, when selecting the performance extension from the Chrome store, select the lightweight ones. Otherwise, your extension tool might use high CPU power.
5. Reset Chrome’s Default Settings
It can use more CPU power if you have customized your Google Chrome settings. Thus, you can reset your chromium-browser settings to default and prevent CPU power. Here’s how to do it:
Step 1. Go to Chrome Settings from the three dots menu.
Step 2. Scroll down to the bottom and click on the Advanced option.
Step 3. From the Reset and cleanup section, click on the Reset settings to other original default > Reset Settings.
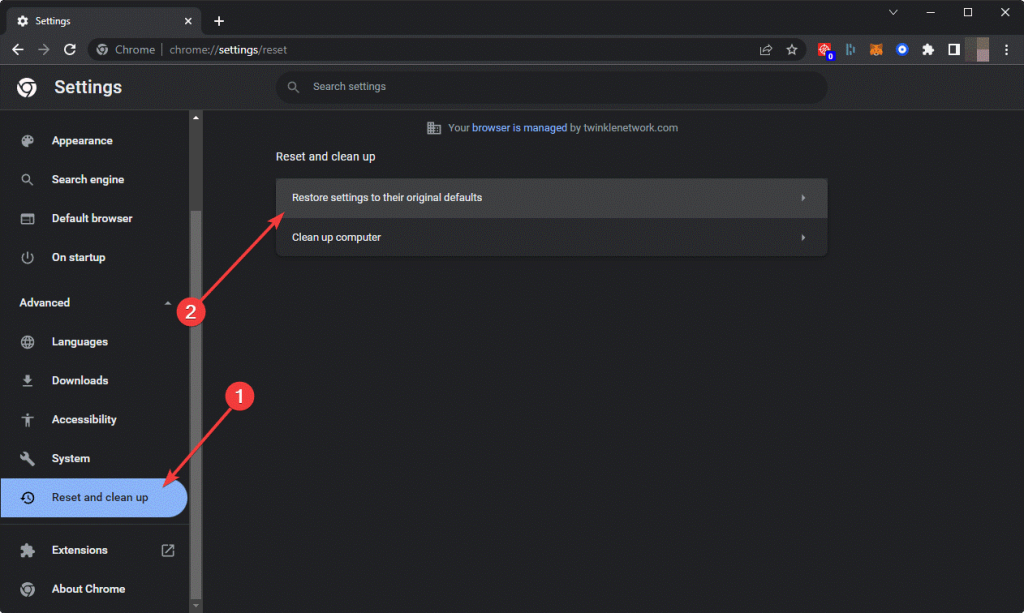
Step 4. Reboot your web browser and check whether the high CPU usage in chromium-browser is fixed.
6. Update Device Drivers
There is a chance that the high CPU usage problem is triggered due to your device drivers. Outdated or incompatible drivers can cause several problems in your system, including the high CPU usage in chromium browsers.
You can go to your device drivers manufacturer’s website and download the compatible versions. However, this process takes time and requires technical knowledge.
Thus, if you don’t have time or knowledge, simply get Driver Easy to automatically update all device drivers. This free tool can scan your entire system for outdated drivers and automatically install the latest versions on your PC.
7. Uninstall and Reinstall Chromium Browser
There is a possibility that your current chromium-browser version is outdated or buggy. In that case, the best solution is to uninstall and reinstall your browser. It is worth trying the shot:
Step 1. Launch Control Panel from the search bar.
Step 2. Go to Programs > Programs and Features and look for your chromium-browser.
Step 3. Right-click on it and then select Uninstall.
Step 4. To delete the folder completely, go to —
C:\Users\<username>\AppData\Local\Google\Chrome\
Step 5. Go to Microsoft Store or your chromium browser’s website to download the new app.
8. Limit CPU Resources for the Chromium Browser
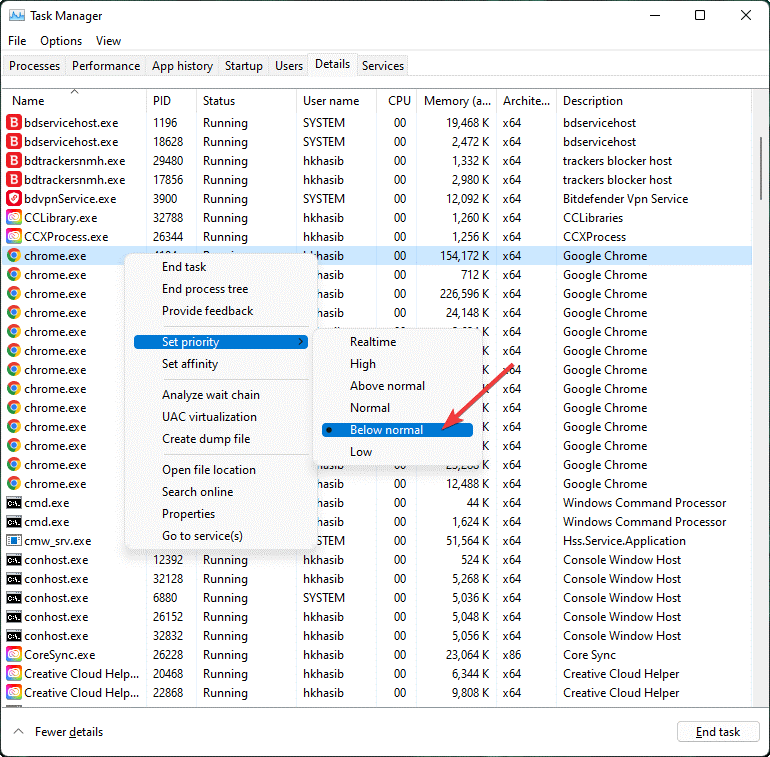
You can simply head over to the Task Manager and customize your system settings to spend fewer CPU resources on Chrome. It is a pretty simple process:
Step 1. Right-click on the Start icon on Windows and click on Task Manager.
Step 2. Navigate to the Details tab.
Step 3. Right-click on your browser’s process file like chrome.exe.
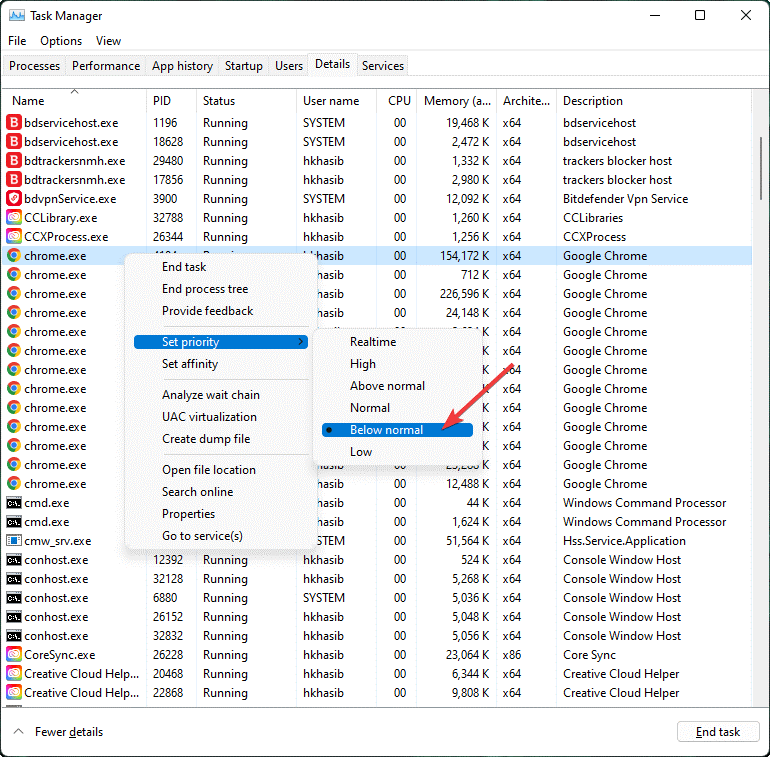
Step 4. Set CPU priority to Below Normal.
9. Close All the Tabs
If you have like hundreds of tabs opened on your browser, close all unnecessary ones. The more tabs you have is equivalent to more CPU consumption, leading to low battery. So, once your work is done, close tabs.
Let’s Fix High CPU Usage in Your Chromium Browser!
Chromium browsers are the best, with little flaws here and there. As you can see, the high CPU usage problem can be fixed using several methods like cache cleaning, extension removal, etc.
So, you use the best suitable method as per your requirements and enjoy your chromium browsers. Also, keep on following us for more information on web browsers or anything tech-related.
Popular Post
Recent Post
How to Fix Unable to update the Minecraft Native Launcher Windows 11
The “Unable to update the Minecraft Native Launcher” issue can be frustrating. However, there are many ways to fix it. Here, we will discuss some effective ways to fix this problem.
Troubleshooting Guide: How To Fix Copy And Paste Not Working On Windows 10/11
Fix the copy and paste not working issue on Windows 10/11 hassle-free with this comprehensive guide. Here you’ll find effective tried and tested methods that can troubleshoot and permanently resolve the problem.
How to Force Quit on Windows 11 and Windows 10
Encountering unresponsive programs or frozen applications on our Windows devices can be a frustrating experience. When a program hangs or stops responding, it can disrupt our workflow and hinder productivity. This is where the ability to force quit a program comes in handy. Here, we will explore different methods to force quit on Windows 11 […]
How to Enable Secure Boot Windows 11 and Windows 10
One of the key features that can significantly enhance the security of your Windows operating system is Secure Boot. By enabling Secure Boot on your Windows 11 or Windows 10 system, you can protect your device against malware and unauthorized operating systems. Benefits of Enabling Secure Boot in Windows 11 And 10 1. Protection Against […]
How to Change Administrator on Windows 10 and Windows 11
In Windows operating systems, the administrator account holds the highest level of privileges and control over the system. Sometimes, you may need to change the administrator account for various reasons such as security, ownership transfer, or simply to give someone else access to the system. Here, we will explore different methods to change the administrator […]
How to Open BIOS Windows 11 and Windows 10
Here are the best ways to Open BIOS Windows 11 and Windows 10. These steps are very easy.
How to Convert HEIC to JPG on Windows 11 and Windows 10
Learn the best ways to convert HEIC to JPG on Windows and Windows 10 computers.
How to Fix Valorant not uninstalling Windows 11 – Remove Valorant Completely
Online gaming has become increasingly popular, with many gamers enjoying multiplayer games. One such game that has gained a significant following is Valorant. However, like any software, Valorant is not immune to technical issues, and one common problem that players encounter is the difficulty in uninstalling the game, particularly on the Windows 11 operating system. […]
Your Organization’s Data Cannot Be Pasted Here: 7 Ways to Fix It
Encountering the “Your organization’s data cannot be pasted here” error can be frustrating, but armed with the right knowledge and troubleshooting steps, you can quickly overcome this hurdle.
Tenorshare Reiboot Review 2024 [Fully Unbiased]
Read The Complete Unbiased Review of Tenorshare Reiboot

