15 Ways to Fix Windows Can’t Connect to this Network Error
The internet is a part of life today. No work or play is possible without the network. Thus, the whole hell will break down when your Windows device shows a “Can’t connect to this error” message.
Windows has powerful network drivers that let you enjoy fast and stable internet connectivity. However, sometimes Windows users encounter network errors, leading to poor or no internet connection.
Now, there is nothing to stress about. It is easy to fix the Windows can’t connect to this network error. This guide will show you 15 easy solutions to fix the network error. So, let’s get moving.
Causes Behind Windows Can’t Connect To This Network Error
There is no particular reason behind Windows can’t connect to this network error. However, several factors can trigger this error on your Windows PC, such as:
Outdated Network Adapter Drivers
Network adapter drivers intermediate between your PC and the network source. Thus, if network adapters are faulty or outdated, your Windows device might not connect to the network.
Problematic Internet Source
It can simulate the error if you mistakenly turned off the router or other network devices. In addition, if the physical network connection is distributed, it can cause network troubles. So, thoroughly check your internet source when you cannot connect with your network.
Outdated Windows OS
Windows computers are met with many errors when Windows OS is outdated. Also, if you have some pending network errors, that can make your computer lose performance. So, go to Settings and ensure no pending updates are available for your computer.
Malware Infection
Yes, malware infection can cause Windows can’t connect to this network error. Plus, if your PC is running slow or other error messages are showing too, malware is the problem. So, you can get the best antimalware program like Avast, McAfee or Norton to clean your system. Once the malware infection is cleared, the network errors will automatically fix.
Here’s How to Fix Windows Can’t Connect To This Network Error
Now, you know what can cause Windows to not connect to this network error. Let’s move to fixing the network problems.
1. Restart Your Computer
Don’t want to sound cliche but restarting a PC is a very effective solution. It can fix corrupted caches and temporary system glitches. Thus, just restart your PC before trying another way to fix Windows that can’t connect to this network error.
2. Tweak Network Adapter Settings
Often changing network adapter channel width can help to fix Windows can’t connect to this network error. Here’s how you can do that:
Step 1. Press Windows + X keys to select Settings.
Step 2. Select Network & Internet and click on the Change adapter options.
Step 3. Look for your wireless adapter and right-click on it. Select Properties from the menu.
Step 4. Click on Configure > Advanced tab.
Step 5. Choose the 802.11d from the Property list and set the value to Enabled.
Step 6. Click on the OK button to save the changes.
3. Update Your Network Adapter Driver
As already mentioned, outdated or faulty network adapter drivers can disturb your network source. So, you can follow these steps to manually update the driver on your computer:
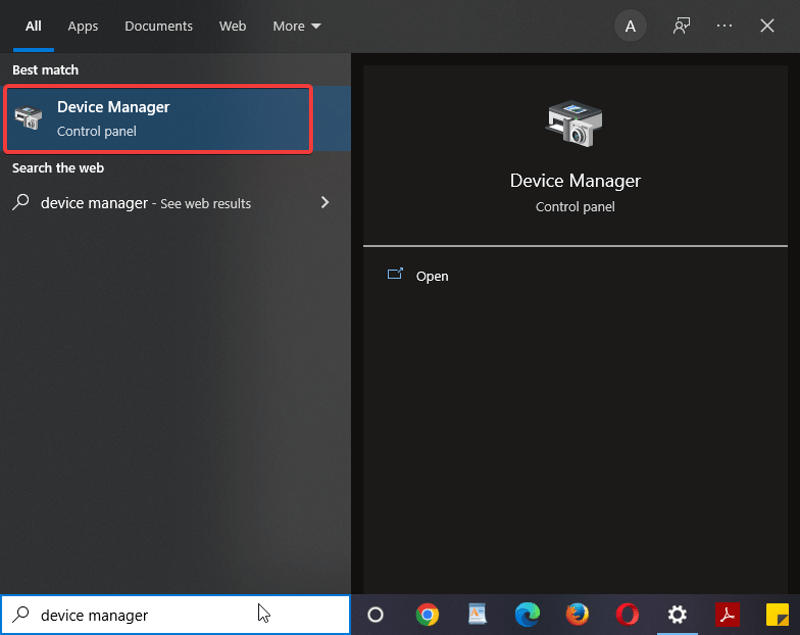
Step 1. Press Windows + X keys and select Device Manager.
Step 2. From the Network adapters dropdown menu, look for your wireless network adapter.
Step 3. Right-click on it and select Update Driver Software.
Step 4. Click on Browse my computer for driver software.
Step 5. After that, click on Let me pick from a list of device drivers on my computer.
Step 6. Uncheck the Show compatible hardware option.
Step 7. Now go to your network adapter manufacturer’s website to install the latest drivers.
Step 8. Don’t forget to restart your computer once the installation is complete.
Does the manual driver updating process seem complicated? In that case, you can get Driver Easy to automatically update your system drivers. This free software can scan your entire system for outdated drivers and allow you to update them all with a click.
4. Run Network Troubleshooter
You can easily fix Windows that can’t connect to this network error using Windows troubleshooting. However, if the WiFi error isn’t included in your network troubleshooting options, you can manually find and fix network connectivity troubles. Follow these steps to run a network troubleshooter on your computer:
Step 1. Press Windows + I keys to launch Settings.
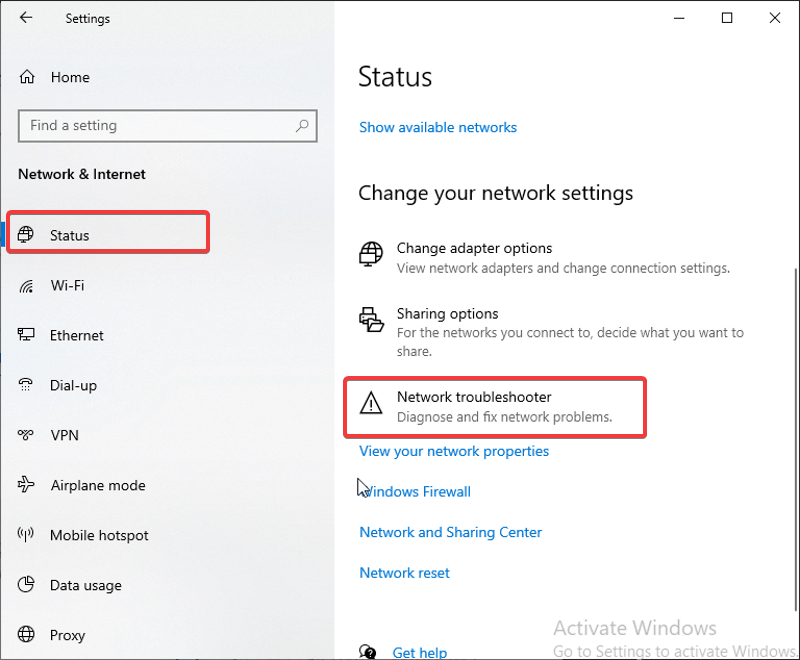
Step 2. Go to Network & Internet > Network troubleshooter.
Step 3. Wait for a few minutes to troubleshooter scan your computer and find the errors.
5. Use Forget Network and Reconnect
Are you getting error messages while connecting to WiFi? There is a chance that your computer is still looking for the network or it hasn’t completely disconnected from your WiFi network. In either case, you can disconnect and reconnect using the Forget Network option. To do so:
Step 1. Go to Settings > Network & Internet.
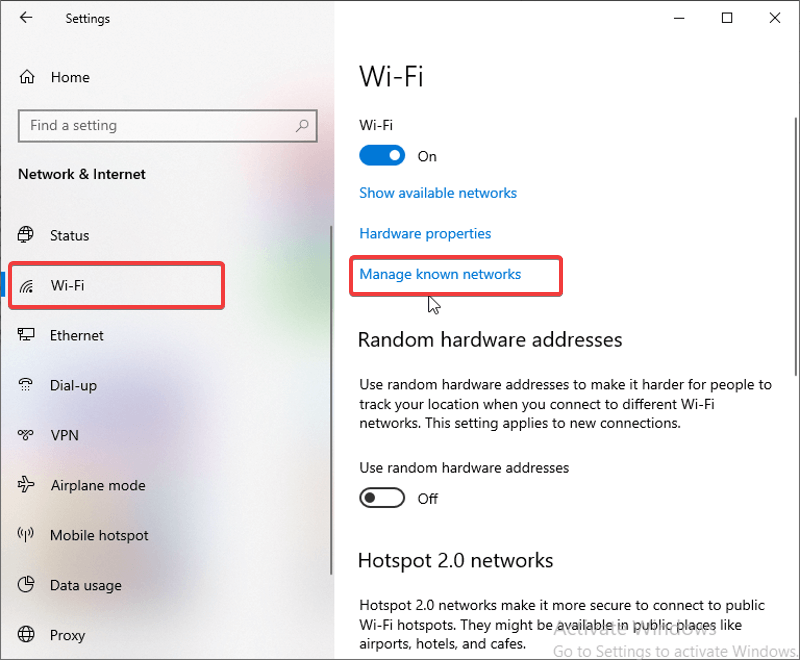
Step 2. Select WiFi and click on the Manage known networks.
Step 3. You will now find a list of networks you have connected to your computer. Click on the recent networks and select Forget to remove those networks from your computer.

Step 4. After that, reconnect your WiFi and see if it works now.
6. Change the Wireless Network Mode
Modifying your wireless network mode can also fix WiFi network errors. Follow these steps to change the wireless network mode on your computer:
Step 1. Right-click on the network connection icon located on the Task. Select Open Network & Internet settings from the list.
Step 2. Select Network and Sharing Center > click on the Change adapter settings.
Step 3. Look for the wireless network adapter, right-click on it and select Properties from the menu.
Step 4. Go to Configure > Advanced tab.
Step 5. Select the Wireless mode and change its value from the dropdown menu. And press OK.
7. Disable IPv6
If Windows can’t connect to this network error still persists, disabling IPv6 can help you. Remember, the process of disabling IPv6 is different for all devices. So, check your router’s instructional manual before following these steps:
Step 1. From the Taskbar, right-click on the Network & internet settings icon.
Step 2. Click on the Network and Sharing Center option.
Step 3. Select your current connection.
Step 4. Under the Connection status window, click on the Properties button.
Step 5. Look for Internet Protocol Version 6 (TCP /IPv6) and uncheck it.
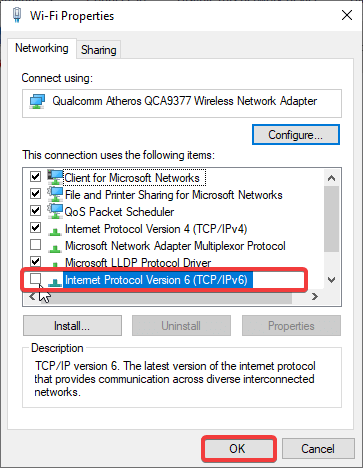
6. Click the OK button to save the changes and restart your Windows computer to apply the changes.
8. Use Command Prompt
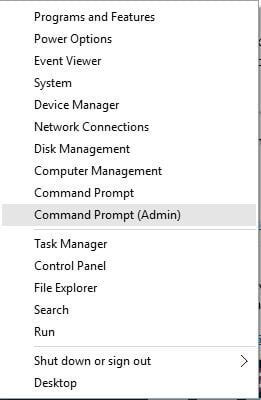
If you have updated your Windows software and after that, you are unable to connect with the network. You might have to use PowerShell to fix the error. Here’s how to do it:
Step 1. Press Windows + X and select Command Prompt (Admin) or PowerShell (Admin).
Step 2. On the Command Prompt window, enter the following command and press the Enter—
reg delete HKCRCLSID{988248f3-a1ad-49bf-9170-676cbbc36ba3} /va /f
Step 3. After that, enter the following command —
netcfg -v -u dni_dne

Step 4. Close the Command Prompt and restart your computer.
9. Uninstall Antivirus Program
Sometimes your antivirus software can conflict with network settings, leading to disturbed networks. So, you can uninstall the antivirus software to check whether it fixes Windows can’t connect to this error. Here’s how you can do it:
Step 1. Press the Windows + X keys and select Apps and features.
Step 2. Look for the antivirus software and right-click on it.
Step 3. Click on the Uninstall and Restart your PC.
10. Enter Your APN Credentials
When you try to connect your Windows device to a cellular network, it stops you from accessing it. In that case, reentering your APN credentials can fix the error. Simply follow these steps:
Step 1. Connect your computer to an Ethernet.
Step 2. Go to your web browser and check if it loads web pages.
Step 3. If the internet is connected, but web pages don’t load. In that case, contact your mobile ISP and ask for APN credentials.
Step 4. Enter the credentials to sign into your mobile network.
11. Use Network Adapter Troubleshooter
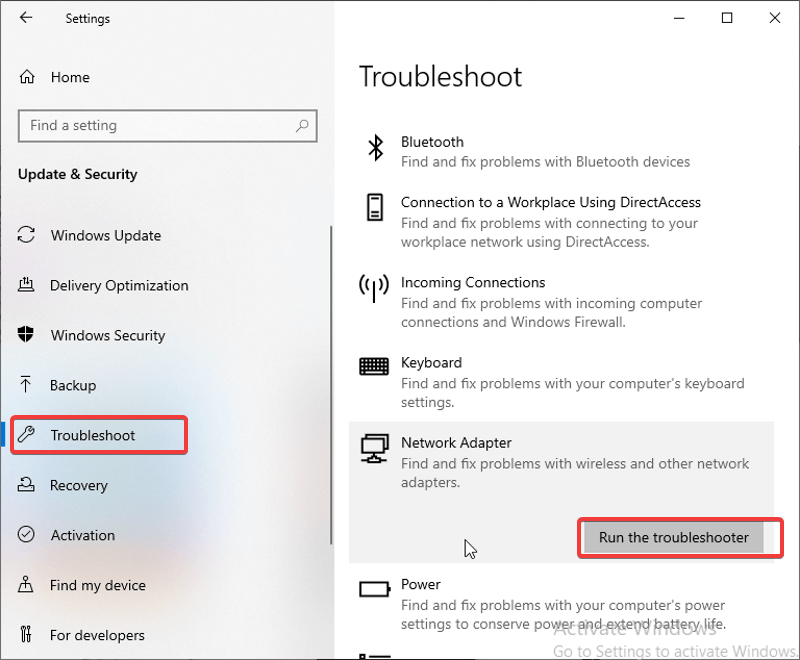
Many Windows users have reported that network error is fixable by running the network adapter troubleshooter. This will check if there are any network adapter issues and instantly fix them. Here are steps to run the network adapter troubleshooter:
Step 1. Go to Settings and select Update & Security.
Step 2. Click on the Troubleshooter option from the vertical pane of the page.
Step 3. After that, click on Network Adapter and hit the Run the troubleshooter button on the option.
12. Enable and Disable Airplane Mode
Another easy way to fix Windows can’t connect to this network error is enabling and disabling Airplane mode. This will refresh your network connection, resulting in solving your small network glitches.
13. Reset Your Network
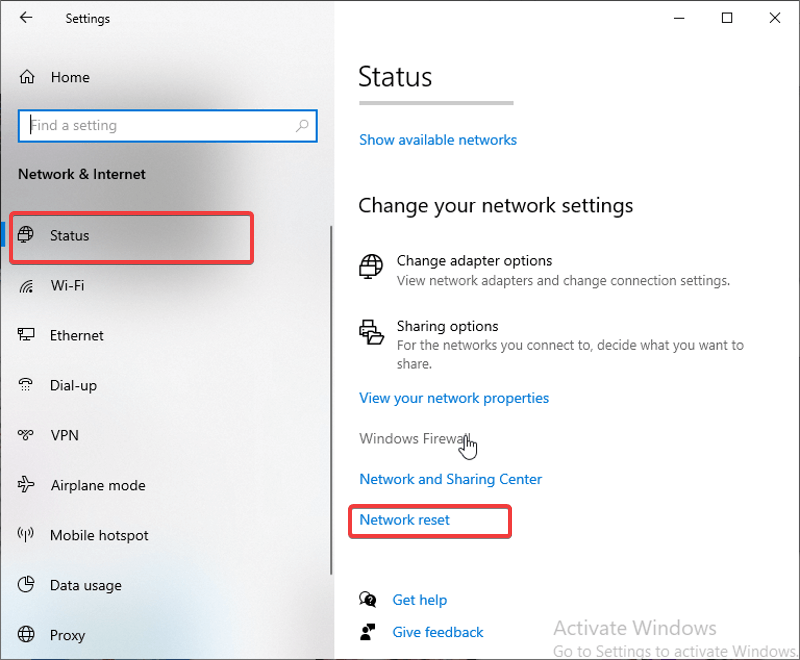
You could reconfigure your network settings if nothing worked to fix the network error on your Windows computer. Resetting the network will help to fix corrupted or outdated servers. To do so:
Step 1. Go to Settings > Network & Internet on your computer.
Step 2. Scroll down on the Status page and click on the Network reset option.
Step 3. After that, click on the Reset now button on the next page.
14. Release the IP and Flush the DNS Cache
It is not complicated as it sounds. You can easily release the IP and flush the DNS cache following these steps:
Step 1. Press Windows + R keys to launch the Run Command box.
Step 2. Type cmd in the search field and press Enter to open the Command Prompt.
Step 3. Add these commands and hit Enter after each command—
netsh winsock reset
netsh int ip reset
ipconfig /release
ipconfig /renew
ipconfig /flushdns
Step 4. Afterwards, close the window and restart your computer.
15. Update Your Windows OS
It is also possible to fix Windows not connecting to this network error by updating your operating system. Often updating the Windows OS will fix all the minor system bugs. So, you can check for Windows updates as follows —
To check for updates, select Start > Settings > Windows Update , then select Check for updates. If updates are available, you can choose to install them.
Let’s Fix Windows Can’t Connect To This Network Error Now!
There you go, people! You are now all set to fix Windows can’t connect to this network error. However, first try basic fixes like checking physical connections, restarting your router, etc.
If basic solutions don’t work, you can follow the technical solutions mentioned in the post.
That’s it for now! Keep on following this website for more informative guides.
Popular Post
Recent Post

Advanced SystemCare: Tool To Clean Your PC
Your computer slows down over time. Files pile up, junk builds inside the system, and things start to feel sluggish. You open a browser, and it takes forever. Programs crash without warning. This is a sign that your PC needs a good cleanup. Many users ignore these signs. They think buying a new computer is […]

Top 10 PC Cleaning and Optimization Tools For Windows 11/10
Discover the best PC cleaning and optimization tools for Windows 11 and 10. Remove junk files, improve speed, and keep your PC healthy with trusted cleaners.

Clear Microsoft Teams Cache On Windows PC [Complete Guide]
Learn how to clear Teams cache on Windows PC with 3 easy methods. Fix slowdowns, glitches, and errors fast. A simple guide for every Windows 11 user.

How To Clear Browsing History on PC: Chrome, Edge, Firefox, Opera
Learn how to clear browsing history on PC across Chrome, Edge, Firefox, and Opera with easy steps, tips, pros, and FAQs.

Clear Cache and Cookies: Complete Guide For Windows 11/10
Learn how to clear cache and cookies on Windows 10 and 11. This complete guide covers Chrome, Edge, and Firefox with simple, step-by-step instructions for every user.

How To Clean PC Trackpad/Touchpad Without Damaging It
Learn how to clean PC trackpad and clean PC touchpad safely with simple steps. Improve performance, remove dirt, and keep your laptop surface smooth and responsive.

How To Clean Your GPU/Graphics Card [Complete Guide]
Introduction A graphics card is one of the most important parts of a computer. It handles visuals, gaming, video editing, and design work. Over time, dust builds up inside it. This dust blocks airflow and traps heat. When heat increases, performance drops. In some cases, the system may even crash. That is why learning how […]

How To Clean PC Power Supply Unit Safely Without Damaging
Follow simple, safe steps to clean your computer’s power supply unit. Improve cooling, reduce overheating, and protect your PC’s performance.

How To Clean a CPU Without Damaging It [Complete Guide]
Learn how to clean a CPU safely without damage. Follow simple steps, precautions, and methods to improve cooling, boost performance, and extend your computer’s life.

How To Clear Browser Cache On Windows 11/10 [Chrome, FireFox, Edge]
Learn how to clear browser cache on Windows 11 and 10. Follow simple steps to clean browser cache, fix slow browsing, and improve performance easily.
