Clear Microsoft Teams Cache On Windows PC [Complete Guide]
Microsoft Teams is widely used for daily work and communication. People rely on it for meetings, messaging, and sharing files. Over time, though, the app may become slow or start behaving oddly. A simple fix that many users ignore is clearing the Teams cache. Even though it sounds minor, it can resolve many common issues.
Teams saves temporary data on your system to improve speed and performance. This stored data is called cache. When it grows too large or gets damaged, it can create problems instead of helping. You may notice delays, messages not appearing, or the app crashing without warning. Clearing the cache helps reset things and often brings the app back to normal.
This guide explains everything in a clear way. It covers basic precautions, along with the advantages and drawbacks of clearing cache. You will also find three simple methods to clear Teams cache on Windows 11. The steps are easy to follow, whether you are new to the app or already familiar with it.
Before You Begin: Important Precautions to Keep in Mind
Before you jump in, it is smart to pause and prepare. Clearing the cache is safe, but there are a few things you should know first. Taking these steps will help you avoid any surprises and make the process smooth.
- Close Microsoft Teams completely before starting. If Teams is still running in the background, clearing the cache may not work properly. Check your system tray at the bottom right corner and close the app fully before you proceed.
- Save all ongoing work inside Teams. Any unsaved chats or drafts may be lost during the process. Make sure you have noted down anything important before you clear Teams cache.
- Do not delete the wrong folders. The cache folders have specific names and locations. Be careful to only delete the cache files and not other important app data or system files.
- Know that you will be signed out. After you clear the Teams cache, the app may ask you to sign in again. Keep your login credentials handy so you are not locked out.
- Your chat history will still be safe. Teams stores messages on Microsoft’s servers, not just locally. Clearing the local cache will not delete your conversation history. It will still appear once you log back in.
- Make sure your Windows is up to date. An outdated operating system can sometimes cause cache-related issues to return quickly. Check for Windows updates before you start.
- Backup important local files if needed. If you have saved any files directly through the Teams app locally, make a backup just to be safe. It is always better to be cautious.
- Restart your PC after clearing the cache. A fresh restart helps Windows fully apply the changes. It also helps Teams load cleanly the next time you open it.
The Good and the Not-So-Good: Advantages and Disadvantages of Clearing Teams’ Cache
Understanding both sides helps you make a better decision. There are clear benefits to clearing the cache, but there are also a few downsides you should be aware of. Here is a balanced look at what happens when you clear Teams cache on your Windows PC.
Advantages
- Teams run faster after clearing the cache. Old and bloated cache files slow down the app. Once removed, Teams has less clutter to deal with and responds more quickly to your actions.
- It fixes many common Teams errors. Glitches like missing profile pictures, channels not loading, or messages not showing are often caused by a corrupted cache. Clearing it usually solves these problems.
- It frees up storage space on your PC. Cache files can take up several gigabytes over time. When you clear the Teams cache, you recover that space for other uses.
- It improves overall app stability. A clean cache means the app is working with fresh data. This reduces the chances of unexpected crashes or freezing during important meetings.
- It can fix sign-in problems. Sometimes Teams fails to log you in properly because of corrupted cache data. Clearing the cache often resolves authentication issues quickly.
- It helps Teams sync properly with the server. When cache data is outdated, Teams may show old information. After clearing, everything reloads fresh from the server.
Disadvantages
- Teams will take longer to load the first time after clearing. Since the cache is empty, Teams needs to rebuild it from scratch. The first launch may feel slower than usual.
- You will need to sign in again. This is a minor inconvenience, but if you use two-factor authentication, it takes a little more time to get back in.
How To Clear Microsoft Teams Cache on Windows 11: 3 Methods
There is more than one way to clear Teams cache on a Windows 11 PC. The method you choose depends on your comfort level with the computer. All three methods are safe and effective. Let us go through each one clearly.
Method 1: Clear Cache by Deleting the Cache Folder Manually
This is the most direct method. You open the file system and remove the cache folder on your own. It may seem technical at first, but it becomes very easy once you know the exact location. There is no need for extra tools or settings, and you stay in full control of what gets deleted.
It works for both the classic version of Microsoft Teams and the newer app. The folder structure is slightly different, but the idea stays the same. Once the cache files are cleared, Teams usually runs more smoothly and fixes common issues like lag or loading errors.
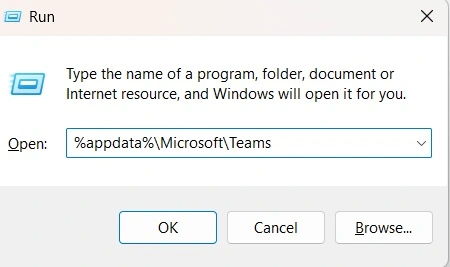
Step 1: Press the Windows + R keys together on your keyboard. A small Run dialog box will open. Type %appdata%\Microsoft\Teams in the box and press Enter. This will open the Teams folder in File Explorer.
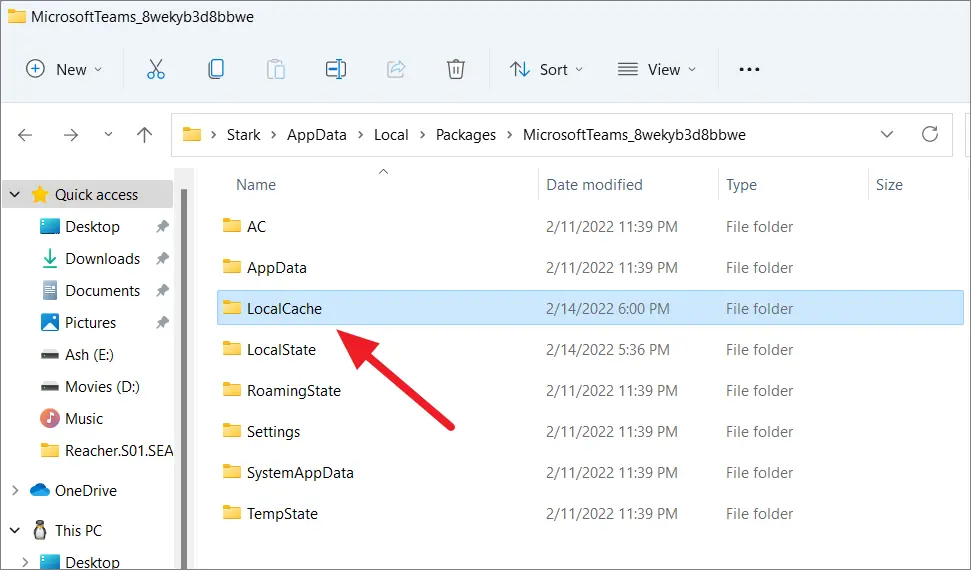
Step 2: Inside this folder, look for folders named Cache, blob_storage, databases, GPUCache, IndexedDB, Local Storage, and tmp. Select these folders and press the Delete key. Now restart Teams and sign back in. Your cache is cleared.
Method 2: Clear Cache Using the New Microsoft Teams Settings
The newer version of Microsoft Teams includes a built-in option to clear the cache. This makes the process much easier for most users. You do not have to open system folders or deal with hidden files, which saves time and avoids confusion.
Everything is handled from within the app itself. With just a few clicks, you can clear stored data and refresh the app. This method is quick, safe, and suitable even if you are not comfortable working with system settings.
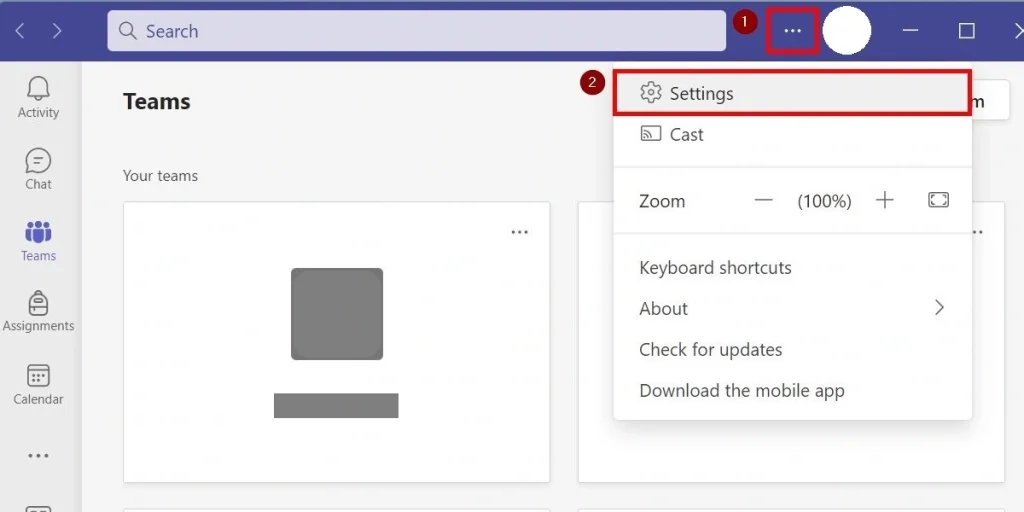
Step 1: Open Microsoft Teams on your Windows 11 PC. Click on the three-dot menu icon at the top right corner of the window. From the drop-down menu, select Settings.
Step 2: In Settings, go to the Privacy or General section and find the option to clear cache. Click it and confirm. The app will restart, and the cache will be cleared.
Method 3: Clear Cache Using Command Prompt
If you are comfortable typing commands, this method is quick and efficient. The Command Prompt allows you to remove cache files without opening File Explorer. It saves time and keeps the process straightforward.
It suits users who prefer a faster and more direct approach. With a few simple commands, you can clear the cache and reset temporary data. Just be careful while entering commands, as small mistakes can lead to errors.
Step 1: Click on the Start menu and type Command Prompt. Right-click on it and choose Run as administrator. This gives you the permission needed to delete system-level files.
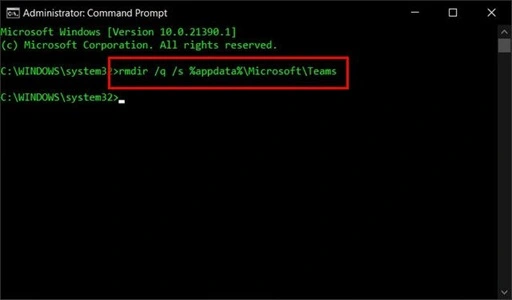
Step 2: Type the following command and press Enter:
rd /q /s %appdata%\Microsoft\Teams\Cache
This will delete the cache folder completely. You can also run similar commands for other Teams folders if needed. Once done, restart Teams and log back in. Your clear Teams cache process is complete.
Author’s Tip
Many people wait until something goes wrong before they clear Teams cache. But it is actually a good habit to do it every few months, even when everything seems fine. Think of it like cleaning your room. You do not wait for it to become a mess before tidying up. Regular clearing keeps Teams running smoothly all the time.
If you are using Teams for important work meetings, schedule a cache clear for the weekend or after hours. This way, you will not interrupt any calls or lose track of ongoing chats. It only takes a few minutes, and the performance boost is well worth it.
Also, if Teams keeps showing problems even after you clear Teams cache, consider uninstalling and reinstalling the app. Sometimes the app itself needs a fresh installation. But in most cases, clearing the cache alone is enough to fix the issue.
Conclusion
Microsoft Teams is a powerful tool, but it needs a little maintenance now and then. Cache buildup is one of the most common reasons why the app slows down or behaves oddly. The good news is that it is very easy to fix. You do not need to be a tech expert to clear the Teams cache on your Windows PC.
We covered three different methods in this guide. Whether you prefer doing it manually, using the app settings, or through the Command Prompt, all three options work well on Windows 11. Pick the one that feels most comfortable for you and follow the steps carefully.
Now that you know how to clear Teams cache, you can keep your app running at its best. Share this guide with a colleague who might be struggling with a slow Teams app. A quick cache clear might be all they need to get back on track.
Frequently Asked Questions (FAQs)
Q1. Will clearing the Teams cache delete my messages or files?
No, clearing the cache will not delete your messages or shared files. All your chat history and documents are stored on Microsoft’s cloud servers. When you clear Teams cache locally on your PC, you are only removing temporary data that the app stores to load faster. Once you sign back in, all your chats and files will appear just as before.
Q2. How often should I clear the Microsoft Teams cache?
There is no fixed rule, but doing it every two to three months is a good practice. If you use Teams heavily every day, you might want to clear the Teams cache more often. You should also do it right away if you notice the app is slow, crashing, or showing incorrect information. Think of it as routine maintenance for your app.
Q3. Do I need to reinstall Teams after clearing the cache?
No, you do not need to reinstall Teams. Clearing the cache is a much lighter action. It simply removes the temporary files stored by the app. Teams will rebuild the cache automatically the next time you use it. Reinstallation is only needed if the app continues to have problems even after you clear the Teams cache multiple times.
Popular Post
Recent Post

Top 10 PC Cleaning and Optimization Tools For Windows 11/10 [2026]
Discover the best PC cleaning and optimization tools for Windows 11 and 10. Remove junk files, improve speed, and keep your PC healthy with trusted cleaners.

Clear Microsoft Teams Cache On Windows PC [Complete Guide]
Learn how to clear Teams cache on Windows PC with 3 easy methods. Fix slowdowns, glitches, and errors fast. A simple guide for every Windows 11 user.

How To Clear Browsing History on PC: Chrome, Edge, Firefox, Opera
Learn how to clear browsing history on PC across Chrome, Edge, Firefox, and Opera with easy steps, tips, pros, and FAQs.

Clear Cache and Cookies: Complete Guide For Windows 11/10
Learn how to clear cache and cookies on Windows 10 and 11. This complete guide covers Chrome, Edge, and Firefox with simple, step-by-step instructions for every user.

How To Clean PC Trackpad/Touchpad Without Damaging It
Learn how to clean PC trackpad and clean PC touchpad safely with simple steps. Improve performance, remove dirt, and keep your laptop surface smooth and responsive.

How To Clean Your GPU/Graphics Card [Complete Guide]
Introduction A graphics card is one of the most important parts of a computer. It handles visuals, gaming, video editing, and design work. Over time, dust builds up inside it. This dust blocks airflow and traps heat. When heat increases, performance drops. In some cases, the system may even crash. That is why learning how […]

How To Clean PC Power Supply Unit Safely Without Damaging
Follow simple, safe steps to clean your computer’s power supply unit. Improve cooling, reduce overheating, and protect your PC’s performance.

How To Clean a CPU Without Damaging It [Complete Guide]
Learn how to clean a CPU safely without damage. Follow simple steps, precautions, and methods to improve cooling, boost performance, and extend your computer’s life.

How To Clear Browser Cache On Windows 11/10 [Chrome, FireFox, Edge]
Learn how to clear browser cache on Windows 11 and 10. Follow simple steps to clean browser cache, fix slow browsing, and improve performance easily.
How To Clear Cache Memory On Windows 11/10 [2026]
Learn how to clear cache memory on Windows 11/10 using safe built-in methods to improve speed, free space, and maintain smooth system performance.
