How to Fix WiFi Keeps Disconnecting on Windows 10?
A McKinsey report states that 35% of people today work from home. And we all know a stable internet connection is essential to work from home. But, when your WiFi keeps disconnecting on Windows 10, you might lose a good work day.
Usually, when the internet stops working, people start to blame their service providers. But that’s not always the case. Sometimes system glitches can also cause problems. So, to rule that out, let’s check out what to do when your WiFi keeps disconnecting on your Windows 10 computer.
Reasons Behind WiFi Keeps Disconnecting on Windows 10
We identified some of the frequent causes of this error by consulting the engaged and supportive Windows 10 user community. Remember that your problem might not be like anyone else’s; these are some of the issues frequently when people talk about WiFi that stops working.
- Wireless Sense. WiFi Sense is a new feature in Windows 10. It was created to simplify connecting to other WiFi networks, but occasionally it just gets in the way. For example, you can use it to automatically connect to a wireless hotspot that has been shared and is currently open by another Windows 10 user.
- Power Management. Microsoft has introduced many features to reduce power usage to lengthen the battery life of devices. One of these options is Power Management, which allows you to automatically disable different hardware when your computer’s power consumption reaches a certain level. Unfortunately, this feature may turn off your WiFi adapter, resulting in frequent network disconnections from your computer.
- Faulty or outdated drivers. Drivers are crucial parts to have because they handle a variety of tasks, including maintaining the functionality of your connected hardware. Your drivers won’t operate as intended if they’re outdated or damaged, leading to issues.
- Wireless Adapter with a wrong configuration. Your Wireless Adapter configuration may have changed, affecting settings like the channel frequency range detection. Although they might seem minor adjustments, they can make your WiFi keep disconnecting on Windows 10.
- Placement or damage to the router. You may lose WiFi network access if your router isn’t working properly. Moving your router closer to your device will improve its placement. Also, check if the router has any damage.
Quick Check Ups to Fix WiFi Keeps Disconnecting on Windows 10
Before diving into the technical solutions, MakeUseOf suggested to check following things:
- There is no airplane mode on.
- Your router is undamaged physically.
- There isn’t a service outage happening in your area.
- The network is not too far away.
- The router is connected correctly.
If none of those problems are present, restart your router once; this will solve the problem immediately. You can start using the following fixes if restarting the router doesn’t work to solve the issue.
8 Solutions to Fix WiFi Keeps Disconnecting on Windows 10
Here are the technical fixes that you can try when WiFi keeps disconnecting on Windows 10 despite restarting your router:
Solution 1. Set Your Network to Private
Remember, keeping your network private is generally advisable due to the numerous risks of using public WiFi. While using a public connection, you can expose your personal information, hackers can infect your system with malware, you could experience cyberattacks, and many other problems could occur.
You might want to set your WiFi connection to private to reduce the possibility of outside interference. Here’s how to do it:
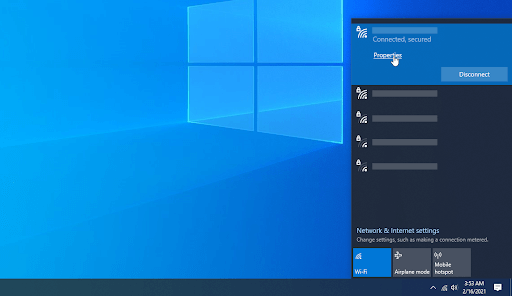
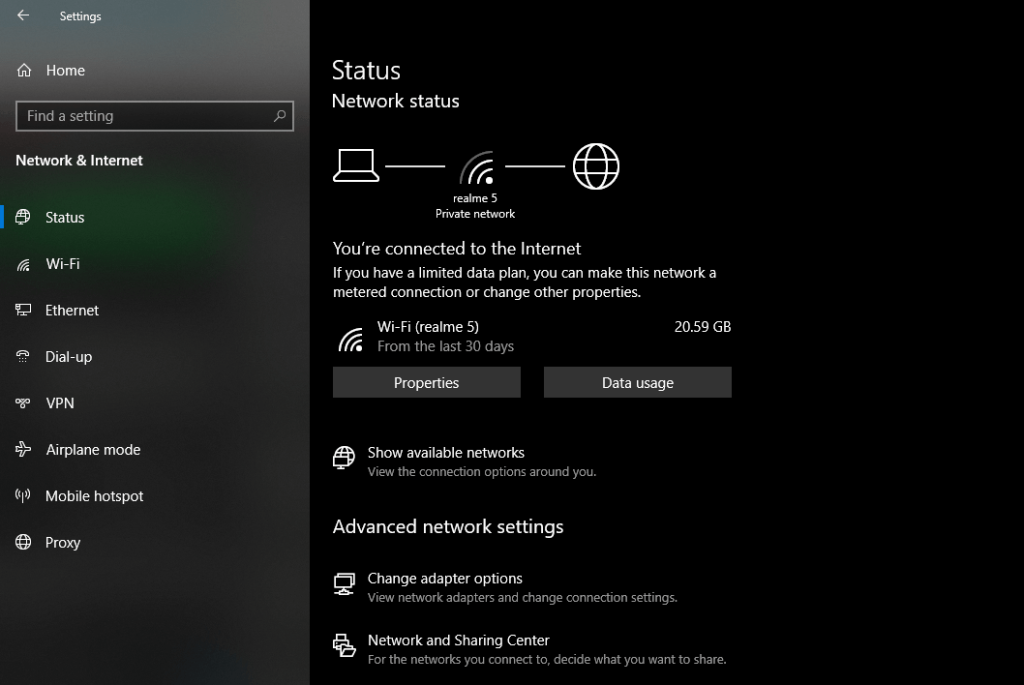
Step 1. In the taskbar’s lower right corner, click the WiFi Network icon.
Step 2. Next, navigate to the Network Properties page.
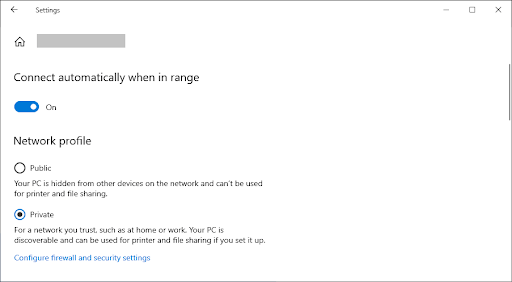
Step 3. The network profile should be changed from Public to Private.
Solution 2. Tweak with the Power Management
Your wireless adapter may occasionally be disabled by your Power Management settings, resulting in a brief disconnect. This is easily fixable with just one minor change.
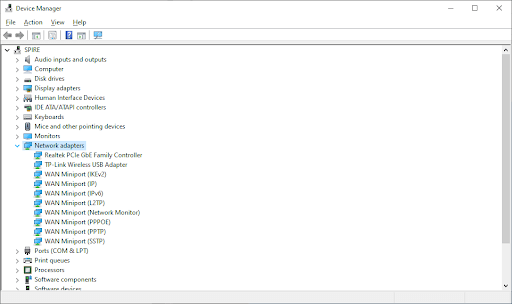
Step 1. On your keyboard, press Windows and X, then select Device Manager from the menu.
Step 2. Check the arrow next to the Network Adapters menu to expand it.
Step 3. Double-click your adapter to open a new window, then select the Power Management tab. Finally, click OK after clearing the checkbox next to Allow the computer to turn off this device to conserve power.
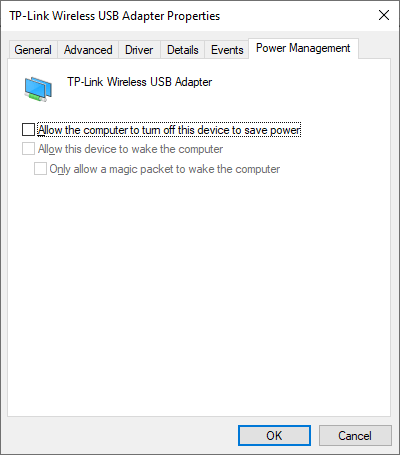
Step 4. Click OK, tick the checkbox next to “Allow the computer to turn off this device to save power.”
Step 5. Try restarting your device to see if WiFi still works.
Solution 3. Check Your Network’s Bandwidth
You might have a minor problem on your hands if you’ve been telling friends and neighbors your password. They would first consume all of your bandwidth, severely taxing your network and slowing it down.
Second, if they disclose the password information to a third party, your router will quickly become overloaded with connected devices. This amount of traffic is too much for your network to handle, which occasionally causes some of your devices to disconnect.
As a result, if you discover some unidentified devices on your network, you can change or add a password and use your router’s tools to see who is using them.
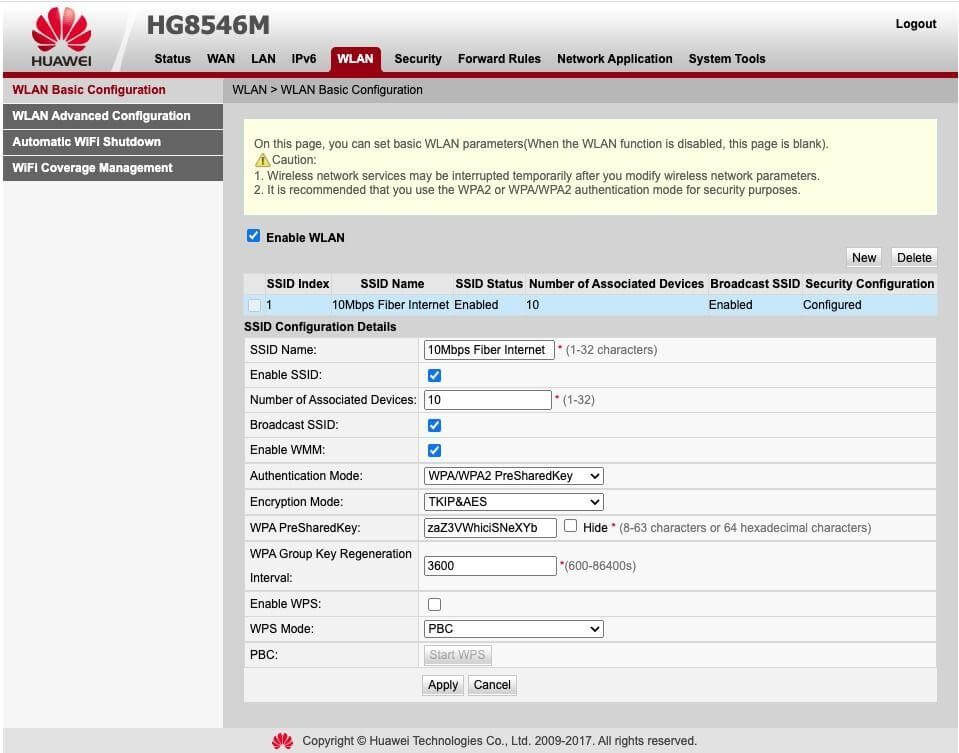
Step 1. Access your router at 192.168.1.1. (it can vary for your router).
Step 2. Use your credentials to log in.
Step 3. You can view every device connected to your router on the “connected devices” page on most routers. Continue to the next step if strange, unidentified devices start to appear or if you simply want to protect yourself from intruders.
Step 4. Then select WLAN > WLAN Basic Configuration.
Step 5. WPA PresharedKey should be changed.
Step 6. Click Apply after entering the password.
Solution 4. Update Your WiFi Adapter Driver
Another frequent problem affecting connectivity is a WiFi adapter driver that has reached its expiration date. As a result, you need to update or install new drivers on your computer.
Most drivers are updated automatically by Windows updates, but you can also manually update them to ensure they are current. Follow these steps to do so:
Step 1. First, go to Device Manager by pressing the Windows + X keys.
Step 2. Enlarge the Network Adapters category.
Step 3. Next, select “right-click” on your WiFi adapter.
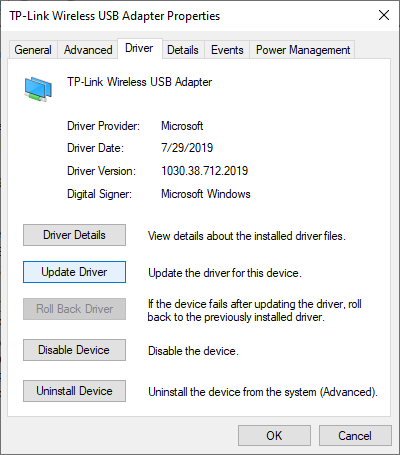
Step 4. Update the driver by tapping it.
Solution 5. Forgot All Unwanted Networks
Windows makes an effort to link your device to the fastest internet connection available, which you have used at least once. As a result, this setting will connect you to the best options when you have multiple network connections.
When the connection on either of those connections is unstable, it can lead to issues. For example, after disconnecting you, it might switch from one network to another. Disconnecting repeatedly could hurt you.
To prevent this, try to ignore all other networks besides the one you plan to use. You can also disregard the networks in your area that you no longer use because your device still contains their data.
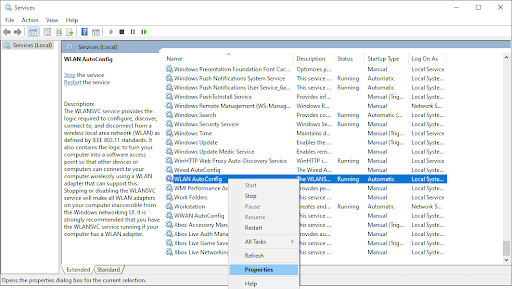
Solution 6. Switch WiFi Autoconfig Service
When your preferred network becomes available, Windows will connect you automatically using the WLAN Auto-Config service. Even if you already added the password, you might need to manually connect your device to the internet if this setting is disabled.
Your network will restart with an automatic connection if you reset this setting. Here is how to fix WiFi that keeps disconnecting on Windows 10:
Step 1. By pressing Win + R, the Run dialog box will appear.
Step 2. Hit OK after entering “services.msc.”
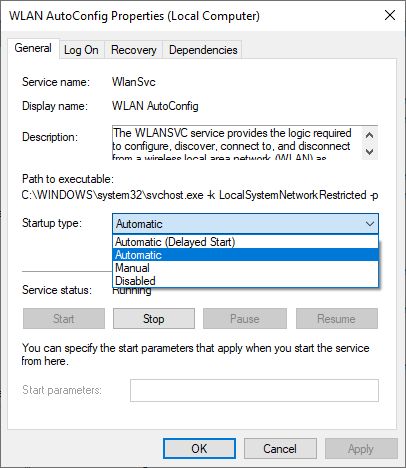
Step 3. Double-tap WLAN AutoConfig after locating it in the list of choices.
Step 4. From the Startup type dropdown menu, choose Automatic.
Solution 7. Change Your DNS Server
Changes to the DNS server can occasionally solve connectivity problems, though this is uncommon. To improve internet connectivity, use these steps to switch the DNS server to Google’s DNS:
Step 1. Go to Settings.
Step 2. Go to the Network and Internet by navigating.
Step 3. Navigate to Advanced network settings and select Change adapter options.
Step 4. Choose your network adapter from the menu.
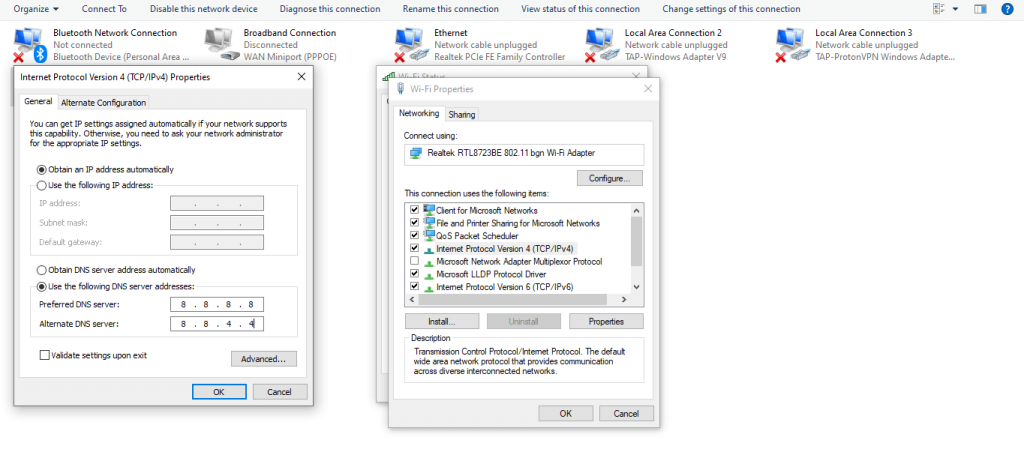
Step 5. Double-click Internet Protocol Version 4 (TCP/IPv4) under Properties.
Step 6. Examine the circle for using the DNS servers listed below.
Step 7. Set the Preferred and Alternate DNS servers to 8 8 8 8 and 8 8 4 4.
Solution 8. Use Troubleshooter
If the issue still exists even after applying all the fixes on the list, try running the Windows network troubleshooter. This automated troubleshooting tool finds the connectivity problem and fixes it. Take the following actions to run it on Windows:
Step 1. Go to Settings.
Step 2. Select Update and Security from the menu.
Step 3. Pick Troubleshoot from the sidebar on the left.
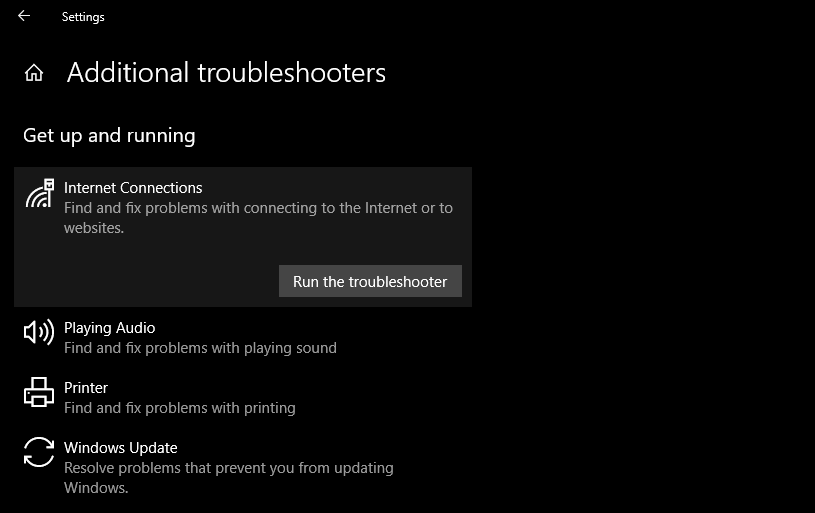
Step 4. Select Additional troubleshooters by clicking.
Step 5. Run the troubleshooter by clicking Internet Connections and then that button.
Parting Remarks:
You can use all or some of the solutions on the list to restart your internet connection. Pick up your cell phone and call your network provider if nothing else works. There is a big fat chance that the internet may not be operating due to a hardware problem.
The last step is to perform a thorough scan once or twice a month to check for unauthorized WiFi usage. Also, check other Windows 10 guides here if you get stuck while fixing your network.
Popular Post
Recent Post

Advanced SystemCare: Tool To Clean Your PC
Your computer slows down over time. Files pile up, junk builds inside the system, and things start to feel sluggish. You open a browser, and it takes forever. Programs crash without warning. This is a sign that your PC needs a good cleanup. Many users ignore these signs. They think buying a new computer is […]

Top 10 PC Cleaning and Optimization Tools For Windows 11/10
Discover the best PC cleaning and optimization tools for Windows 11 and 10. Remove junk files, improve speed, and keep your PC healthy with trusted cleaners.

Clear Microsoft Teams Cache On Windows PC [Complete Guide]
Learn how to clear Teams cache on Windows PC with 3 easy methods. Fix slowdowns, glitches, and errors fast. A simple guide for every Windows 11 user.

How To Clear Browsing History on PC: Chrome, Edge, Firefox, Opera
Learn how to clear browsing history on PC across Chrome, Edge, Firefox, and Opera with easy steps, tips, pros, and FAQs.

Clear Cache and Cookies: Complete Guide For Windows 11/10
Learn how to clear cache and cookies on Windows 10 and 11. This complete guide covers Chrome, Edge, and Firefox with simple, step-by-step instructions for every user.

How To Clean PC Trackpad/Touchpad Without Damaging It
Learn how to clean PC trackpad and clean PC touchpad safely with simple steps. Improve performance, remove dirt, and keep your laptop surface smooth and responsive.

How To Clean Your GPU/Graphics Card [Complete Guide]
Introduction A graphics card is one of the most important parts of a computer. It handles visuals, gaming, video editing, and design work. Over time, dust builds up inside it. This dust blocks airflow and traps heat. When heat increases, performance drops. In some cases, the system may even crash. That is why learning how […]

How To Clean PC Power Supply Unit Safely Without Damaging
Follow simple, safe steps to clean your computer’s power supply unit. Improve cooling, reduce overheating, and protect your PC’s performance.

How To Clean a CPU Without Damaging It [Complete Guide]
Learn how to clean a CPU safely without damage. Follow simple steps, precautions, and methods to improve cooling, boost performance, and extend your computer’s life.

How To Clear Browser Cache On Windows 11/10 [Chrome, FireFox, Edge]
Learn how to clear browser cache on Windows 11 and 10. Follow simple steps to clean browser cache, fix slow browsing, and improve performance easily.
