Here’s How to Enable Desktop Stickers in Windows 11
Windows 11 has been full of surprises. Microsoft has introduced many new and graphic-rich features to Windows 11 OS to make it the best PC solution.
Recently, Microsoft experimented with Windows Spotlight and desktop Search bar, which has been a quiet hit. So, this time Microsoft is testing Stickers for desktop backgrounds in Windows 10.
Usually, stickers are available in instant messaging apps to make your conversations fun. But Windows 11 has taken stickers to the next level, allowing you to add stickers to your desktop wallpapers.
It is a totally non-productive feature, but a fun way to create a lively workspace. Currently, the sticker feature is only available for Windows 11 22H2 build 25126 users.
Excited to use desktop stickers in Windows 11?
If so, simply scroll through this post to know how to enable, disable, or use desktop stickers on your Windows 11 PC.
How to Enable Desktop Stickers in Windows 11 Computer?
The Desktop Stickers let you turn your boring wallpaper into a fun place. These stickers sit permanently on your desktop, even if you change the wallpaper.
However, it is still an experiment, so you have to tweak with Registry to enable Desktop Stickers on your computer. Thus, we recommend first taking a system backup before adjusting the Registry settings. It is always better to be cautious than to lose your data.
However, if you follow these steps closely, you can easily enable the Desktop Stickers context menu from the Registry:
Step 1. Press Windows and R keys on your keyboard to open the Run command box.
Step 2. Enter regedit in the search field and hit the Enter key.
Step 3. After that, the Windows Registry Editor will now launch on your Desktop.
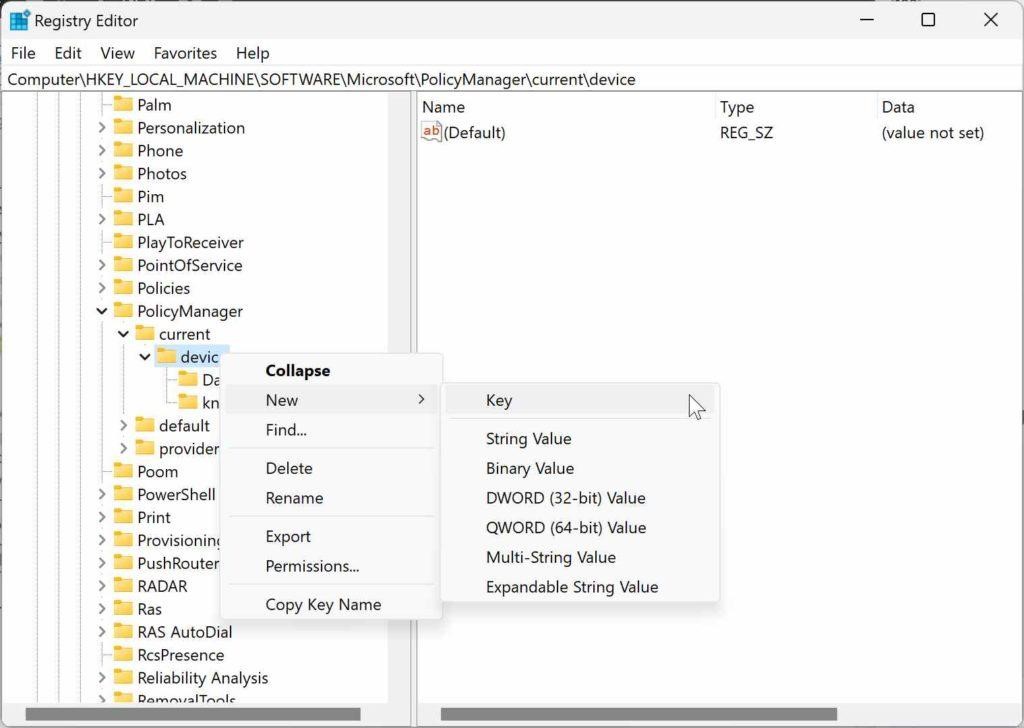
Step 4. Follow this path to reach the specific key in the Registry—
HKEY_LOCAL_MACHINE\SOFTWARE\Microsoft\PolicyManager\current\device
Step 5. After locating the device key, right-click on it and select New, followed by Key.
Step 6. Rename the new key created as Stickers.
Step 7. Up next, right-click on Stickers and select New, followed by DWORD (32-bit) Value.
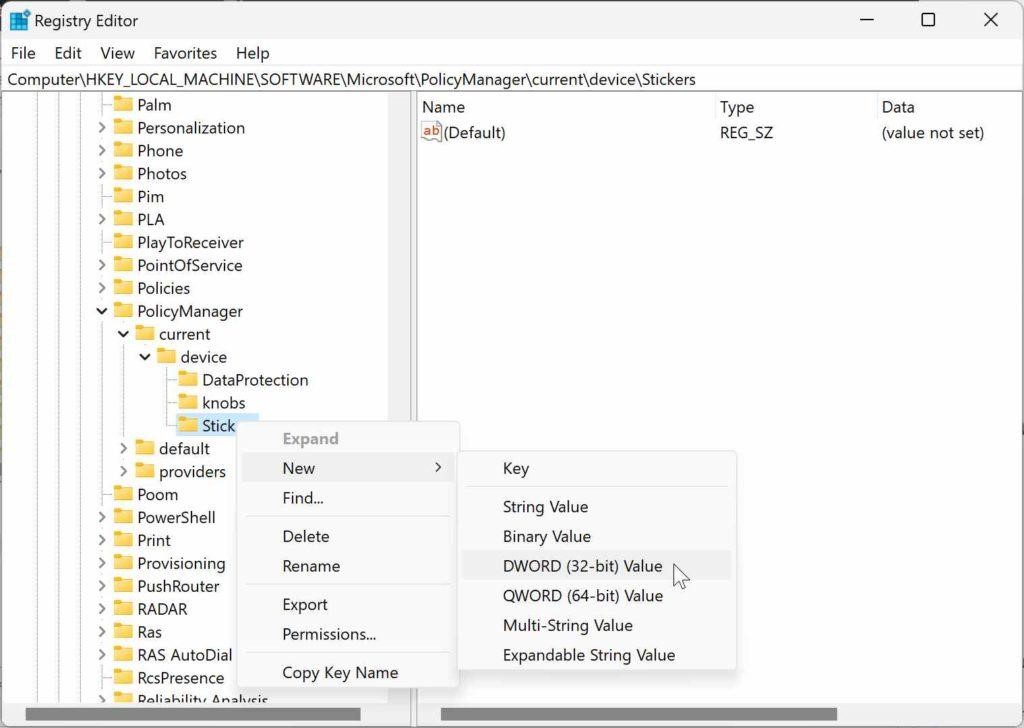
Step 8. Now, rename the new Registry Entry as EnableStickers.
Step 9. Double-click on EnableStickers. A new box will pop up with an option to set the Value data. Set the value to 1.
Step 10. Finally, reboot your PC to implement the new changes.
How to Add Desktop Stickers to Your Background?
After activating Desktop Stickers from the Registry Editor, you can add them to your wallpaper. There is no limit on how many stickers you can add to your desktop. But this goes without saying that more Stickers are equivalent to more RAM space.
Thus, we recommend our readers to use 1-2 Desktop Stickers at the start. That is because it is a beta feature yet, so nobody actually knows how it can impact your system’s performance.
Here are the simple steps to add Desktop Stickers on Windows 11:
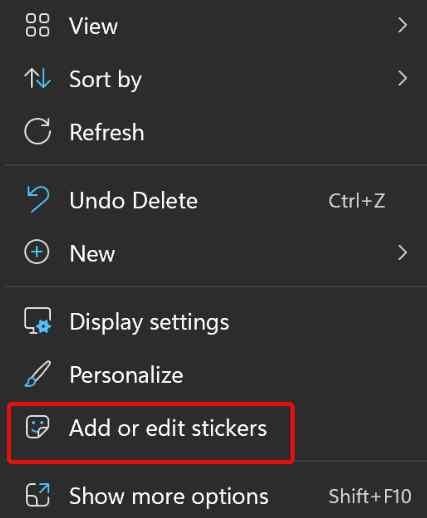
Step 1. Right-click on any empty space on your desktop and choose the Add or Edit Stickers option from the pop-up menu. Alternatively, open Windows Settings by pressing Windows and I keys. After that, select Personalization > Background > Add Stickers.
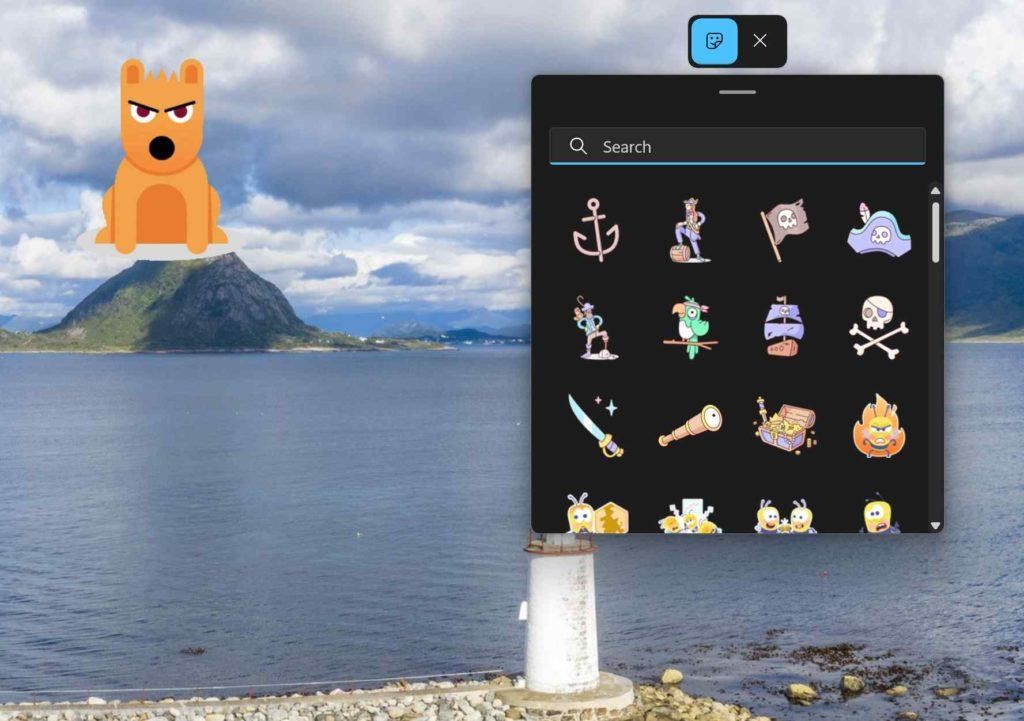
Step 2. You will now get a new Sticker Editor where you can select different stickers. In addition, you can use the search option to find your favorite stickers from a huge gallery.
Step 3. Click on the Sticker that you have selected, and it will be added to your desktop.
Step 4. Once the sticker is added to your desktop, right-click on it and select the Add or Edit Sticker option. The Sticker Editor will open up with features to resize or delete your stickers.
Step 5. In this mode, you can drag and drop the Sticker on your desktop to change its position. Once you are done, click on the X icon to close the Sticker Editor.
Step 6. You can also delete the Desktop Stickers in the Editor mode by clicking on the Recycle Bin icon.
How to Disable Desktop Stickers in Windows 11?
Windows 11 Desktop Stickers are fun. Unfortunately, they are just fun and nothing else. These Stickers are not boosting your productivity in any way. In fact, they can reduce your PC’s space by consuming extra space on your RAM.
Plus, the Desktop Stickers feature is an experiment with no further details. Thus, if you wish to disable Stickers at any point, simply follow these steps:

Step 1. Press the Windows and R keys to open the Run box. Then, type regedit and hit the Enter button.
Step 2. Once in the Registry Editor, navigate to this path—
HKEY_LOCAL_MACHINE\SOFTWARE\Microsoft\PolicyManager\current\device\
Step 3. Now, look for the Stickers key or change the EnableStickers Value to 0 from 1.
Step 4. Close the Registry Editor from the X icon and restart your PC to apply the changes. And you are done.
Should I Get the Desktop Stickers or Not?
Desktop Stickers is a new Microsoft experiment. So, if you love to try new things and want your desktop to look inspiring, there is no harm in trying Windows 11 Desktop Stickers.
However, before enabling Desktop Stickers in Windows 11, ensure you have significant free space in your RAM from Task Manager. If not, avoid getting the stickers, as they will only slow down your PC.
So, that’s it for now! For more Windows 11 guides, keep on following us on social networks.
Popular Post
Recent Post

Advanced SystemCare: Tool To Clean Your PC
Your computer slows down over time. Files pile up, junk builds inside the system, and things start to feel sluggish. You open a browser, and it takes forever. Programs crash without warning. This is a sign that your PC needs a good cleanup. Many users ignore these signs. They think buying a new computer is […]

Top 10 PC Cleaning and Optimization Tools For Windows 11/10
Discover the best PC cleaning and optimization tools for Windows 11 and 10. Remove junk files, improve speed, and keep your PC healthy with trusted cleaners.

Clear Microsoft Teams Cache On Windows PC [Complete Guide]
Learn how to clear Teams cache on Windows PC with 3 easy methods. Fix slowdowns, glitches, and errors fast. A simple guide for every Windows 11 user.

How To Clear Browsing History on PC: Chrome, Edge, Firefox, Opera
Learn how to clear browsing history on PC across Chrome, Edge, Firefox, and Opera with easy steps, tips, pros, and FAQs.

Clear Cache and Cookies: Complete Guide For Windows 11/10
Learn how to clear cache and cookies on Windows 10 and 11. This complete guide covers Chrome, Edge, and Firefox with simple, step-by-step instructions for every user.

How To Clean PC Trackpad/Touchpad Without Damaging It
Learn how to clean PC trackpad and clean PC touchpad safely with simple steps. Improve performance, remove dirt, and keep your laptop surface smooth and responsive.

How To Clean Your GPU/Graphics Card [Complete Guide]
Introduction A graphics card is one of the most important parts of a computer. It handles visuals, gaming, video editing, and design work. Over time, dust builds up inside it. This dust blocks airflow and traps heat. When heat increases, performance drops. In some cases, the system may even crash. That is why learning how […]

How To Clean PC Power Supply Unit Safely Without Damaging
Follow simple, safe steps to clean your computer’s power supply unit. Improve cooling, reduce overheating, and protect your PC’s performance.

How To Clean a CPU Without Damaging It [Complete Guide]
Learn how to clean a CPU safely without damage. Follow simple steps, precautions, and methods to improve cooling, boost performance, and extend your computer’s life.

How To Clear Browser Cache On Windows 11/10 [Chrome, FireFox, Edge]
Learn how to clear browser cache on Windows 11 and 10. Follow simple steps to clean browser cache, fix slow browsing, and improve performance easily.
