How to Fix the “All Cameras Are Reserved” Error on Windows
Are you trying to open the camera on your Windows PC to have a video call with your team? But every time you click on the video calling app, you get an “All Cameras Are Reserved” error message.
This is a 0xA00f4288 error code, often spotted on Windows 10 and now on Windows 11. This camera app error needs to be fixed immediately to resume video calling on your device.
Most people consider that other apps use the camera on their PC, leading to the 0xA00f4288 error code. But that’s not always true.
Many other reasons can contribute to this error. Thus, it is better to learn all the possible ways to fix the All Cameras Are Reserved error on Windows PCs.
Factors Contributing to the All Cameras Are Reserved Error on Windows
To fix the All Cameras Are Reserved error on Windows PCs, you must first understand the possible factors behind the error. This error doesn’t only occur when another app uses your PC’s camera; it can also happen when:
- Camera drivers are missing, outdated, or incompatible.
- The camera application’s files and cache are corrupted or incompatible with your operating system.
- Camera access is not permitted in Windows 10.
- An antivirus program is restricting the camera’s access.
- The camera app is corrupt.
- Other programs are making use of your camera.
- The camera settings are inappropriate.
- The Windows Defender Firewall is blocking the camera.
- Antivirus security policies exacerbate the error.
- Problematic updates have been installed on your computer.
- Microsoft Apps has out-of-date apps.
- Interference from incompatible proxy servers.
Here’s How to Fix the “All Cameras Are Reserved” Error on Windows PCs
Now that you know many things can contribute to the All Cameras Are Reserved error, let’s now see how you can fix this error on your computer. We came up with the following solutions to fix the All Cameras Are Reserved error on Windows PCs after an intensive search:
Solution 1. Update the Camera App
You should update the app to the most recent version to ensure your camera continues functioning properly. To access the Windows camera app, open the Microsoft Store and navigate to the Library. After that, click Get updates. Windows will automatically update all your installed apps, including your camera.
Solution 2. Restart Your Computer
In this situation, the first thing you can try is to restart your Windows PC. Most users’ problems were resolved with a simple restart. However, as it turns out, an issue can arise from a temporary glitch, and restarting is the best course of action.
Restart the computer, and the error must be resolved by now. If you answered yes, you are ready to go. However, if the problem persists, try the solutions listed below.
Solution 3. Repair the Camera App
Windows includes a repair option for its built-in applications. It can be used to remove any corrupted or missing system files causing the problem. The steps to repair the camera app are listed below.
Step 1. To begin, press the Windows + I shortcut key to access Settings.
Step 2. Select the Apps option.
Step 3. In the following window, select Apps & features.
Step 4. Locate the Camera, click the three-dots icon, and select the Advanced option.
Step 5. Select the Repair option.
Wait until the process is finished. Once completed, check to see if the All Cameras Are Reserved error message has been resolved. If not, select the Reset option from the Repair menu. It will return the camera application to its default settings.
Solution 4. Modify Permissions
You must grant the necessary permissions to run the camera application without issue. The problem occurs after updating the system to the most recent OS update. The steps to assign all necessary permissions are outlined below.
Step 1. Open Settings and navigate to the Privacy & security options on the left panel of the screen.
Step 2. Select Camera from the App permissions menu in the following window.
Step 3. Switch the toggle next to Allow apps to access your Camera.
Solution 5. Use the Camera Troubleshooter
You can also use the camera troubleshooter in this situation. It is a built-in feature of Windows OS that will resolve any minor issues with your system’s camera. Here’s how to use a camera troubleshooter on a PC running Windows.
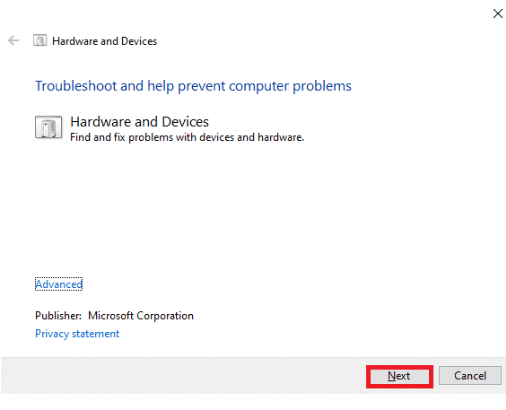
Step 1. Navigate to Settings.
Step 2. Click the Troubleshoot option on the System tab.
Step 3. Select Other troubleshooters in the following window.
Step 4. Select the Run option located next to the Camera.
Solution 6. Update Your Camera Drivers
An outdated camera driver is frequently the root of the problem. You must download the most recent camera driver update to fix the All Camera Are Reserved error on Windows PCs. Here’s how to go about it.
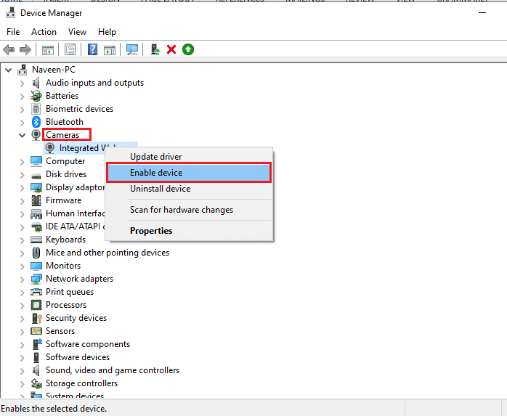
Step 1. Select Device Manager by pressing the Windows + X hotkeys.
Step 2. To expand the Camera option, double-click it.
Step 3. Select Update driver from the context menu.
Solution 7. Run Malware Scans
According to several Microsoft experts, scanning your PC will help keep your computer virus-free. However, you cannot use external or internal hardware devices if your PC has been infected with a virus or malware. As a result, you may encounter the 0xA00f4288 error code in Windows 10.
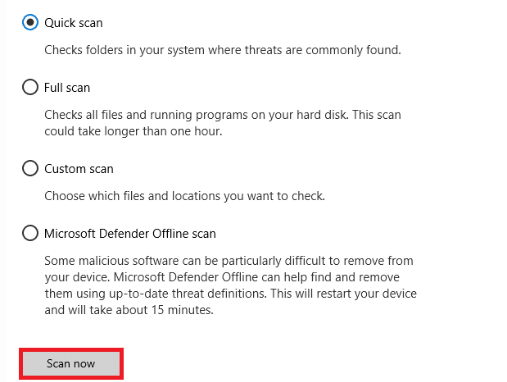
Many great antivirus software for Windows is available, like Norton, McAfee, CCleaner, and more. In addition, you can download the best tool to protect your PC from cyber threats.
Solution 8. Disable Windows Defender
Furthermore, the Windows Defender Firewall on your computer may prevent camera access for security reasons. If Windows Defender Firewall has blocked your camera, you must temporarily enable or disable the Firewall security on your computer.
Step 1. Open the Control Panel from the Windows search bar.
Step 2. Under the Control Panel, select the System and Security tab.
Step 3. Select Windows Defender Firewall from the System and Security menu.
Step 4. Turn Windows Defender Firewall on or off from the left-hand pane.
Step 5. The screen below will appear with various radio buttons to enable or disable Windows Defender Firewall for Private and Public network settings.
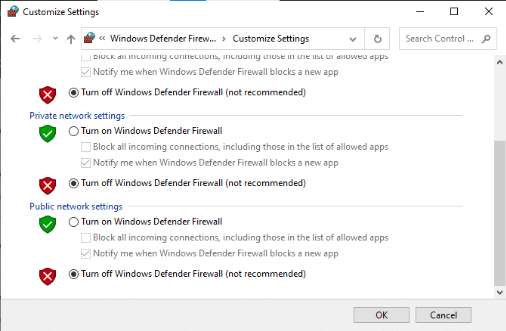
Step 6. To disable Windows Defender Firewall for Private network settings, check the box next to Turn off Windows Defender Firewall (not recommended) in Private network settings.
Step 7. Check on the “Turn off Windows Defender Firewall (not recommended)” option under Public network settings to disable Windows Defender Firewall.
Step 8. After that, click the OK button.
Step 9. Finally, the Windows 10 Firewall will be turned off.
Step 10. If you need to enable it again in the future, repeat the previous steps and again select the “Turn on Windows Defender Firewall” from both Private and Public network settings.
Solution 9. Tweak with the Registry Editor
Several users have confirmed that modifying some registry keys on their computer has fixed the All Cameras Are Reserved error in Windows PCs. To do the same, follow the steps outlined below.
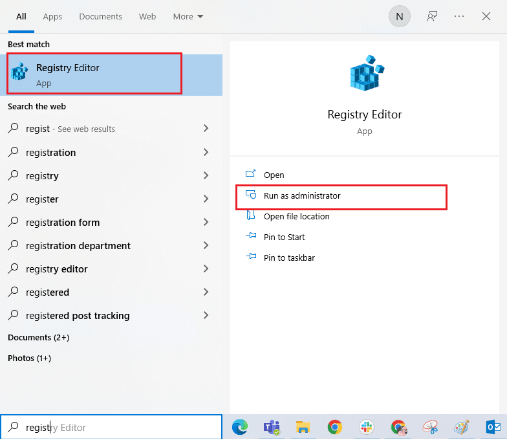
Step 1. Press the Windows key, enter Registry Editor, and select Run as administrator.
Step 2. Now, navigate to the specified key folder path in the Registry Editor.
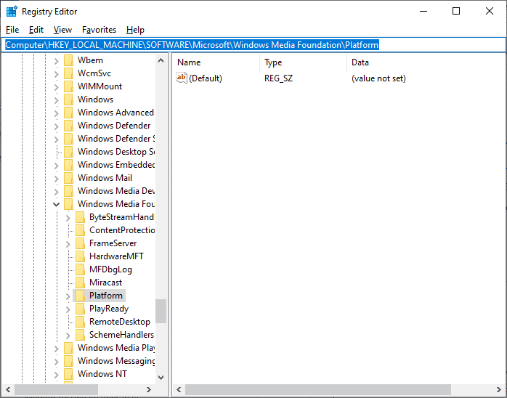
Computer\HKEY_LOCAL_MACHINE\SOFTWARE\Microsoft\Windows Media Foundation\Platform
Step 3. Now, right-click on Platform and select New, then Dword (32-Bit) Value, as shown.
Step 4. Then, as shown, name it EnableFrameServerMode.
Step 5. Then, double-click on the EnableFrameServerMode, enter 1 as the Value data, and click OK.
Step 6. Finally, restart your computer. Check to see if you’ve resolved the All Cameras Are Reserved error.
Solution 10. Reinstall the Problematic App
You have no choice but to reinstall apps if they are causing the All Cameras Are Reserved error code. Here are a few steps to reinstalling complex applications from the Microsoft Store. In this guide, we will show how to reinstall the Zoom app:
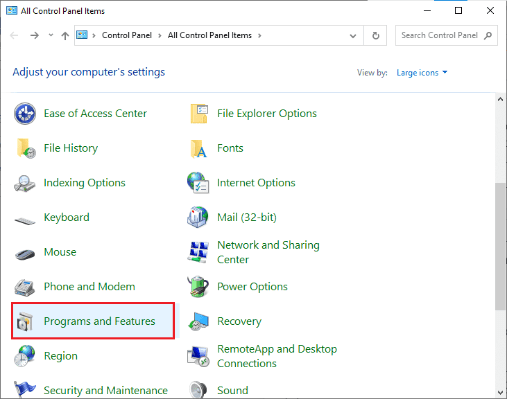
Step 1. Press the Windows key, type Control Panel, and then press the Open button.
Step 2. Set View by > Large Icons, then select Programs and Features.
Step 3. Now, select Uninstall from the Zoom menu.
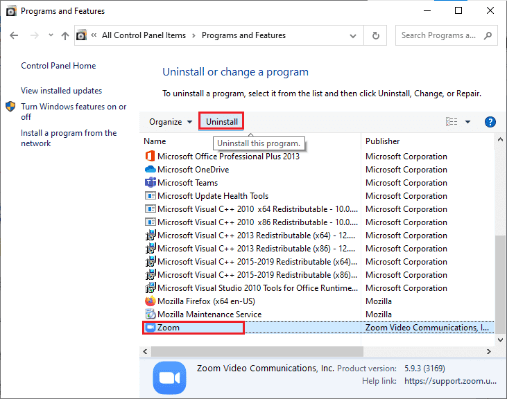
Step 4. After the app has been completely uninstalled, confirm any prompts and restart your computer.
Step 5. Go to the official Zoom download page and click the Download button.
Step 6. Now go to My Downloads and double-click the Zoom setup file to start it.
Step 7. To finish the installation on your PC, follow the on-screen instructions.
Step 8. You have now successfully reinstalled Zoom on your computer. Now see if you can resolve the 0xA00f4288 error code.
Solution 11. Reregister the Camera App
If none of the methods helped by far, try re-registering your camera as instructed below. There are two ways to complete the task.
I. Device Manager
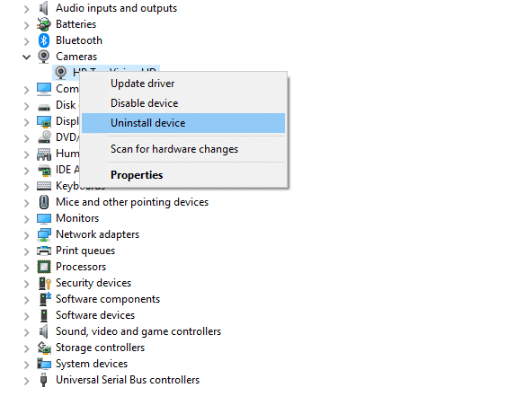
Step 1. Use Windows Search to open the Device Manager.
Step 2. Double-click on the Cameras section to expand it.
Step 3. Then, select the Uninstall device option when you right-click on the camera driver (HP TrueVision HD).
Step 4. Now, navigate to the Action tab and choose Scan for hardware changes.
II. PowerShell
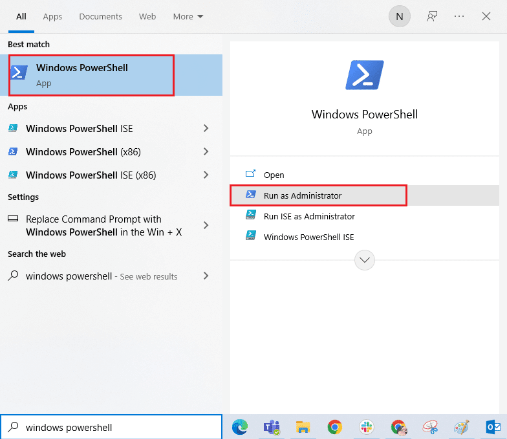
Step 1. Press the Windows key, enter Windows Powershell, and then select Run as Administrator.
Step 2. Then, press the Enter key and type the following command.
Get-AppxPackage -allusers Microsoft.WindowsCamera | Foreach {Add-AppxPackage -DisableDevelopmentMode -Register “$($_.InstallLocation)\AppXManifest.xml”}
Step 3. Wait until the common execution is complete before checking to see if you have resolved the All Cameras Are Reserved error.
Parting Remarks
There you go, peeps. You have learned how to fix the All Cameras Are Reserved error on Windows PCs.
As you can see, simply restarting your computer or updating the camera app can fix the problem. But if that didn’t work, you might have to tweak Registry settings or use PowerShell.
So, let’s try all the solutions and make the camera app work again on your PC. Meanwhile, do check other guides here.
Popular Post
Recent Post

Advanced SystemCare: Tool To Clean Your PC
Your computer slows down over time. Files pile up, junk builds inside the system, and things start to feel sluggish. You open a browser, and it takes forever. Programs crash without warning. This is a sign that your PC needs a good cleanup. Many users ignore these signs. They think buying a new computer is […]

Top 10 PC Cleaning and Optimization Tools For Windows 11/10
Discover the best PC cleaning and optimization tools for Windows 11 and 10. Remove junk files, improve speed, and keep your PC healthy with trusted cleaners.

Clear Microsoft Teams Cache On Windows PC [Complete Guide]
Learn how to clear Teams cache on Windows PC with 3 easy methods. Fix slowdowns, glitches, and errors fast. A simple guide for every Windows 11 user.

How To Clear Browsing History on PC: Chrome, Edge, Firefox, Opera
Learn how to clear browsing history on PC across Chrome, Edge, Firefox, and Opera with easy steps, tips, pros, and FAQs.

Clear Cache and Cookies: Complete Guide For Windows 11/10
Learn how to clear cache and cookies on Windows 10 and 11. This complete guide covers Chrome, Edge, and Firefox with simple, step-by-step instructions for every user.

How To Clean PC Trackpad/Touchpad Without Damaging It
Learn how to clean PC trackpad and clean PC touchpad safely with simple steps. Improve performance, remove dirt, and keep your laptop surface smooth and responsive.

How To Clean Your GPU/Graphics Card [Complete Guide]
Introduction A graphics card is one of the most important parts of a computer. It handles visuals, gaming, video editing, and design work. Over time, dust builds up inside it. This dust blocks airflow and traps heat. When heat increases, performance drops. In some cases, the system may even crash. That is why learning how […]

How To Clean PC Power Supply Unit Safely Without Damaging
Follow simple, safe steps to clean your computer’s power supply unit. Improve cooling, reduce overheating, and protect your PC’s performance.

How To Clean a CPU Without Damaging It [Complete Guide]
Learn how to clean a CPU safely without damage. Follow simple steps, precautions, and methods to improve cooling, boost performance, and extend your computer’s life.

How To Clear Browser Cache On Windows 11/10 [Chrome, FireFox, Edge]
Learn how to clear browser cache on Windows 11 and 10. Follow simple steps to clean browser cache, fix slow browsing, and improve performance easily.
