13 Ways to Reduce RAM Usage on Windows PC
Is your Windows PC lagging, crashing, or freezing on you a lot? Then, this is the case of a bloated RAM. And you have to reduce RAM usage on your Windows PC to solve the problem.
Random Access Memory is used by computers to effectively run apps, games, and other operations on your PC. It requires significant free space on RAM to perform daily computer operations like running software, playing music, and more.
What Can a Low RAM Space Cause on Your PC?
Every task you do on your computer takes up some space. For example, even right-clicking on an icon consumes a small amount of RAM.
If your computer’s RAM is overloaded, it will lag, and you’ll be unable to perform basic tasks. Furthermore, excessive RAM usage can result in a variety of Windows errors, including:
- Application or system failure
- Loading time is slow.
- Poor web browsing speed
- PC performance has suffered
How to Check If Your Windows PC’s RAM Is Being Overused?
Many operational factors can cause your computer to lag, crash, or freeze. As a result, if your PC is running slowly, it is not a sure sign that your RAM is being overused.
So, check your RAM usage before you make a decision. Here’s how you do it:
Step 1: Select Task Manager by pressing the combination Ctrl + Alt + Delete.
Step 2: If the Task Manager only displays a running program list, click More Details.
Step 3: Select Memory from the Performance menu.
Step 4: On the screen, you can see your PC’s RAM usage and how much memory is free and in use.
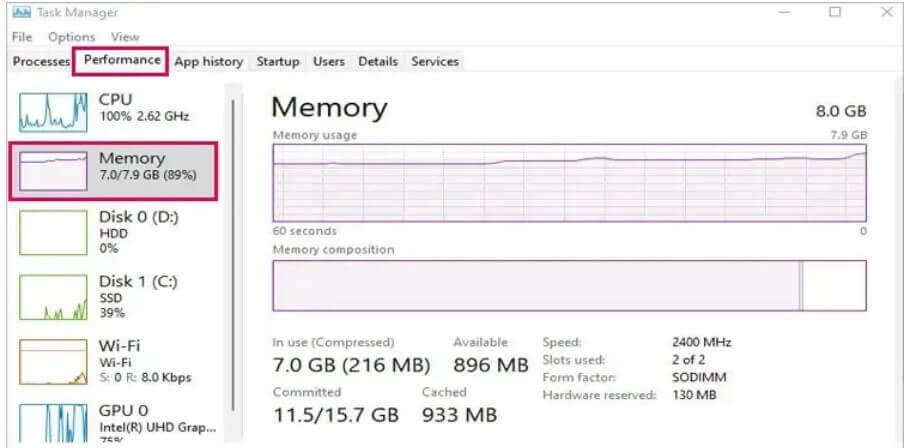
When idle, RAM typically consumes 3-5 GB. It may differ depending on the operating system. However, it is recommended that you have at least 5 GB of RAM available to perform your tasks smoothly.
You must also check the RAM usage for the Task Manager by performing the following steps:
Step 1: Navigate to Task Manager > Processes > Memory.
Step 2: You can now see the memory usage of each running application.
Here’s How You Can Reduce RAM Usage on Windows PC
Don’t replace your RAM until you’ve determined that your PC is running on low RAM. You can use the following 13 ways to reduce RAM usage on your Windows PC:
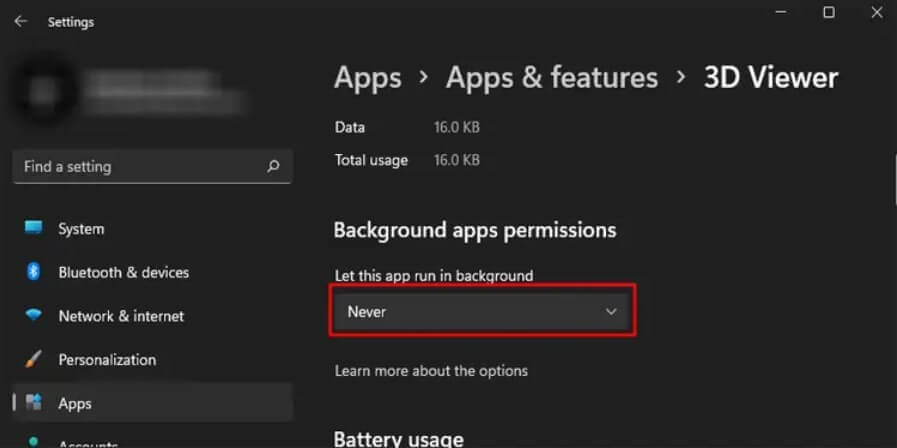
Way 1: Disable Background Programs
When you work on your computer, you may be unaware that several programs are running in the background. For example, game launchers, chat programs, and antivirus software frequently consume RAM in the background.
As a result, you can disable unwanted background programs and free up RAM space by doing the following:
Step 1: On the Taskbar, click the up arrow icon. When you hover over it, a box with the words “Show hidden icons” will appear on your screen.
Step 2: Right-click the application you want to stop running in the background.
Step 3: After that, press Quit or Exit and repeat the process on all unwanted apps.
Way 2: Disable High-Usage Programs
Use the following steps to disable background programs that are taking up a lot of space on your computer:
Step 1: Open the Task Manager with the help of Ctrl + Shift + Esc keys.
Step 2: Expand the Task Manager More Details pop-up.
Step 3: On the Details tab, left-click Memory to sort all processes by memory usage.
Step 4: Scroll down to see which app uses memory most.
Step 5: Select the programs that use a lot of memory and click End Task to turn them off.
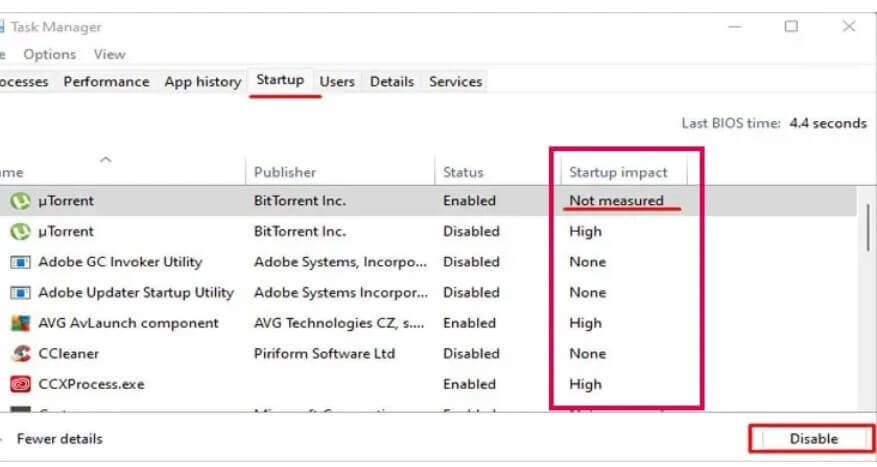
Way 3: Disable the Startup Application
High RAM usage on your PC is also caused by programs that start with your computer. Startup programs can take up a lot of RAM and slow down your PC’s boot time. As a result, you can disable specific apps from starting as follows:
Step 1: Navigate to the Task Manager > Startup tab.
Step 2: From there, you’ll be able to see all of the startup applications.
Step 3: Right-click on the programs with Low, None, or Not measured startup impact and select Disable.
Way 4: Modify Virtual Memory
Because of the memory shortage, your Windows PC will use memory from your storage devices to expand the RAM. This is referred to as virtual memory.
When a computer uses virtual memory, it uses a page file, which stores data from your hard drives. This can be used to remove excess data from RAM. To increase virtual memory, you must increase the page file size.
However, this does not imply that you can significantly modify the virtual memory. For example, you can configure virtual RAM to be as little as 1.5 times and a maximum of up to three times the actual computer’s RAM. Here’s how to boost virtual memory:
Step 1: Press the Windows + I keys to access the Windows Settings menu.
Step 2: Navigate to System > About > Advanced System Configuration.
Step 3: On the Advanced tab, beneath the Performance section, click on Settings.
Step 4: Go to the Advanced tab. Then, select Change under Virtual memory.
Step 5: Uncheck the box “Automatically manage paging file size for all drives.” Then, check the Custom size box.
Step 6: Select the Initial and Minimum sizes for your virtual memory and press OK.
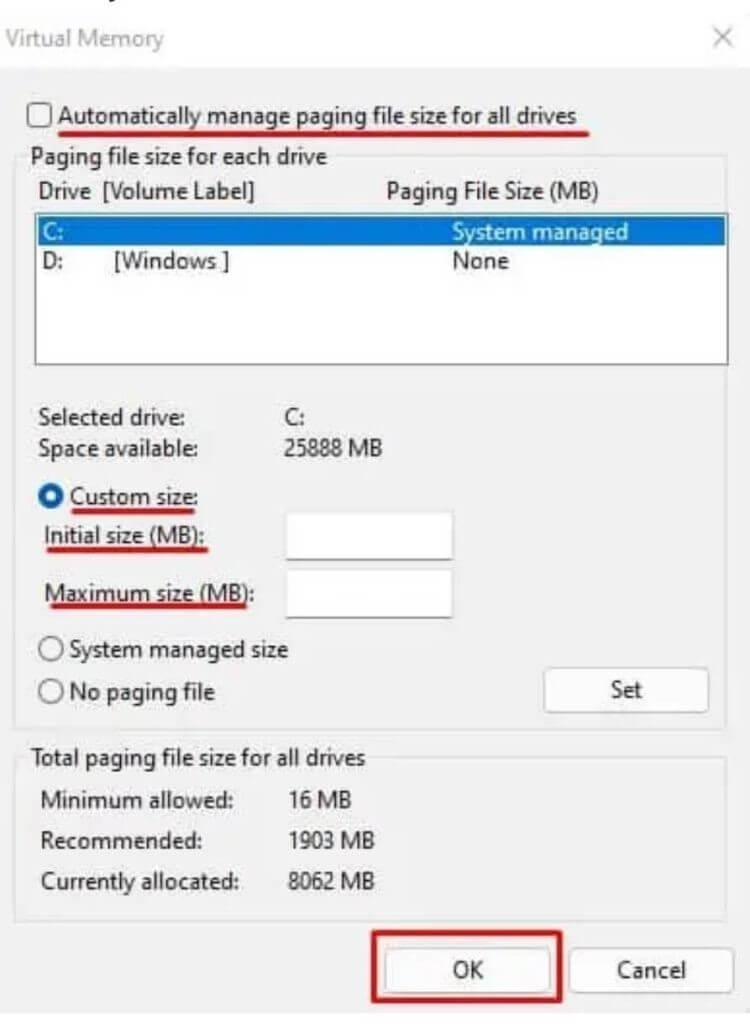
Step 7: Select Apply > OK. Then, restart your computer.
Way 5: Modify the NDU Value
Many Microsoft users experience an error displaying 99% memory usage. Even if the device has a significant amount of free RAM, you may receive an error message stating, “Computer low on memory.”
This error is caused by unidentified bugs in the Network Diagnostic Usage (NDU). Fortunately, you can resolve NDU errors by modifying Registry values. However, before tinkering with the Registry Editor, make a backup of your system. This way, you will not lose your data if something goes wrong.
After backing up your system, proceed as follows to change the NDU value:
Step 1: Hit the Windows + R keys to bring up the Run dialogue box.
Step 2: Type regedit and press Enter.
Step 3: Visit this location—
Computer\HKEY LOCAL MACHINE\SYSTEM\ControlSet001\Services\Ndu
Step 4: From the right panel, double-click on Start.
Step 5: Replace the value with 4 under Value data.
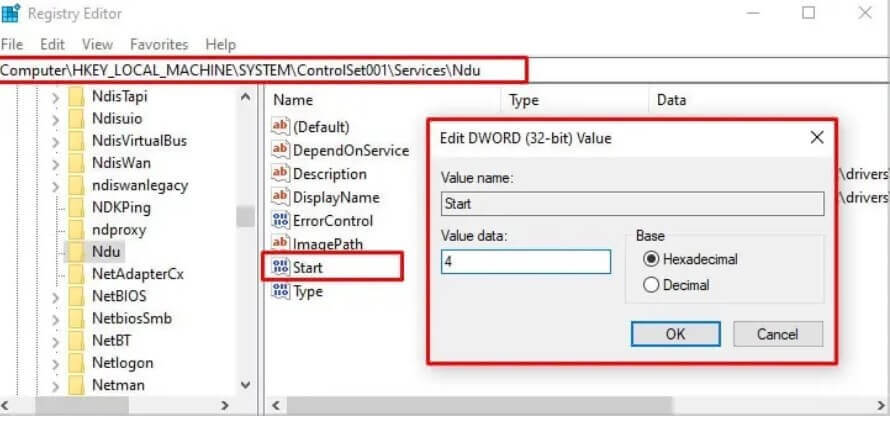
Step 6: Press the OK button.
Step 7: Restart your computer to reduce RAM usage on Windows PCs.
Way 6: Uninstall Browser Extensions
If your web browser is slow, it could be due to multiple browser extensions running in the background. You should remove unwanted browser extensions to reduce RAM usage on your Windows PC.
Each web browser has a unique method for deactivating extensions. This guide will demonstrate how to disable extensions in Chrome:
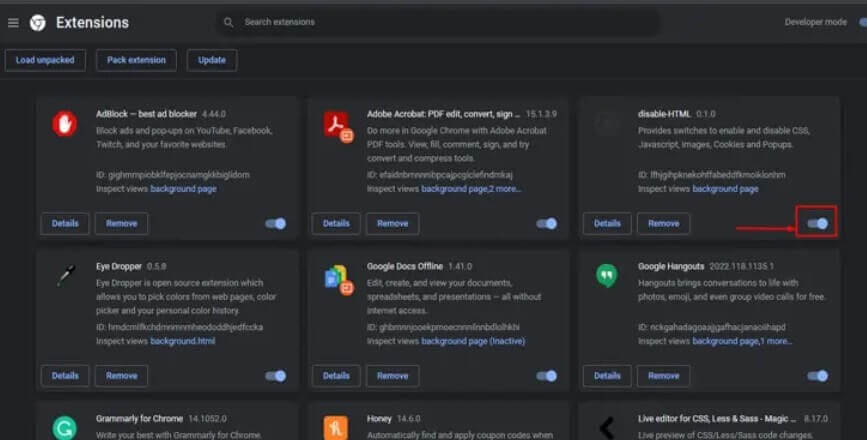
Step 1: Open the Chrome app and select the three vertical dots at the top.
Step 2: Navigate to Settings > Extensions.
Step 3: Toggle the button next to the extension you want to deactivate.
Way 7: Perform Virus Scans
Malware can consume memory space and reduce your computer’s overall performance if infected. So, if you notice an application taking up a lot of memory, you should run an antivirus scan.
Today, many excellent antivirus programs for Windows are available, including McAfee, Norton, CCleaner, and others. You can also virus scan your computer using the Windows default utility, Windows Defender, in addition to third-party tools. Here’s how to use Windows Defender:
Step 1: Open Settings by pressing Windows + I.
Step 2: Navigate to Privacy & Security > Windows Security > Windows Security > Open Windows Security.
Step 3: Choose Virus and threat protection.
Step 4: Navigate to Current Threats and click on the Scan Now button.
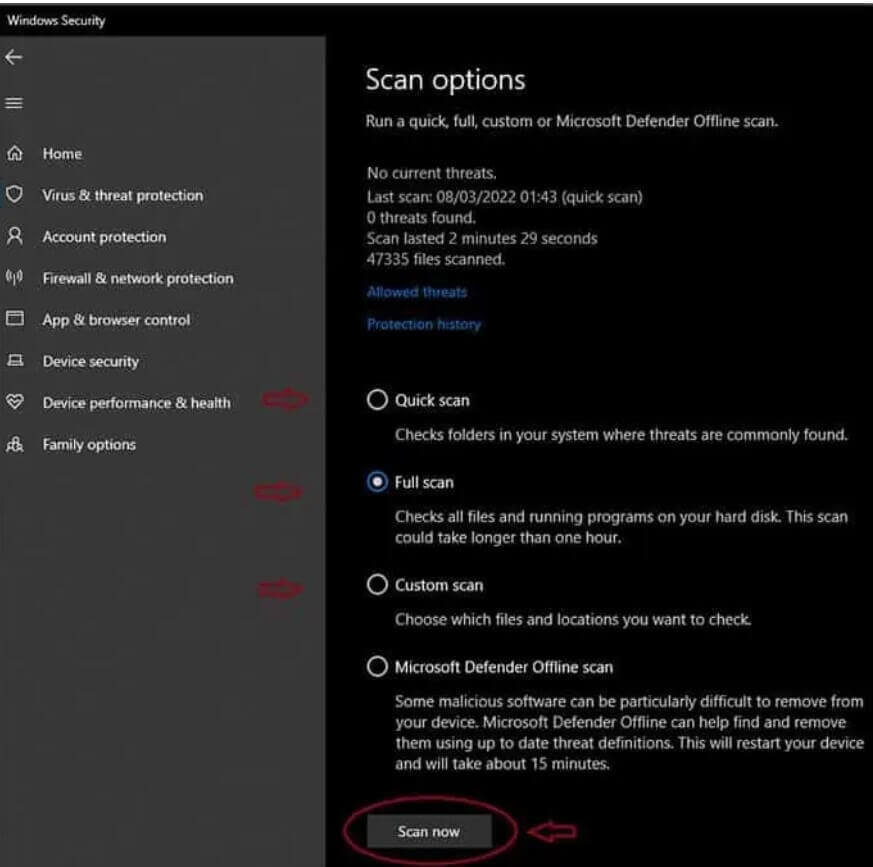
Step 5: Windows Defender will remove if there are any threats.
Way 8: Purchase a Dedicated Graphics Card
Without a dedicated GPU, your PC will share physical memory with graphical memory. That is, if your system only has integrated graphics, it will perform graphics-related tasks in RAM. This can result in high RAM usage during games, causing your system to lag.
As a result, when using a shared graphics card, the system does not need to share RAM. The GPU is capable of handling all graphics-related tasks.
Way 9: Turn off the Superfetch Services
Superfetch, also known as SysMain, is a background service that analyses your frequently used programs and preloads them into RAM. This will shorten the startup time of the application, but it may increase RAM usage.
So, try to disable SysMain services to reduce RAM usage on your PC. To accomplish this:
Step 1: Press the Windows + R keys to open the Run dialogue box.
Step 2: Type “services.msc” and hit Enter.
Step 3: In the Services window, double-click on SysMain or Superfetch.
Step 4: Change the Startup type to Manual and click the Stop button under the Service status.
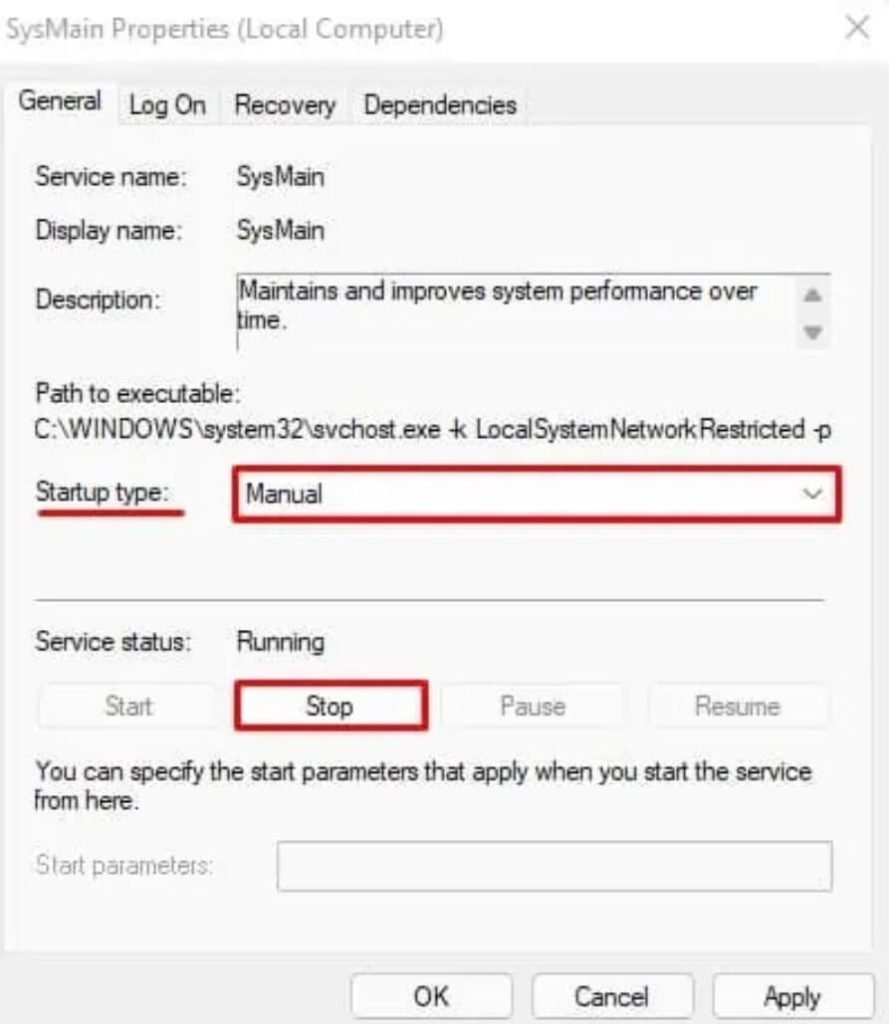
Step 5: Select Apply > OK.
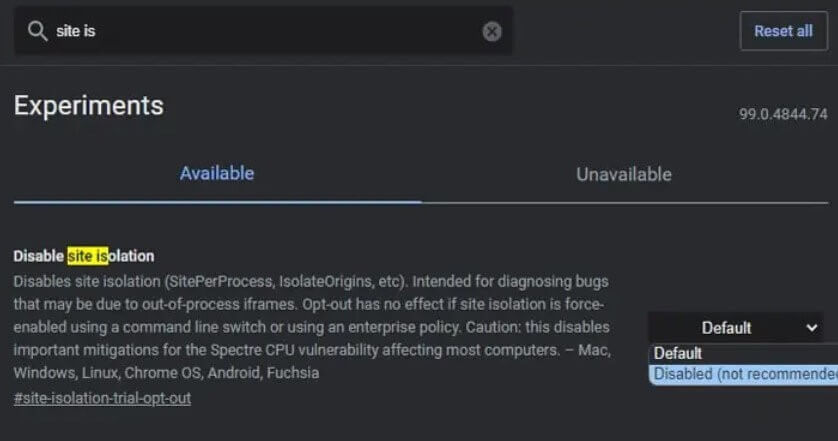
Way 10: Turn off Site Isolation
Site Isolation is enabled by default for Chrome users. This feature safeguards against malicious websites that can circumvent browser security to access data.
This setting, however, can result in excessive memory usage. Although we do not recommend disabling this setting, you can try this solution to reduce RAM usage if your PC is extremely slow. To disable Site Isolation, follow these steps:
Step 1: Launch Chrome and type chrome:/flags/ into the address bar.
Step 2: Next, look for Site Isolation.
Step 3: Expand the Site Isolation dropdown menu and select Disabled.
Way 11: Turn off Animations
Modern and stunning animations bring various interface elements to life in Windows 10 and 11. On the other hand, the animations are loaded into RAM and remain there indefinitely.
It is best to disable most or all animations to relieve RAM pressure. Particularly if you are already running low on memory. Here’s how to turn off Windows animations:
Step 1: Open the Start menu and look for “View advanced system settings.”
Step 2: Navigate to the Advanced tab, then to the Performance tab, and finally to the Settings tab.
Step 3: Select Adjust for optimal performance. Set it to Custom if you prefer. This way, animations will only work when there is enough free space.
Way 12: Close all Web Browser Tabs
If your internet browser is running at a snail’s pace, it could be because you have too many tabs open at once. If you are using Chrome and it is using a lot of memory. Each tab in Chrome runs a separate process and consumes a lot of RAM.
Close all tabs once finished preventing web browsers from hogging your memory. Next, close web browsers while playing or performing other time-consuming tasks on your computer.
Way 13: Increase your RAM Space
When nothing else works to reduce RAM usage on your Windows PC, you’re left with only one option: upgrade your RAM. This eliminates the need to disable background programs and remove applications. You can also view all Windows graphics on your device.
Furthermore, you can never have too much RAM. If your computer only has one RAM stick, purchase another to run sticks in Dual-channel mode. Dual-channel memory can boost your PC’s performance by 20-30%.
Furthermore, it is recommended that you purchase at least 16 GB of RAM to ensure that your system runs smoothly.
Let’s Reduce RAM Usage on Your Windows PC Now!
High RAM pressure is never a good thing. It causes your computer to be slow, sluggish, and buggy. As a result, always take preventive measures to reduce RAM usage on your Windows PC.
We’ve shared the top 13 solutions to reduce your RAM usage. We hope that these methods will assist you in improving the performance of your computer. Meanwhile, don’t forget to browse the rest of this website’s Windows guides.
Popular Post
Recent Post

Advanced SystemCare: Tool To Clean Your PC
Your computer slows down over time. Files pile up, junk builds inside the system, and things start to feel sluggish. You open a browser, and it takes forever. Programs crash without warning. This is a sign that your PC needs a good cleanup. Many users ignore these signs. They think buying a new computer is […]

Top 10 PC Cleaning and Optimization Tools For Windows 11/10
Discover the best PC cleaning and optimization tools for Windows 11 and 10. Remove junk files, improve speed, and keep your PC healthy with trusted cleaners.

Clear Microsoft Teams Cache On Windows PC [Complete Guide]
Learn how to clear Teams cache on Windows PC with 3 easy methods. Fix slowdowns, glitches, and errors fast. A simple guide for every Windows 11 user.

How To Clear Browsing History on PC: Chrome, Edge, Firefox, Opera
Learn how to clear browsing history on PC across Chrome, Edge, Firefox, and Opera with easy steps, tips, pros, and FAQs.

Clear Cache and Cookies: Complete Guide For Windows 11/10
Learn how to clear cache and cookies on Windows 10 and 11. This complete guide covers Chrome, Edge, and Firefox with simple, step-by-step instructions for every user.

How To Clean PC Trackpad/Touchpad Without Damaging It
Learn how to clean PC trackpad and clean PC touchpad safely with simple steps. Improve performance, remove dirt, and keep your laptop surface smooth and responsive.

How To Clean Your GPU/Graphics Card [Complete Guide]
Introduction A graphics card is one of the most important parts of a computer. It handles visuals, gaming, video editing, and design work. Over time, dust builds up inside it. This dust blocks airflow and traps heat. When heat increases, performance drops. In some cases, the system may even crash. That is why learning how […]

How To Clean PC Power Supply Unit Safely Without Damaging
Follow simple, safe steps to clean your computer’s power supply unit. Improve cooling, reduce overheating, and protect your PC’s performance.

How To Clean a CPU Without Damaging It [Complete Guide]
Learn how to clean a CPU safely without damage. Follow simple steps, precautions, and methods to improve cooling, boost performance, and extend your computer’s life.

How To Clear Browser Cache On Windows 11/10 [Chrome, FireFox, Edge]
Learn how to clear browser cache on Windows 11 and 10. Follow simple steps to clean browser cache, fix slow browsing, and improve performance easily.
