5 Ways to Change a User Account Type on Windows 11
A Windows account you use to access your system determines the level of your control. For example, Standard account holders can only perform limited activities on the computer. On the contrary, administrative account users have full control over other user accounts and system settings.
If you have multiple users listed on your computer, there might come a situation when you want to switch the account type. For instance, you might have to limit a user’s access when they misconduct.
Fortunately, it is easy to change the user account type on Windows. But, only administrators can change machine settings and user account type on Windows 11 anytime.
Let’s see how to change a user account type on Windows 11.
User Account Types on Windows 11
There are mainly two user accounts available on Windows 11 and Windows 10 — Standard and Administrative user accounts. However, there is also a provision to create a guest user account for temporary users.
Each Windows user account offers different authority and control over the computer. Let’s understand the privileges and limitations of every user account:
Administrative User Account
Admin accounts have full control over the computer system and other user accounts. The first account created during the Windows 11 installation process has administrative privileges. These account users can delete or download software or make system changes however they want.
Standard User Account
A standard account user has limited privileges to perform tasks on a computer. For instance, these accounts cannot change other user accounts’ settings or install computer-wide software.
By default, a new user account is always standard in Windows 11. However, you can manually change the user account type in Windows 11 and switch the standard account to an administrator account.
Guest User Account
Windows also allows you to create a guest user account. This account is created when a user is given access for a limited time to a computer. It is a temporary account with limited privileges.
How to Check Your User Account Type in Windows 11?
Before learning to change user account type in Windows 11, let’s understand how to check your account type. You can check your current user account type on Windows 11 by following these steps:
Step 1. From the Start menu, search for the Control Panel.
Step 2. On the Control Panel window, click on User Accounts.
Step 3. Again, click on User Accounts and check the account type under your username. There you will know whether your account type is Standard or Administrator.
To check all user accounts configured on your computer, follow these steps:
Step 1. Go to the Control Panel.
Step 2. You can click on the Change account type option from the User Accounts section.
Step 3. If only the email address is visible, it is a standard user account. But, if the email address and administrator are shown, it is an admin user account. If under the username, it says Local account; it is also a standard account.
Legacy User Accounts Settings
Alternatively, you can also use the legacy user accounts settings to figure out whether your account is admin or not. To do so, follow the steps:
Step 1. Press Windows + R keys to open the command box, type netplwiz, and press Enter.
Step 2. If the Group column states Administrator, the account is Administrator. If it reads Users, the account type is a standard account user.
How to Change a User Account Type on Windows 11?
After finding your user account type on Windows, the next step is learning how to change it. Microsoft allows you to change a user account type on Windows 11 in many ways, such as:
Way 1. Use the Settings App
From the Windows Settings app, you can easily change the user account. However, you have to first log in from an admin account. You will only get the privilege to change other users’ account settings.
Here’s how you can change a user account type on Windows 11 using the Settings app:
Step 1. Press Windows and I keys to open the Settings app on your computer.
Step 2. After that, navigate to the following path on the Settings window:
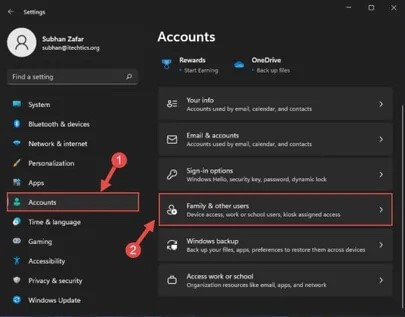
Accounts >> <a href=”http://ms-settings:otherusers”>Family & other users</a>
Step 3. Select the user account you want to change the type and expand it. Then, click on the Change account type next to the Account options.
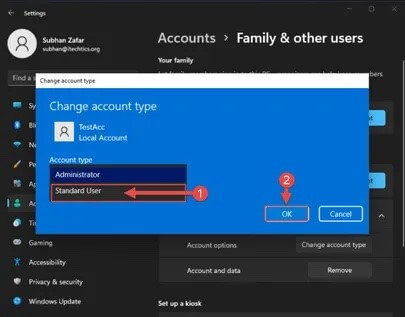
Step 4. Now, a pop-up will appear on your screen. From there, select Standard user from the dropdown menu and click on OK. This will switch your account type to a standard. You can follow the steps if you want to change the account type again.
Way 2. Use Control Panel
There is also a way to change a user account type from the Control Panel window. If you are comfortable using the Control Panel app, follow these instructions to change your account type:
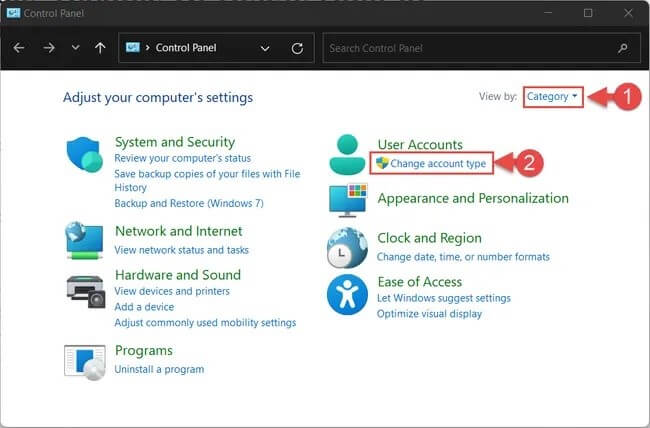
Step 1. Press Windows and R keys to open the command box. Type control and hit Enter.
Step 2. Choose the View by option as Category and next click on Change account type under the User Accounts.
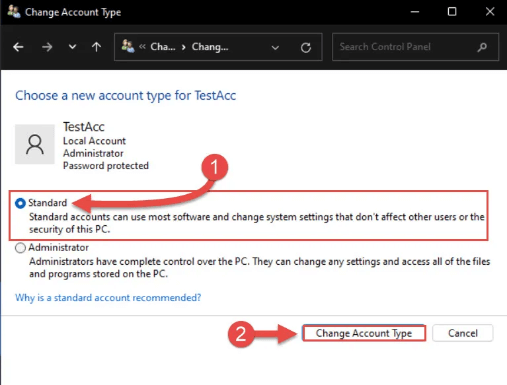
Step 3. After that, click on the account you want to change the type of.
Step 4. Click on the Change account type.
Step 5. Select the new account type in the next window and then click on the Change Account Type. You might notice that the button is grayed out because the account is already selected.
Way 3. Use the Netplwiz Command
Netplwiz is a command that will directly take you to the User Account window. This command can easily change the user account type on Windows 11 as long as you are logged in as an administrator. Follow these steps to use this command:
Step 1. Press Windows and R to open the Run dialogue box. Type netplwiz and press Enter.
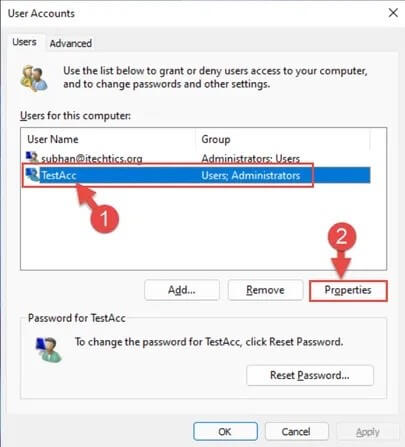
Step 2. On the User Account window, click on the user account you want to change and then click on the Properties.
Step 3. On the Properties window, go to the Group Membership tab, select the account type you want to change, and then click on Apply > OK to save the changes.
Way 4. Use the Computer Management Console
Group Management or Computer Management is yet another easy way to change a user account type on Windows 11. Usually, the account type is defined by which group it belongs to. That is because the account inherits its properties like privilege level.
Using the Computer Management console, you can define which user is a part of which group to control its type. For example, this method works as follows:
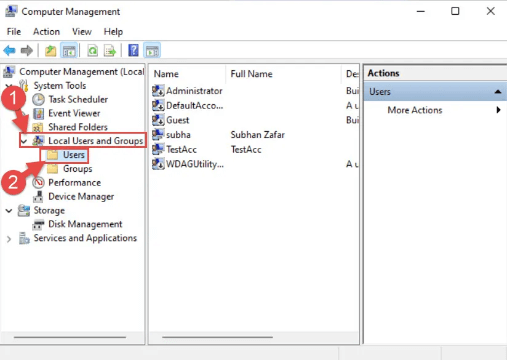
Step 1. Open the Run command box and type compmgmt.msc to launch the Computer Management.
Step 2. Expand Local Users and Groups from the left pane and click on the Users folder.
Step 3. Double-click on the user account from the middle pane that you wish to change.
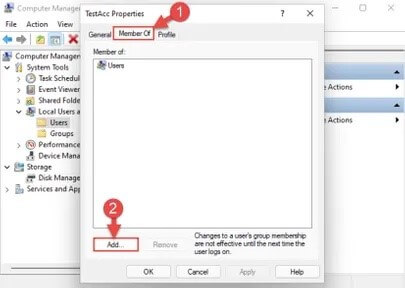
Step 4. From the Properties window, switch to the Member Of tab and click Add.
Step 5. A new popup window will appear. Under Enter the object name to select field, enter any of the following account types and click on Check Names:
Administrators: To change to an administrative account.
Users: To change to a standard account
Step 6. Once you see the group’s complete name and your PC’s name together, click OK.
Step 7. Go back to the Properties window, select the other group under the Member Of field, and click Remove.
Step 8. Finally, click on Apply > OK to save the changes.
Way 5. Use the Command Prompt
If you are comfortable with the Command Line interface, you can use it to change a user account type on Windows 11. You can either use the Command Prompt or Windows PowerShell. This method can even remove administrative users’ privileges and switch them to standard accounts or vice versa.
To switch user account type from standard to administrator using the Command Prompt, follow these steps:
Step 1. Open the Command Prompt as an administrator from the Search menu.
Step 2. On the Command Prompt window, enter this command line:
net users
Step 3. You can now use the exact names of the user accounts on your device. Now, you can use the command to add the user account to the Administrators group, replacing AccName with the account name you want to change.
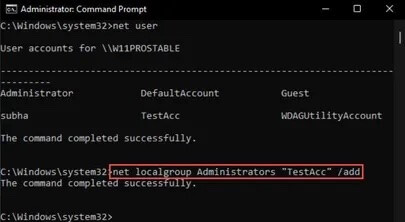
net localgroup Administrators “<em>AccName</em>” /add
To switch user account type from administrator to standard using the Command Prompt, launch the Command Prompt as an administrator. Now, use the following command to remove the user account from the Administrators group.
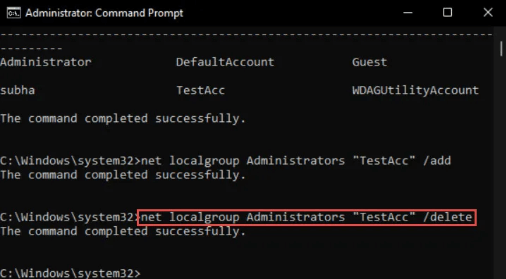
net localgroup Administrators “AccName” /delete
However, if you want to use Windows PowerShell to change the account type, follow these steps to change the standard account to an admin account:
Step 1. Launch PowerShell as an administrator and enter this command to get the user account names on your computer:
Get-LocalUser
Step 2. After that, add a user account to the administrators’ group in Windows 11. Don’t forget to replace AccName with the account name you want to change to:
add-LocalGroupMember -Group “Administrators” -Member “<em>AccName</em>”
To convert the account type to standard using PowerShell, use this command line:
remove-LocalGroupMember -Group “Administrators” -Member “AccName”
Conclusion
There you go, people! You can now change the account type on your Windows device. All the methods are easy to use. But if you are not a technical person, it is better to use the Control Panel or the Windows Settings app. Otherwise, you can also use the command line interface.
Regardless of your method, don’t forget to share your experience with us in the comments. Also, keep on following this portal for more information on technical guides.
Recommended Articles:
How To Clean a Laptop Fan Without Opening [2026 Guide]
Popular Post
Recent Post

Advanced SystemCare: Tool To Clean Your PC
Your computer slows down over time. Files pile up, junk builds inside the system, and things start to feel sluggish. You open a browser, and it takes forever. Programs crash without warning. This is a sign that your PC needs a good cleanup. Many users ignore these signs. They think buying a new computer is […]

Top 10 PC Cleaning and Optimization Tools For Windows 11/10
Discover the best PC cleaning and optimization tools for Windows 11 and 10. Remove junk files, improve speed, and keep your PC healthy with trusted cleaners.

Clear Microsoft Teams Cache On Windows PC [Complete Guide]
Learn how to clear Teams cache on Windows PC with 3 easy methods. Fix slowdowns, glitches, and errors fast. A simple guide for every Windows 11 user.

How To Clear Browsing History on PC: Chrome, Edge, Firefox, Opera
Learn how to clear browsing history on PC across Chrome, Edge, Firefox, and Opera with easy steps, tips, pros, and FAQs.

Clear Cache and Cookies: Complete Guide For Windows 11/10
Learn how to clear cache and cookies on Windows 10 and 11. This complete guide covers Chrome, Edge, and Firefox with simple, step-by-step instructions for every user.

How To Clean PC Trackpad/Touchpad Without Damaging It
Learn how to clean PC trackpad and clean PC touchpad safely with simple steps. Improve performance, remove dirt, and keep your laptop surface smooth and responsive.

How To Clean Your GPU/Graphics Card [Complete Guide]
Introduction A graphics card is one of the most important parts of a computer. It handles visuals, gaming, video editing, and design work. Over time, dust builds up inside it. This dust blocks airflow and traps heat. When heat increases, performance drops. In some cases, the system may even crash. That is why learning how […]

How To Clean PC Power Supply Unit Safely Without Damaging
Follow simple, safe steps to clean your computer’s power supply unit. Improve cooling, reduce overheating, and protect your PC’s performance.

How To Clean a CPU Without Damaging It [Complete Guide]
Learn how to clean a CPU safely without damage. Follow simple steps, precautions, and methods to improve cooling, boost performance, and extend your computer’s life.

How To Clear Browser Cache On Windows 11/10 [Chrome, FireFox, Edge]
Learn how to clear browser cache on Windows 11 and 10. Follow simple steps to clean browser cache, fix slow browsing, and improve performance easily.
