How to Create a Virtual Hard Drive in Windows 10/11?
A virtual Hard Drive, aka VHD, is the perfect substitute for your physical hard drives. Whenever you run out of hard drive space, you can create a virtual hard drive in Windows 10/11 and expand your storage space.
Sounds like a complex process?
Well, no. It is not at all hard to create a VHD in Windows. There is a simple way to create a virtual hard drive in Windows 10/11 with the built-in Disk Management tool. Within a couple of clicks, you can have a ready-to-use virtual HDD.
If you are creating VHD for the first time, this guide will help you learn about the process here. So, let’s get moving.
What is a Virtual Hard Drive?
A virtual hard drive is a file format that represents the VHD. It contains most elements available on a physical HDD, such as a file system and disk partitions. In addition, you can create files and folders on VHD. Therefore, it can be used as a typical hard disk for a virtual machine.
There is also a Hyper-V virtual hard disk file format. VHDX has a large 64 TB storage capacity compared to the 2TB limit of the VHD format. The latest VHD also offers data corruption protection during power outages and optimizes dynamic structural alignments.
VHDX also allows you to prevent disk performance degradation on new and large-sector physical disks. In addition, you can select between fixed-size or dynamically expanding VHD or VHDX files.
Fixed-size is a disk type that offers better performance. The virtual hard disk file allows you to use the maximum size when a virtual hard disk is created.
Dynamically expanding offers better usage of physical storage space. The VHD file grows to its maximum size because data is written on the virtual hard disk.
After creating a new .vhd or .vhdx file in Windows, you can copy or move it to any Windows 10/11 PC you want to mount it on. Once the file is mounted, it will appear as a drive on This PC to access it.
Benefits of Creating a Virtual Hard Disk in Windows 10/11
Creating a virtual hard disk can benefit Windows users in many ways, such as:
Easy storage. Using VHD, you will get a portable hard drive to expand your storage space. It will save you from the hassle of updating a new physical hard drive for a periodic need.
Install OS. VHD has the ability to install an operating system and dual-boot without altering your existing partitions. This feature comes in handy when you have limited space on your physical hard disk and have to update your OS.
Storage virtualization. You can create and set up virtual hard drive storage to support storage virtualization.
Easy backup. A virtual hard drive can work as a backup storage device to replicate your system. You can use VHD to restore system backup and smoothly run your operations when your system gets corrupted due to malware infection.
Integration with virtualization platforms. Setting up a VHD also enables users to use virtualization platforms like Hyper-V and VirtualBox.
Better security. You can encrypt and password-protect data in virtual hard drive space. It allows you to save your data as a single file. This way, you can better secure your files.
How to Create a Virtual Hard Drive in Windows 10/11?
Disk Management is the built-in Windows tool that allows you to create a virtual hard drive in Windows 10/11. There is no need to use third-party or any supporting software to create and set up a VHD. Here you can follow these steps to create mountable VHDs using the Disk Management tool:
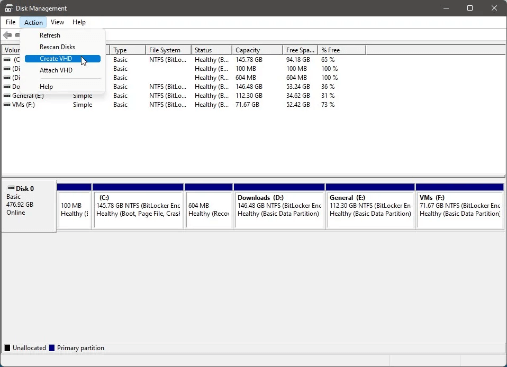
Step 1. First, you need to press the Windows + R keys to open the Run command box. After that, type diskmgmt.msc and press Enter to open the Disk Management application. Alternatively, search the Start menu for Create and format hard disk partitions.
Step 2. Once on the Disk Management window, go to Actions > Create VHD. It will take you to the VHD creation wizard.
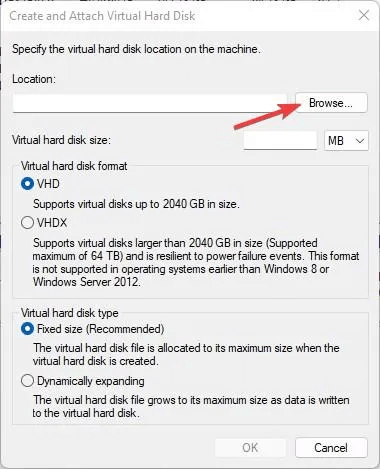
Step 3. Click on the Browse button. Next, go to a drive or folder where you want to save the VHD file, give a name of your choice in the File Name field and press the Save button.
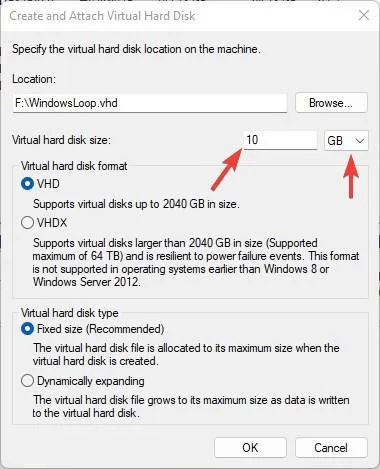
Step 4. Next, you can select GB from the Virtual hard disk size tab and enter the figure of hard disk space you want to allot in the blank field next to it.
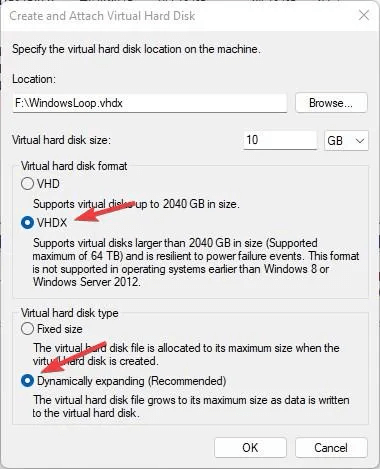
Step 5. After that, select the VHDX and Dynamically expanding options and hit the OK button. However, if you have chosen the VHD format in the previous step, you should select the Fixed size option.
Step 6. Wait for a few minutes, and you have now successfully created a virtual hard drive in Windows 10/11. So, the next step is to set up and initialize your virtual hard disk.
How to Set Up a Virtual Hard Drive in Windows 10/11?
Now that you have successfully created a virtual hard drive on your system, the next step is learning how to set it up is essential. That is because creating a VHD is one part, and it is useless unless you initialize it on your Windows system. Here’s how you can set up a virtual drive in Windows 10/11:
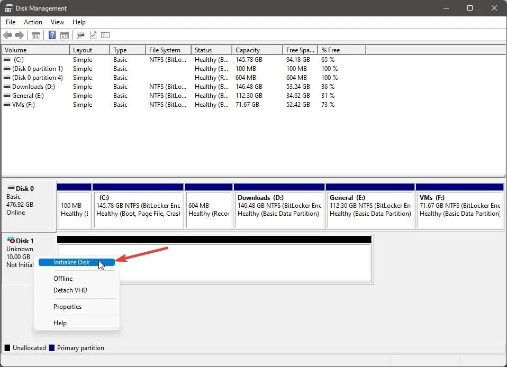
Step 1. Right-click on the new drive button present on the far-left side and click on the Initialize Disk option.
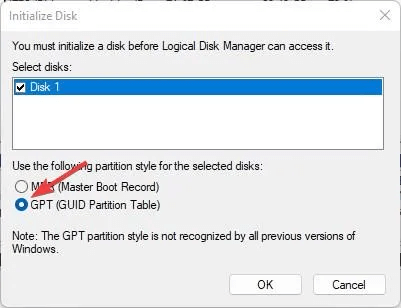
Step 2. Select your disk from the list. Look for the MBR (Master Boot Record) option. You can also select the GPT (GUID Partition Table) if your Windows OS supports it. And click on the OK button.
Step 3. Right-click on the Unallocated space and choose the New Simple Volume option.
Step 4. Click on Next.
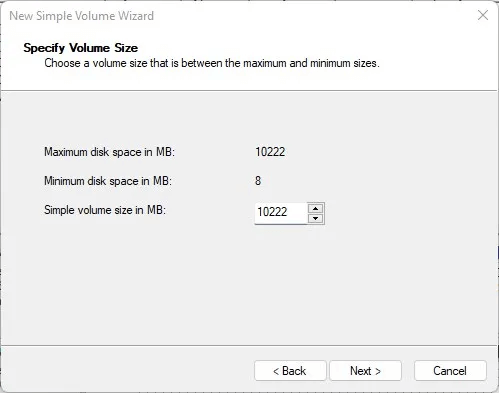
Step 5. Specify the partition size. You can leave this option unchanged if you plan to utilize all the available partition space. Click on Next.
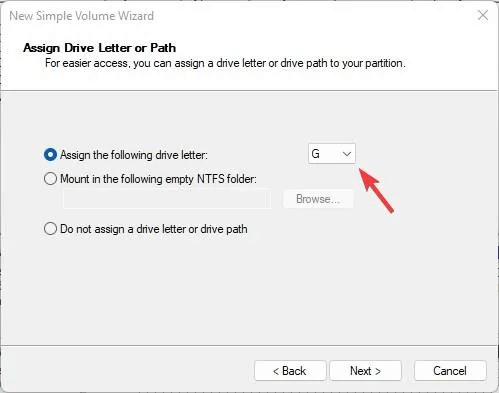
Step 6. Use the dropdown menu to select the drive letter you wish to assign to the drive. Click Next.
Step 7. Now, under the Format this volume with the following settings section, you can select these settings:
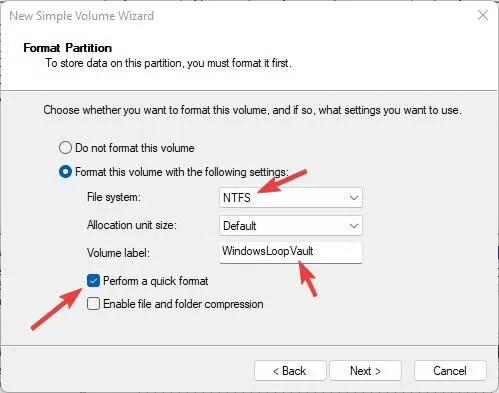
File System: NTFS
Allocation unit size: Default
Volume label: Enter your name or your drive’s name
Perform a quick format: Formats the drive faster
Enable file and folder compression: You can skip this option
Step 8. Click OK > Finish, and you are done.
How to Mount a VHD on Windows 10/11?
Usually, your virtual hard disk will automatically mount to your device. But, if you cannot mount your VHD to your Windows device or create another VHD, you need to know how to attach and detach the virtual drive.
Here’s how you can mount the VHD on Windows:
Step 1. Go to the Start menu and search for Disk Management.
Step 2. Click on the Action button > Attach VHD option.
Step 3. Click on the Browse button and look for your .vhd or .vhdx files. If you only plan to view and extract files from the drive, just check the Read-only option to prevent accidental deletion or damage to your virtual drive data.
Step 4. Click OK, and your virtual drive will now be mounted to your device.
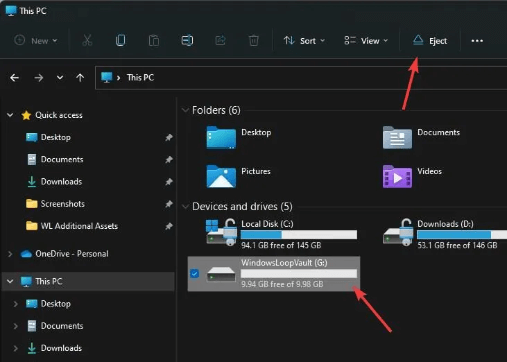
How to Dismount a VHD on Windows 10/11?
Once your work is done, you can dismount your VHD from your computer system. However, before doing that, ensure to backup files and applications stored on your virtual drive to prevent data loss. Here’s how you can dismount a virtual drive:
Step 1. Open Disk Management from the Start menu.
Step 2. Right-click on the drive button and select the Detach VHD option.
Step 3. Follow all the on-screen steps carefully to detach the virtual drive. Otherwise, you might end up corrupting your data. After following these steps, you can successfully dismount your virtual drives.
Parting Remarks
Now, you are ready to create a virtual hard drive in Windows 10/11. You can also set up, mount, and unmount the hard disk on your Windows devices.
As you have noticed, no third-party software is required to create a virtual drive. Instead, you can simply use default Disk Management software to create your virtual hard drive.
So, now let’s go and create your virtual hard drive. Meanwhile, keep on following us for more Windows updates and guides.
Popular Post
Recent Post

Advanced SystemCare: Tool To Clean Your PC
Your computer slows down over time. Files pile up, junk builds inside the system, and things start to feel sluggish. You open a browser, and it takes forever. Programs crash without warning. This is a sign that your PC needs a good cleanup. Many users ignore these signs. They think buying a new computer is […]

Top 10 PC Cleaning and Optimization Tools For Windows 11/10
Discover the best PC cleaning and optimization tools for Windows 11 and 10. Remove junk files, improve speed, and keep your PC healthy with trusted cleaners.

Clear Microsoft Teams Cache On Windows PC [Complete Guide]
Learn how to clear Teams cache on Windows PC with 3 easy methods. Fix slowdowns, glitches, and errors fast. A simple guide for every Windows 11 user.

How To Clear Browsing History on PC: Chrome, Edge, Firefox, Opera
Learn how to clear browsing history on PC across Chrome, Edge, Firefox, and Opera with easy steps, tips, pros, and FAQs.

Clear Cache and Cookies: Complete Guide For Windows 11/10
Learn how to clear cache and cookies on Windows 10 and 11. This complete guide covers Chrome, Edge, and Firefox with simple, step-by-step instructions for every user.

How To Clean PC Trackpad/Touchpad Without Damaging It
Learn how to clean PC trackpad and clean PC touchpad safely with simple steps. Improve performance, remove dirt, and keep your laptop surface smooth and responsive.

How To Clean Your GPU/Graphics Card [Complete Guide]
Introduction A graphics card is one of the most important parts of a computer. It handles visuals, gaming, video editing, and design work. Over time, dust builds up inside it. This dust blocks airflow and traps heat. When heat increases, performance drops. In some cases, the system may even crash. That is why learning how […]

How To Clean PC Power Supply Unit Safely Without Damaging
Follow simple, safe steps to clean your computer’s power supply unit. Improve cooling, reduce overheating, and protect your PC’s performance.

How To Clean a CPU Without Damaging It [Complete Guide]
Learn how to clean a CPU safely without damage. Follow simple steps, precautions, and methods to improve cooling, boost performance, and extend your computer’s life.

How To Clear Browser Cache On Windows 11/10 [Chrome, FireFox, Edge]
Learn how to clear browser cache on Windows 11 and 10. Follow simple steps to clean browser cache, fix slow browsing, and improve performance easily.
