How to Enable or Disable USB Port in Windows 11
Have you ever encountered blocked USB drive access? We believe the answer will be yes; you must have dealt with many USB drive issues.
This happens because administrators have disabled USB drive detection on your Windows 11. Disabling the USB port in Windows 11 is important to protect your data as anyone can connect an unauthorized USB to your computer and copy your files.
So, it is essential to learn how to enable or disable USB ports in Windows 11 to protect your private data. And this guide will walk you through all the possible ways to enable or disable a USB port on your Windows 11. Let’s get moving.
How to Enable or Disable USB Port in Windows 11 (6 Methods)
USB ports allow you to connect your pen drive or USB drive to your PC to transfer data in minutes. It is the best offline method to exchange files and folders.
But unfortunately, it can be risky too. If anyone gets unauthorized access to your computer, they can easily steal your data using the USB drive.
Therefore, administrators have to disable the USB port so that only authorized users can connect USB drives to your Windows 11. So, let’s see how you can enable or disable USB ports in Windows 11:
Method 1. Use the Registry Editor
If you are a pro-Windows user, go to the Registry Editor to enable or disable USB ports in Windows 11. Here the key point is a pro user. If you haven’t ever tweaked registry settings, don’t follow this method, as you might end up corrupting your entire system.
Even if you are comfortable with the registry settings, ensure that you create the registry data backup. It is a precautionary step in case you lose any data during the process.
Follow these steps to disable the USB ports using the Registry Editor:
Step 1. Press the Windows + R keys on your keyboard to open the Run command box.
Step 2. Type regedit in the Run command window and hit Enter to open the Registry Editor window.
Step 3. Follow this path in the Registry Editor address bar and press the Enter button.
HKEY_LOCAL_MACHINE\SYSTEM\CurrentControlSet\Services\USBSTOR
Step 4. After that, go to the right side of the window and double-click on the DWORD Value — Start.
Step 5. Go to the Edit DWORD (32-bit) Value dialogue box and change the Value Data field to 4.
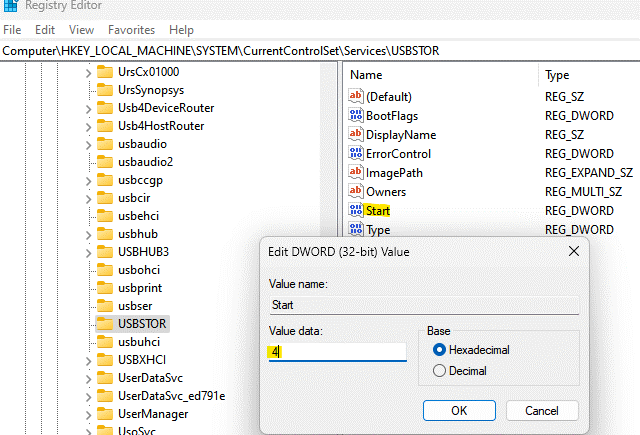
Step 6. Press OK to save the changes. Close the Registry Editor window and restart your computer to check if the USB port access is disabled.
Now, to enable the USB port using the Registry Editor, go to:
Step 1. Open the Run dialogue box and search for regedit.
Step 2. After that, enter this path again in the Registry Editor.
HKEY_LOCAL_MACHINE\SYSTEM\CurrentControlSet\Services\USBSTOR
Step 3. Now, go to the Edit DWORD (32-bit) Value dialogue box and change the Value Data field from 4 to 3.
Method 2. Use the Group Policy Editor
Not everyone has access to the Local Group Policy Editor on Windows systems. However, if you are fortunate enough to have access to the same, you can make a group editor enable or disable USB ports on your Windows 11 computer. To do so, follow these steps:
Step 1. Go to Start, right-click on it and launch the Run command box.
Step 2. Type gpedit. msc and hit OK to launch the Local Group Policy Editor.
Step 3. On the new window, double-click to expand the Administrative Templates option from the left pane.
Step 4. After that, double-click to expand the System option.
Step 5. Next, go to the right side of the pane, scroll down and look for Removable Storage Access settings. And double-click on it.
Step 6. After that, scroll down and look for Removable Disks: Deny execute access. Double-click to open the settings.
Step 7. On the Removable Disks: Deny execute access window; select the radio button to enable or disable the execute access for removable disks.
Step 8. Press Apply > OK to save the changes and move back to the Removable Storage Access window.
Step 9. Follow Steps 6 and 7 for Removable Disks: Deny read access and Removable Disks: Deny write access to enable or disable both settings.
Method 3. Use Device Manager
Device Manager also enables you to disable the USB ports on your computer. Here’s how you can disable or enable your USB port using Device Manager:
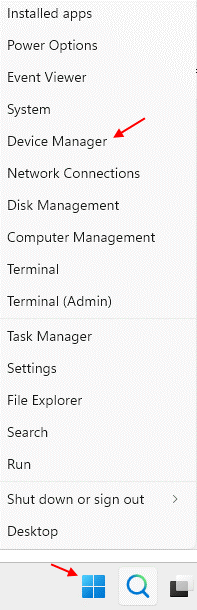
Step 1. Go to the Start menu, right-click on it and choose Device Manager from the context menu.
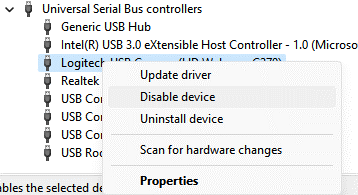
Step 2. On the Device Manager window, go to the Universal Serial Bus controller section and expand it. Look for all the available USB ports, right-click on them all and select Disable.
Step 3. Under the System devices section, also look for the USB ports and disable them all. Similarly, enable the USB ports by clicking on the Enable after right-clicking on the USB ports.
Method 4. Uninstall USB Mass Storage Drivers
If you are worried about system security, you can even uninstall the USB Mass Storage Drivers. This way, you can disable all USB ports at once. Here’s how to do it:
Step 1. Press the Windows + R keys to launch the Run command box.
Step 2. Type devmgmt.msc in the search field and hit Enter to open the Device Manager window.
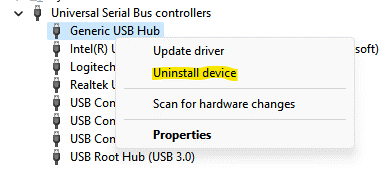
Step 3. Go to the Universal Serial Bus controllers section and expand the menu.
Step 4. Look for the USB Mass Storage Device option, right-click and select Uninstall. Now, all the USB ports are disabled on your computer.
Now, to reinstall the USB ports, connect a USB drive to your PC, and your system will automatically start looking for drivers. Once the system doesn’t find any drivers, it will automatically prompt you to install them. Just follow the on-screen instructions to finish the installation.
You can also use third-party driver installers like Driver Easy to install the accurate drivers on your system.
Method 5. Enable Specific USB Devices
From the group policy, it is possible to allow only specific USB devices to connect to your computer. Just go to Computer Configuration > Administrative Templates > System > Device Installation> Device Installation Restrictions > Allow Installation of devices that match any of these Device IDs.
To find your authorized Device IDs, follow this path: Device Manager > Properties > Details tab > Device Instance Path.
Method 6. Use a Third-party Tool
You can always download a USB drive disabler or enabler on your computer to automatically enable or disable the USB ports. Many great and free USB drive managers are available, such as IntelliAdmin.
Parting Notes
The USB ports are essential for transferring data on your computer without the internet. But if security is your main concern, you can easily disable the USB ports.
Plus, it is super simple to enable the USB ports in Windows 11 anytime. So, let’s disable USB ports and enhance your device’s security now.
Oh, and don’t forget to check other posts on this website for more information on Windows 11.
Popular Post
Recent Post

Advanced SystemCare: Tool To Clean Your PC
Your computer slows down over time. Files pile up, junk builds inside the system, and things start to feel sluggish. You open a browser, and it takes forever. Programs crash without warning. This is a sign that your PC needs a good cleanup. Many users ignore these signs. They think buying a new computer is […]

Top 10 PC Cleaning and Optimization Tools For Windows 11/10
Discover the best PC cleaning and optimization tools for Windows 11 and 10. Remove junk files, improve speed, and keep your PC healthy with trusted cleaners.

Clear Microsoft Teams Cache On Windows PC [Complete Guide]
Learn how to clear Teams cache on Windows PC with 3 easy methods. Fix slowdowns, glitches, and errors fast. A simple guide for every Windows 11 user.

How To Clear Browsing History on PC: Chrome, Edge, Firefox, Opera
Learn how to clear browsing history on PC across Chrome, Edge, Firefox, and Opera with easy steps, tips, pros, and FAQs.

Clear Cache and Cookies: Complete Guide For Windows 11/10
Learn how to clear cache and cookies on Windows 10 and 11. This complete guide covers Chrome, Edge, and Firefox with simple, step-by-step instructions for every user.

How To Clean PC Trackpad/Touchpad Without Damaging It
Learn how to clean PC trackpad and clean PC touchpad safely with simple steps. Improve performance, remove dirt, and keep your laptop surface smooth and responsive.

How To Clean Your GPU/Graphics Card [Complete Guide]
Introduction A graphics card is one of the most important parts of a computer. It handles visuals, gaming, video editing, and design work. Over time, dust builds up inside it. This dust blocks airflow and traps heat. When heat increases, performance drops. In some cases, the system may even crash. That is why learning how […]

How To Clean PC Power Supply Unit Safely Without Damaging
Follow simple, safe steps to clean your computer’s power supply unit. Improve cooling, reduce overheating, and protect your PC’s performance.

How To Clean a CPU Without Damaging It [Complete Guide]
Learn how to clean a CPU safely without damage. Follow simple steps, precautions, and methods to improve cooling, boost performance, and extend your computer’s life.

How To Clear Browser Cache On Windows 11/10 [Chrome, FireFox, Edge]
Learn how to clear browser cache on Windows 11 and 10. Follow simple steps to clean browser cache, fix slow browsing, and improve performance easily.
