How to Remove Viruses from Your Mac Computer?
Has your MacBook or iMac slowed down lately? Is your Mac screen swamped with annoying ads? Have your browser settings changed?
In short, is your Mac device behaving weirdly?
Then, all these are telltale signs that your Mac has a virus infection. Yes, Mac is not a 100% virus-proof machine as you think. Several harmful Mac viruses are available to slow down performance and tamper with your privacy.
Fortunately, it is easy to remove viruses from Mac devices. This guide shows all the possible solutions to make your Mac virus-free. So, let’s start the show.
Can Macs Catch a Virus Infection?
Macs have been considered one of the safest operating systems compared to Windows. Thanks to features like GateKeeper that don’t let Mac users install anything not approved by Apple.
But the tremendous popularity and increased Mac user base have put Mac devices on the radar of hackers and cybercriminals. Many advanced adware, malware, and PUP (potentially unwanted programs) have been designed to attack Mac gadgets.
So, the answer is Yes. Macs can indeed be infected with viruses if you are not cautious.
Common Symptoms of Mac Viruses
Before removing viruses from your Mac, let’s understand how you can detect early signs of Mac virus infections. Here are some common symptoms of Mac viruses:
- Macs can become sluggish or laggy in performing daily operations.
- There is a new toolbar in your browser that you have not installed. These toolbars claim to improve your search experience.
- Your search results are taking you to unexpected websites that you have never heard of before.
- All your web pages are loaded with ads, even those where you have never seen ads before.
- You cannot browse common websites, and it redirects you to spam advertising pages.
- Advertising windows have popped up on your desktop and don’t go away after several attempts.
- You find an application on your device that you have not installed, and it’s asking for your administrator password.
How to Remove Viruses from Your Mac Manually?
If you observe any of the Mac virus symptoms on your device, you should immediately take proactive actions to fix them. Using powerful Mac cleaners like CleanMyMac, you can easily scan your Mac for viruses, malware, and adware.
Once it is confirmed that you are dealing with a Mac infection, you can remove viruses from your Mac using these solutions:
1. Remove Unwanted Browser Extensions
Cybercriminals often use browser extensions to infect your Mac devices. Thus, if there is a browser extension that you have not installed or an extension disturbing your browsing experience, it is better to remove it. Here’s how you can do that:
Remove an Extension from Safari
Step 1. Open Safari and click on the top menu to select Safari Extensions.
Step 2. Look at the list of all extensions and read their descriptions to find the suspicious ones.
Step 3. Tick on all the unwanted extensions and remove them.
Remove an Extension from Google Chrome
Step 1. Open Chrome and click on the 3-dot icon located in the top right corner.
Step 2. Click on the More Tools option and select Extensions from the menu.
Step 3. Check all the extensions and click on the Remove button if you don’t recognize any extensions.
2. Remove Suspicious Applications
Next to browser extensions, applications are the favorite source to infect Mac devices. If you have recently downloaded an app that turns out to be an infection source, uninstall it instantly. Here are the steps to uninstall apps on a Mac:
Step 1. Go to the Applications folder and drag-n-drop the app to the Trash folder.
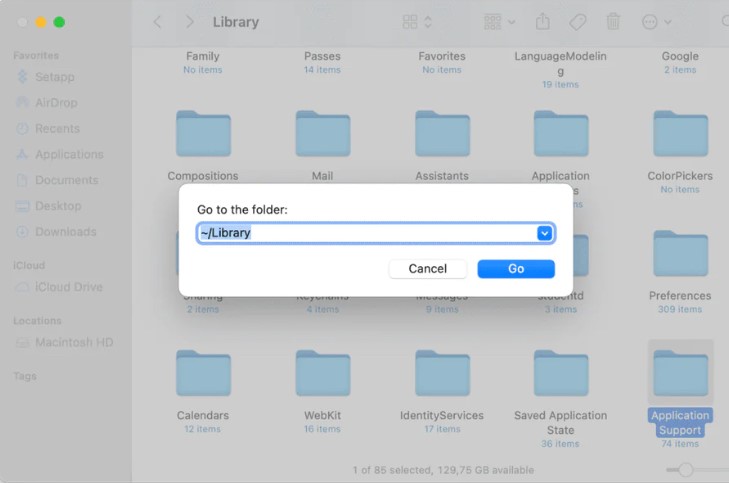
Step 2. After that, go to the ~/Library folder, navigate to the Application Support for the files related to the problematic app, and drag them to the Trash.
Step 3. Open the Launch Agents and Launch Daemons folders and remove files related to the app from there, too.
There is a problem with this app’s uninstallation method. If you delete legitimate app files by mistake, it can create a huge problem. Therefore, we recommend you use CleanMyMac X to remove all traces of the infected apps with a click.
You simply have to download CleanMyMac X and click Uninstaller. Check the box next to the culprit’s application name and click Uninstall to remove all files related to the app.
3. Create a New User Profile
Mostly, viruses are linked to a certain user profile on your computer. This way, hackers can control your admin profile. The only solution to remove viruses from your Mac device is to create a new user profile in this situation.
You can create a new user profile as follows:
Step 1. Head over to Apple Menu > System Preferences > Users & Groups.
Step 2. Enter your admin password after clicking on the lock icon.
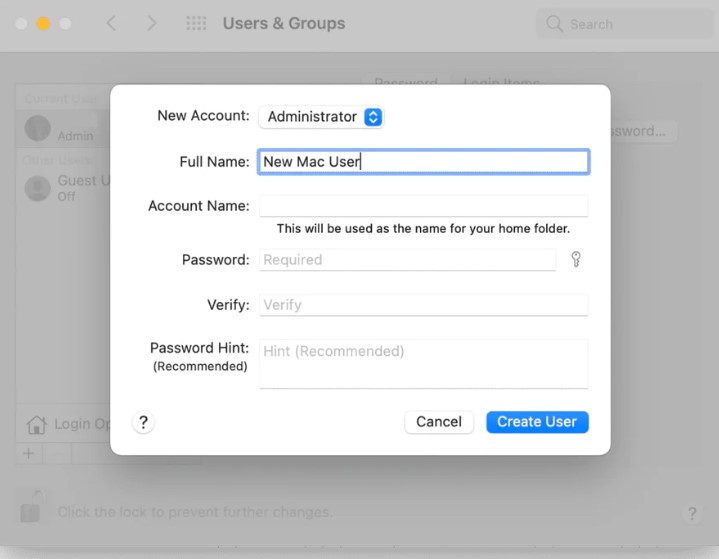
Step 3. Click on the plus sign to add a new user profile and enter all the required details.
Step 4. To move your important data to a new profile, go to the Finder > Go to Finder > Paste in this: /Users.
Step 5. Copy the needed files once you see the Shared folder and paste them into the new user account.
4. Clean Up Your Login Items
Login items are applications that automatically launch when you start your Mac. Malware components often sneak into the login items and impact your device’s speed.
Here’s how you can stop malware login items from launching:
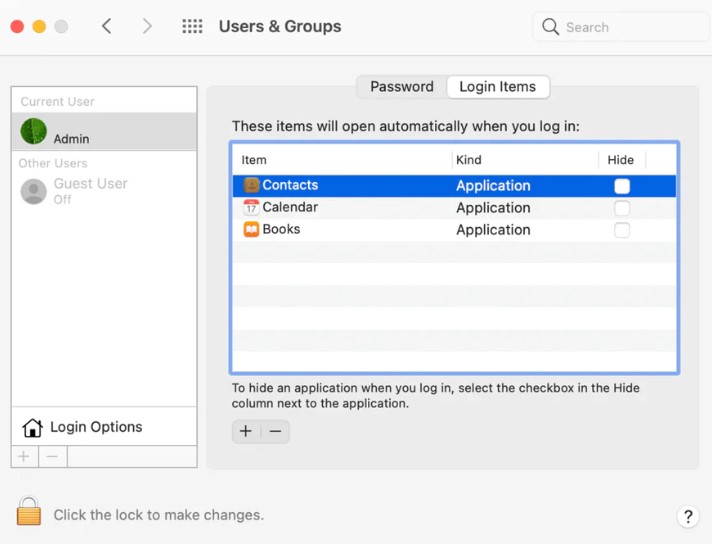
Step 1. Go to Apple Menu > System Preferences > Users & Groups.
Step 2. Click on the Login Items tab. From there, you can click on ‘-‘ to remove suspicious login items.
5. Clear Browser Cache
Browser cache can also store infected ads or files on your MacBook. This can make your web browsers run slowly and redirect to malicious websites. So, you should frequently clean your web browser cache.
In Safari, launch the app and then click on the Clear History > Select All History from the dropdown list. And then click on the Clear History button.
In Google Chrome, go to Chrome Clear Browsing Data > Time Range dropdown > Select All Time > Clear data.
6. Update MacOS
Do you know how Apple can offer incredible protection against malware? It is because of the Xprotect. It is Apple’s built-in malware protection software that scans files you have downloaded and detects malware in them.
With every new system update, Apple will automatically upgrade XProtect so you can experience mind-blowing security. However, if you are using the old Mac version, you are also using outdated XProtect, which might not be able to catch the latest malware.
Therefore, always keep your system up-to-date to stay safe from viruses.
7. Restore from a Time Machine Backup
If none of the solutions have worked for you by far, you can wipe your Mac clean and then restore it from a Time Machine backup. The best thing about this solution is that you can easily boot into the recovery partition and select your backup.
The downside is that you will lose all the work that you have done before the last backup. However, there is an option to manually copy all your Mac data to another drive or cloud storage to restore.
But the problem with it is that you might copy the infected file, and you can further damage your system. So, you can use a virus scanner to first detect the infected files and then create your backup.
Here’s to restoring backup from a Time Machine:
Step 1. Connect your Time Machine backup drive to your Mac.
Step 2. Restart your Mac, and press down the Command and R keys until an Apple logo appears on your screen.
Step 3. Once the MacOS Utilities screen appears, select Restore from a Time Machine. Click Continue.
Step 4. Choose the backup session from the point your Mac started behaving weirdly.
How to Remove Viruses from Your Mac Automatically
If you don’t want to go through the hassle of manually scanning and removing viruses from your Mac, you can use a tool. Using the advanced Mac cleaner CleanMyMac X, you can identify several malware threats, including spyware, ransomware, cryptocurrency miners, and more.
Plus, when CleanMyMac X finds anything suspicious on your computer, it will automatically remove it. In addition, it provides real-time malware protection and warns you when you download something harmful.
Here’s how you can use the tool:
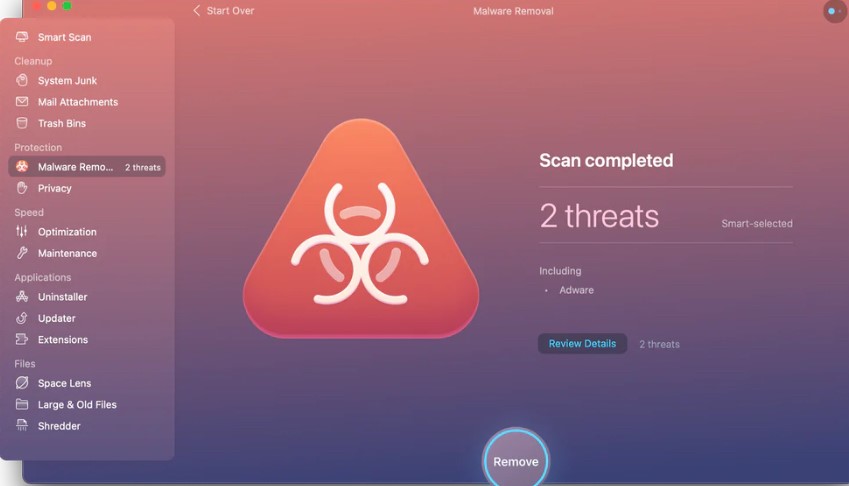
Step 1. Download the free CleanMyMac X version and launch it.
Step 2. Go to the Malware Removal Tab > Scan > Remove, and you are done.
Parting Remarks
Viruses are becoming a normal occurrence on Mac devices lately. Thus, you have to be wary, and whenever you suspect anything suspicious on your device, immediately scan it and remove it.
Also, don’t share your admin passwords or credit card details with any suspicious apps or web browser extensions.
Now, let us bid farewell. And make sure to check other blogs on this website to use your Mac machine safely.
Popular Post
Recent Post

Advanced SystemCare: Tool To Clean Your PC
Your computer slows down over time. Files pile up, junk builds inside the system, and things start to feel sluggish. You open a browser, and it takes forever. Programs crash without warning. This is a sign that your PC needs a good cleanup. Many users ignore these signs. They think buying a new computer is […]

Top 10 PC Cleaning and Optimization Tools For Windows 11/10
Discover the best PC cleaning and optimization tools for Windows 11 and 10. Remove junk files, improve speed, and keep your PC healthy with trusted cleaners.

Clear Microsoft Teams Cache On Windows PC [Complete Guide]
Learn how to clear Teams cache on Windows PC with 3 easy methods. Fix slowdowns, glitches, and errors fast. A simple guide for every Windows 11 user.

How To Clear Browsing History on PC: Chrome, Edge, Firefox, Opera
Learn how to clear browsing history on PC across Chrome, Edge, Firefox, and Opera with easy steps, tips, pros, and FAQs.

Clear Cache and Cookies: Complete Guide For Windows 11/10
Learn how to clear cache and cookies on Windows 10 and 11. This complete guide covers Chrome, Edge, and Firefox with simple, step-by-step instructions for every user.

How To Clean PC Trackpad/Touchpad Without Damaging It
Learn how to clean PC trackpad and clean PC touchpad safely with simple steps. Improve performance, remove dirt, and keep your laptop surface smooth and responsive.

How To Clean Your GPU/Graphics Card [Complete Guide]
Introduction A graphics card is one of the most important parts of a computer. It handles visuals, gaming, video editing, and design work. Over time, dust builds up inside it. This dust blocks airflow and traps heat. When heat increases, performance drops. In some cases, the system may even crash. That is why learning how […]

How To Clean PC Power Supply Unit Safely Without Damaging
Follow simple, safe steps to clean your computer’s power supply unit. Improve cooling, reduce overheating, and protect your PC’s performance.

How To Clean a CPU Without Damaging It [Complete Guide]
Learn how to clean a CPU safely without damage. Follow simple steps, precautions, and methods to improve cooling, boost performance, and extend your computer’s life.

How To Clear Browser Cache On Windows 11/10 [Chrome, FireFox, Edge]
Learn how to clear browser cache on Windows 11 and 10. Follow simple steps to clean browser cache, fix slow browsing, and improve performance easily.
