How to Turn Off Notifications in Windows 10/11 — 9 Easy Methods
Notifications are one of the most annoying yet helpful Windows 10/11 features. They help you stay informed of all the latest happenings on your computer, like the app-required updates, new system updates, etc.
But multiple notification alerts can be distracting. Even if you have turned off the notification sound, notification popups coming on your screen after every minute will keep you annoyed, especially when you are working on important assignments or playing games online.
But there is no need to suffer when you can easily turn off notifications in Windows 10/11. You can use different methods to turn off Windows notifications, and some of the best ones are disclosed below. So, let’s turn off annoying notifications on Windows!
9 Easy Methods to Turn Off Notifications in Windows 10/11
Turning off notifications in Windows is simpler than you imagine. Here are some easy methods to turn off notifications in Windows 10/11:
Method 1. Turn Off All Windows 10/11 Notifications Using the Settings Menu
From the Windows Settings menu, you can turn off all types of notifications on your computer. Here’s how you can do it:
Step 1. Go to the Settings menu by pressing Windows and I keys together.
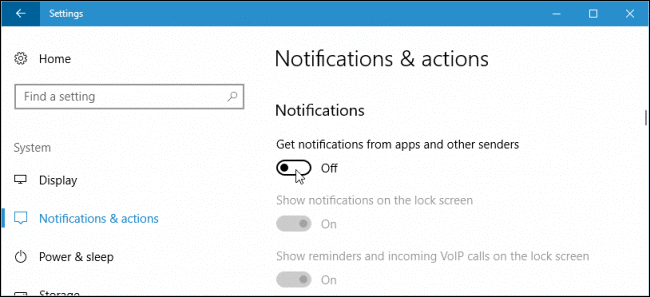
Step 2. On the Settings screen, click on the System option from the left pane. If you don’t see the option, click on the action button in the top-left corner.
Step 3. Turn the toggle located next to the Notifications option to Off on the System tab. This will disable all the notifications on your Windows computer. You can anytime reverse your action by shifting the toggle to On.
Method 2. Turn Off Specific Windows 10/11 Notifications using the Settings Menu
It is possible if you don’t want to turn off all notifications, just the unwanted ones. From the Settings menu, you can also turn off notifications for particular apps, as follows:
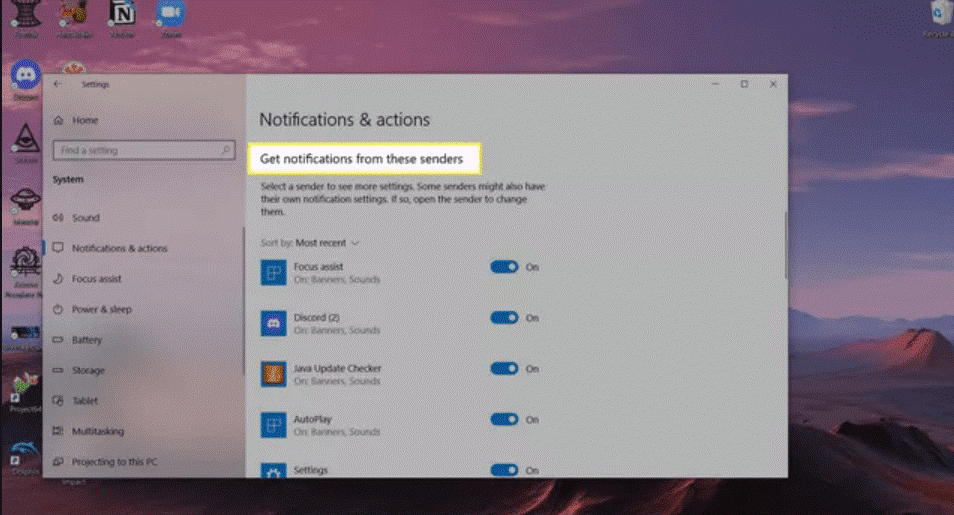
Step 1. Go to Settings menu > System > System tab > tap on the Notifications.
Step 2. Once you are inside the Notifications settings window, scroll down to find all your apps listed here. From the toggle next to every app, you can turn off and on notifications for them. Once you are happy with your changes, close the Settings window, and your new notification rules will be enforced now.
Method 3. Turn Off All Windows 10/11 Notifications Using Registry Editor
Are you comfortable using the Registry Editor? If so, it is possible to shut down all your Windows 10/11 notifications using the Registry Editor. Just remember to only use this method when you know what you are doing, because one wrong move might end up corrupting your entire system.
Follow these steps very carefully:
Step 1. Open the Run dialog box by pressing Windows and R. After that, type Regedit inside the search field and then press Ctrl + Shift + Enter to open the Registry Editor with admin access.
Step 2. When you receive the User Account Control prompt, click on the Yes button to grant administrative privileges.
Step 3. On the Registry Editor window, navigate to the following location using the menu on the left side—
HKEY_CURRENT_USER\Software\Microsoft\Windows\CurrentVersion\PushNotifications
Step 4. Right-click on PushNotifications and select New > Dword (32-bit) Value from the context menu.
Step 5. After that, go to the right pane and rename the just-created Dword to ToastEnabled by right-clicking on the item and choosing Rename.
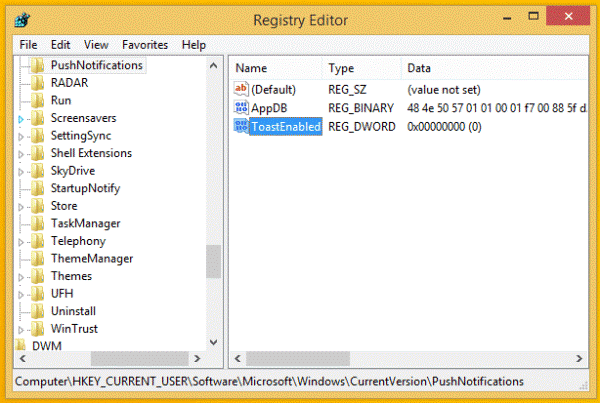
Step 6. Double-click on the ToastEnabled item and set the Base to Hexadecimal and the Value to 1 based on your requirements.
0 – Disable the Notifications at a system level on Windows 11
1 – Enable the Notifications at a system level on Windows 11
Step 7. Don’t forget to reboot your PC to implement the changes.
Method 4. Turn Off Windows 10/11 Notifications using Notification Center
If you want to modify the default notification behavior of an app, you can use Notification Center to turn off notifications on your Windows 10/11. Here’s how this method works:
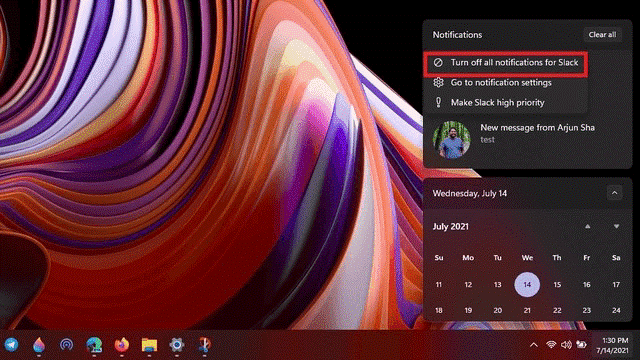
Step 1. Open up the Notification Center by pressing Windows and N keys together.
Step 2. Click on the three-dot icon at the top of an app for which you want to shut off notifications.
Step 3. Select the Turn off all notifications from the pop-up menu for *name of the app*.
Step 4. Just close the window, and your changes will be deployed now.
Method 5. Turn Off Windows 10/11 Notifications for Your Lock Screen
Do you prefer a clean look on your lock screen? If so, you can simply turn off notifications from appearing on your computer’s lock screen. It is pretty simple to do—
Go to Settings menu > System > Notifications > Disable the “Show notifications on the lock screen” toggle.
Microsoft has already removed the Quick Status icon from the lock screen. Thus, Windows 11 users don’t need to disable notifications with this method.
Method 6. Turn Off Windows 10/11 Notification Banners
If you don’t want notification banners to consume unnecessary space on your screen, you can easily turn them off. Unlike Windows 10, Windows 11 doesn’t have a universal toggle to disable the notification banner. So, you have to follow these steps to turn off notification banners in Windows 11:
Step 1. Go to Settings menu > Notifications > Click on the targeted app.
Step 2. Uncheck the box that reads “Show notification banners”. Alternatively, as already discussed, you can disable notifications for individual apps in the Notification Center.
Method 7. Set Notification Priority
In Windows 11, you will get a feature to prioritize your notifications. This way, you can push all the unwanted notifications to the back and highlight important and urgent notifications. To do so:
Option 1. Press Windows and N to open the Notification Center. Next, click on the three dots action menu on the top of your selected app and set the notification priority.
Option 2. Alternatively, you can go to the app’s Settings menu to tweak the notification priority. For this, select the targeted app from the System > Notifications > Notifications from apps and other senders. From there, you can set an app’s notification priority to Top, High, or Normal.
Method 8. Mute Your Windows 10/11 Notifications
Turning off notifications is not always necessary. Sometimes just muting notifications will be sufficient. Using the Focus Assist, you can easily mute annoying notifications in Windows 10/11. It automatically mutes notifications when you are playing games or using a projector.
However, you can also manually mute notifications using these steps:
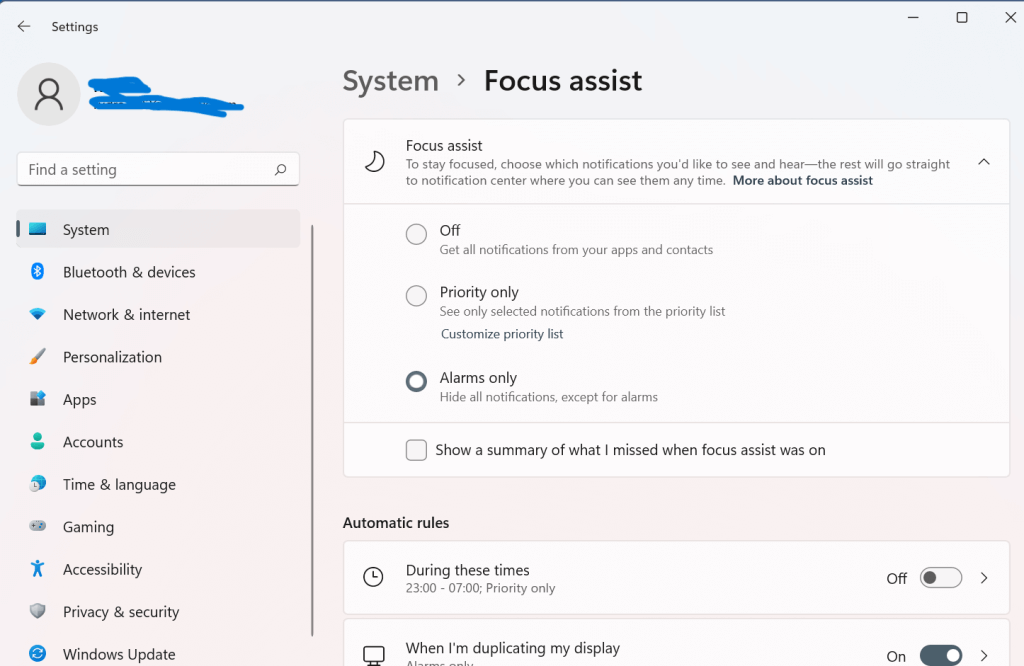
Step 1. Open the Settings menu and click on Focus assist under the System section.
Step 2. By default, only the alarms or notifications are set in the list when you enable Focus Assist. But you can select the appropriate options depending on your preferences.
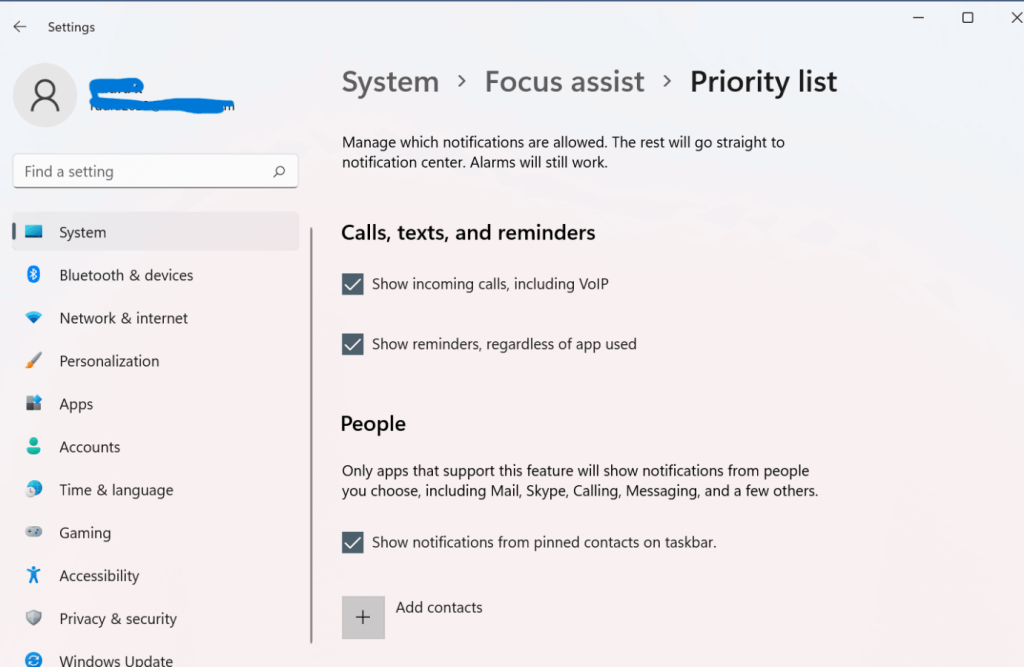
Step 3. You can click on the Customize priority list to get the notifications from a list of priority apps.
Step 4. After that, click on Add an app to include an app in your priority list. You will now get notifications for only the apps present in the priority list when you enable Focus Assist.
Step 5. You can press toggle from the Action Center to activate or deactivate Focus Center anytime and start receiving notifications from the priority apps.
Method 9. Turn Off Windows 10/11 Notifications from the App
Some apps can still send you notifications despite turning off notifications on your computer. This happens because of the privacy settings that you have chosen for the application. In that case, you have to directly open the app settings to turn off notifications.
For every app, you have to follow different steps. For this guide, we are going to demonstrate how to turn off Google Chrome notifications:
Step 1. Open the Google Chrome app by clicking on it or using the Search option.
Step 2. Click on the three dots to open the menu section.
Step 3. Click on Settings and select the Privacy and Security option from the pop-up menu. Next, select Site Settings.
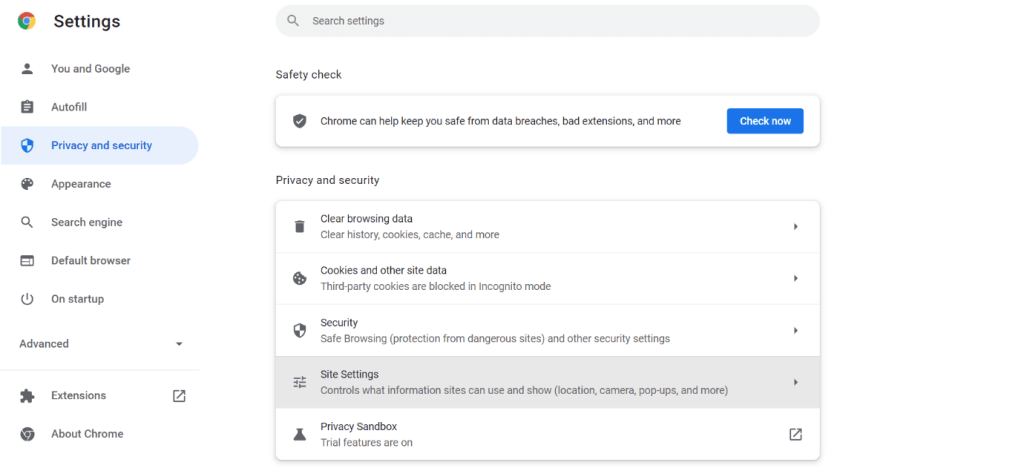
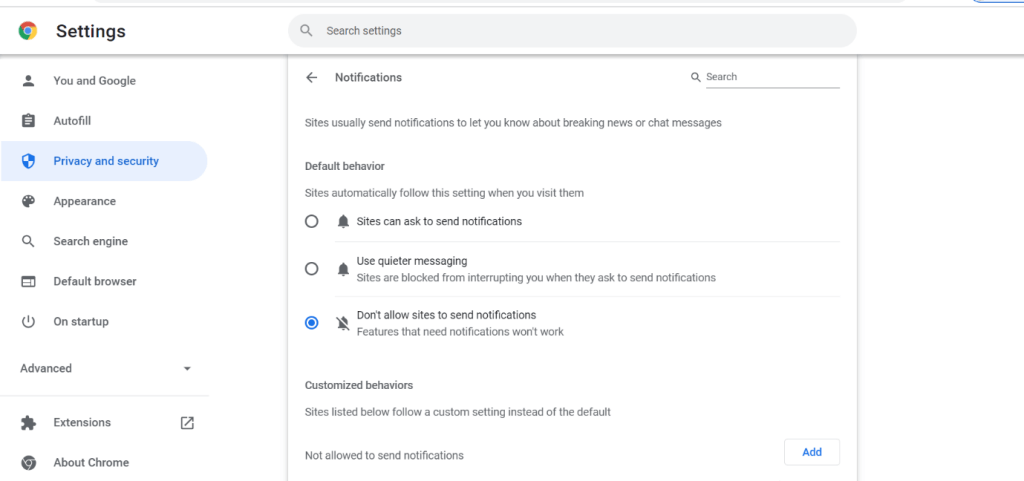
Step 4. Move down to the Permission section and select Notifications.
Step 5. Block all the notifications, and you are done.
Parting Thoughts
There you go, peeps! You have now learned all the best methods to turn off notifications on Windows 10/11. Depending upon your requirements, you can turn off all notifications, specific app notifications, or temporarily mute notifications on your device.
On the final note, we would advise readers to use tools like CCleaner to run full PC health checkups to ensure that notifications are not slowing down your device. In addition, it can keep malware away from your computer.
If you found this post helpful, do check other blogs on this website.
Recommended Articles:
How To Clean a Gaming PC: Complete Guide
Popular Post
Recent Post

Advanced SystemCare: Tool To Clean Your PC
Your computer slows down over time. Files pile up, junk builds inside the system, and things start to feel sluggish. You open a browser, and it takes forever. Programs crash without warning. This is a sign that your PC needs a good cleanup. Many users ignore these signs. They think buying a new computer is […]

Top 10 PC Cleaning and Optimization Tools For Windows 11/10
Discover the best PC cleaning and optimization tools for Windows 11 and 10. Remove junk files, improve speed, and keep your PC healthy with trusted cleaners.

Clear Microsoft Teams Cache On Windows PC [Complete Guide]
Learn how to clear Teams cache on Windows PC with 3 easy methods. Fix slowdowns, glitches, and errors fast. A simple guide for every Windows 11 user.

How To Clear Browsing History on PC: Chrome, Edge, Firefox, Opera
Learn how to clear browsing history on PC across Chrome, Edge, Firefox, and Opera with easy steps, tips, pros, and FAQs.

Clear Cache and Cookies: Complete Guide For Windows 11/10
Learn how to clear cache and cookies on Windows 10 and 11. This complete guide covers Chrome, Edge, and Firefox with simple, step-by-step instructions for every user.

How To Clean PC Trackpad/Touchpad Without Damaging It
Learn how to clean PC trackpad and clean PC touchpad safely with simple steps. Improve performance, remove dirt, and keep your laptop surface smooth and responsive.

How To Clean Your GPU/Graphics Card [Complete Guide]
Introduction A graphics card is one of the most important parts of a computer. It handles visuals, gaming, video editing, and design work. Over time, dust builds up inside it. This dust blocks airflow and traps heat. When heat increases, performance drops. In some cases, the system may even crash. That is why learning how […]

How To Clean PC Power Supply Unit Safely Without Damaging
Follow simple, safe steps to clean your computer’s power supply unit. Improve cooling, reduce overheating, and protect your PC’s performance.

How To Clean a CPU Without Damaging It [Complete Guide]
Learn how to clean a CPU safely without damage. Follow simple steps, precautions, and methods to improve cooling, boost performance, and extend your computer’s life.

How To Clear Browser Cache On Windows 11/10 [Chrome, FireFox, Edge]
Learn how to clear browser cache on Windows 11 and 10. Follow simple steps to clean browser cache, fix slow browsing, and improve performance easily.
