How to Disable User Account Control (UAC) in Windows 11
In the computer system, there are multiple programs operational that run in the background and upgrade automatically. Many of them make system changes, but some can potentially harm the system’s integrity.
The UAC or User Account Control stays on in default mode and blocks unwanted changes. It prompts users to verify local administration permission for all tasks and any modifications necessary.
While it is helpful to keep the UAC enabled, using the user account control disable approach in Windows 11 can stop the non-stop prompts. The steps to disable UAC are discussed here.
How to disable UAC in Windows 11?
The UAC is a pre-set function in Windows 11 devices and previous versions that protects the system from unapproved changes. There are multiple ways to handle this process, and we have covered each version in this post. Read ahead to know the steps that are crucial to follow to disable User Account Control in Windows 11.
Method 1: Disable the UAC through Control Panel
While running the Windows 11 system, active applications make significant internal changes to fit their software for the computer.
The UAC pops up with the prompt for administrator permission. The UI to disable user account control in Windows 11 version differs from the UAC for previous versions through the Control Panel-based steps. But this method is the simplest option for users with limited technical expertise.
How to do this?
Step 1: Click on the Windows tab on the home screen taskbar. Or, press the Windows key.
Step 2: Type the term “Change User Account Control Settings” in the search field.
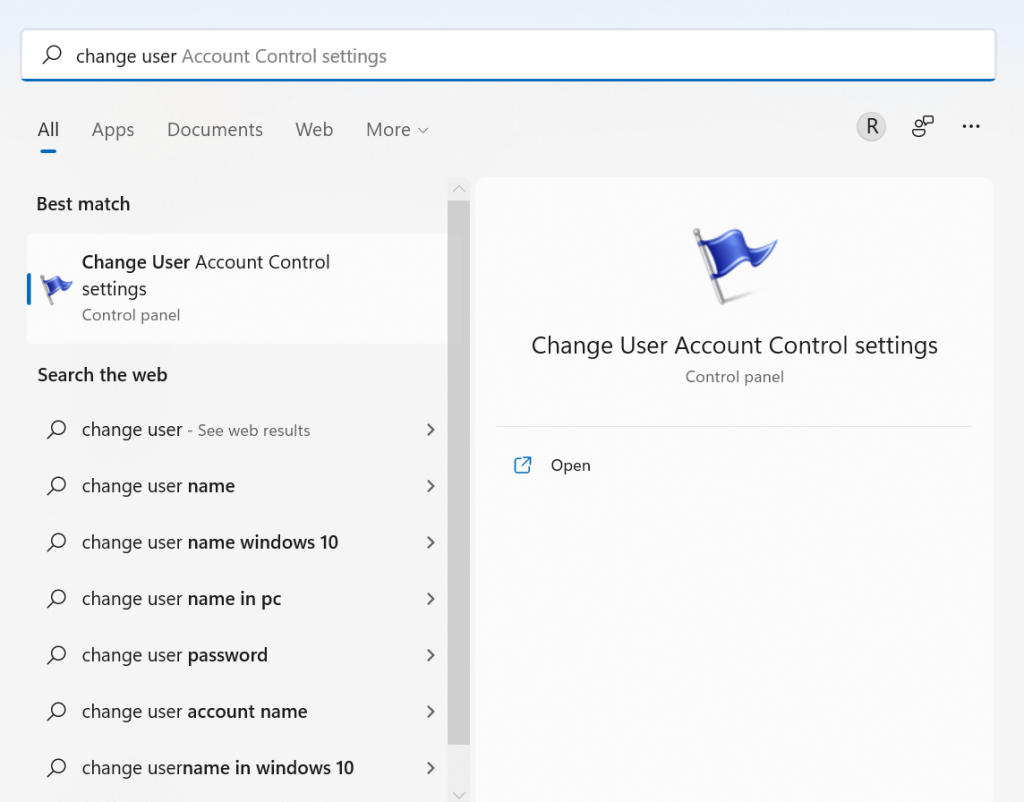
Step 3: After choosing the right app option from the menu list, it will launch the UAC settings. You would see an up-and-down slider on the left side of the screen with “Always Notify” and “Never Notify” options on both ends. The default is set towards the “Always Notify” side.

Users can move the slider up to get notifications for all new app downloads and updates or downward for the opposite.
Step 4: Slide the button to the extreme downward end for “Never Notify”. None of the app change prompts would appear with this selection.
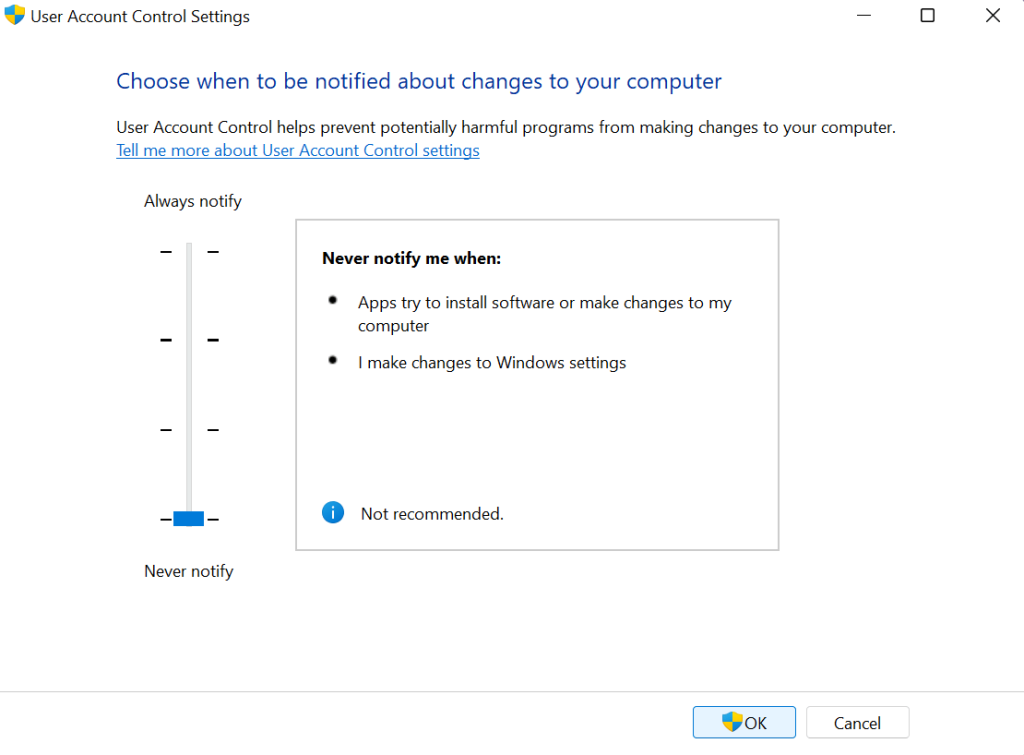
Step 5: Click on the OK button to confirm.
Step 6: The prompt for UAC changes would come up again. To confirm this user account control disable steps, select the “Yes” option. The changes will go into effect automatically.
Method 2: Disable UAC in Windows 11 via Windows Registry
Users can access the Registry Editor on the Windows 11 device to do the user account control disable steps efficiently. Notably. This method is complex and better for users with more technical expertise. So, follow the steps cautiously.
How to do this?
Step 1: Click on the Window and the “R” key on the keyboard. Then, type in the Regedit command for Registry Editor access in Windows 11.
Step 2: Add the following command path in the Registry Editor address bar on the next window:
HKEY_LOCAL_MACHINE\SOFTWARE\Microsoft\Windows\CurrentVersion\Policies\System
Step 3: The “EnableLUA” value would appear on the right side. Search for it and make the changes, like modifying the “1” value data to “0”.
Click on the “OK button to save.
Step 4: Restart your system to activate the changes that you made. The UAC settings would get disabled when the Windows 11 system boots up again.
You can utilize the pre-set registry files for disabling the UAC settings in Windows 11 by downloading ZIP archive files and then restarting the system.
Method 3: Disable the User Account Control in Windows 11 for Singular Programs
Instead of deactivating all of the apps/programs, users can disable User Account Control in Windows 11 for specific programs.
How to do this?
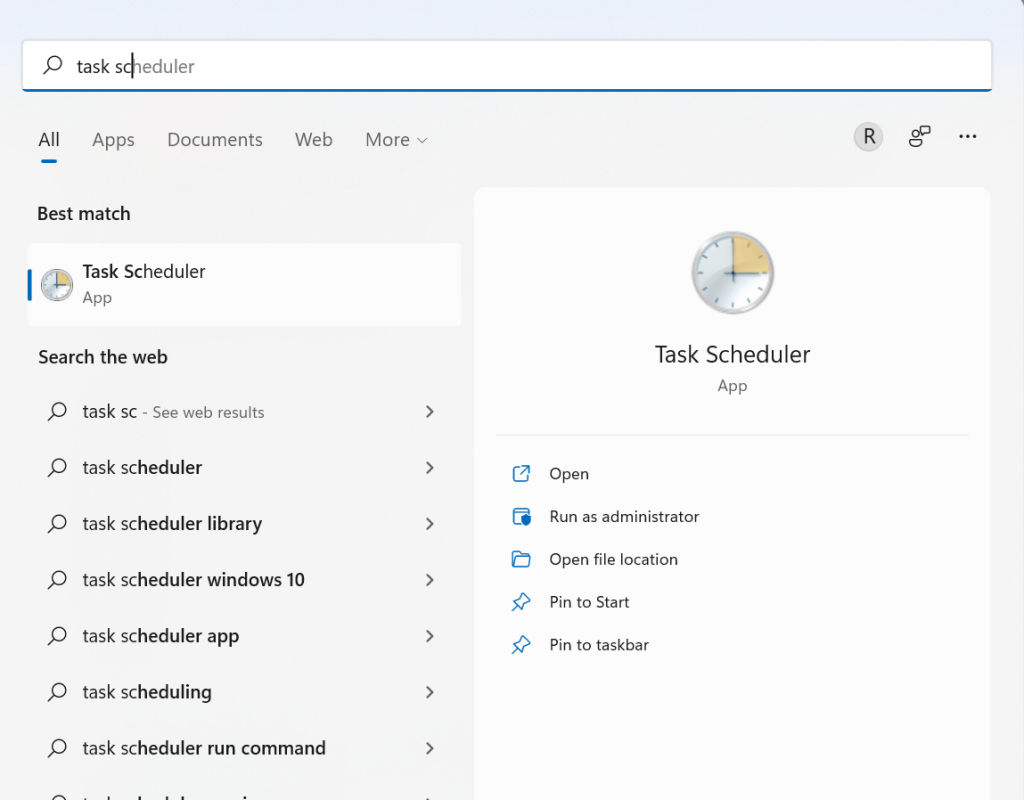
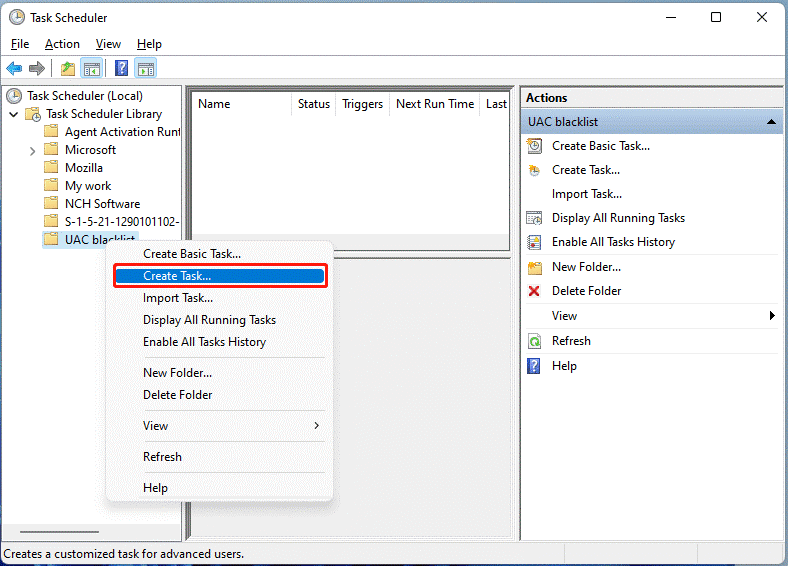
Step 1: Click on the Windows Search icon on the home screen and type in Task Scheduler. Choose the first result that appears.
Step 2: Right-click your cursor on top of the “Task Scheduler Library” option. Then, select the “New Folder” choice.
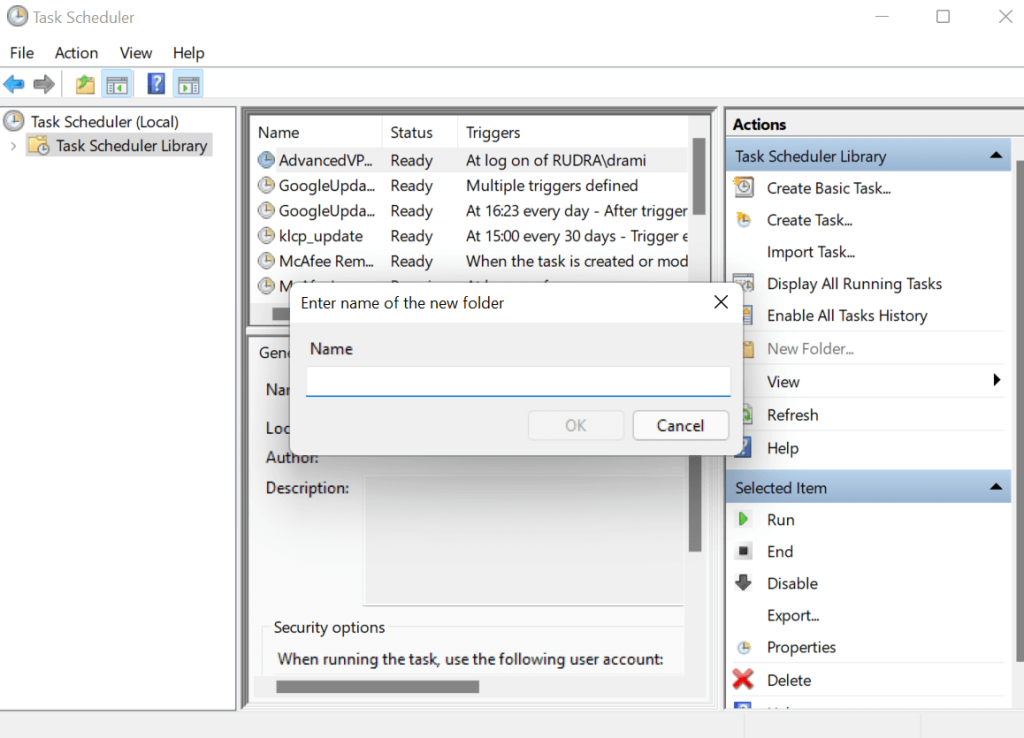
Name the file, e.g., UAC Blacklist.
Step 3: Click on the Task Scheduler Library to expand it.
Step 4: Right-click your cursor on the new folder that you create and choose the “Create Task” option.
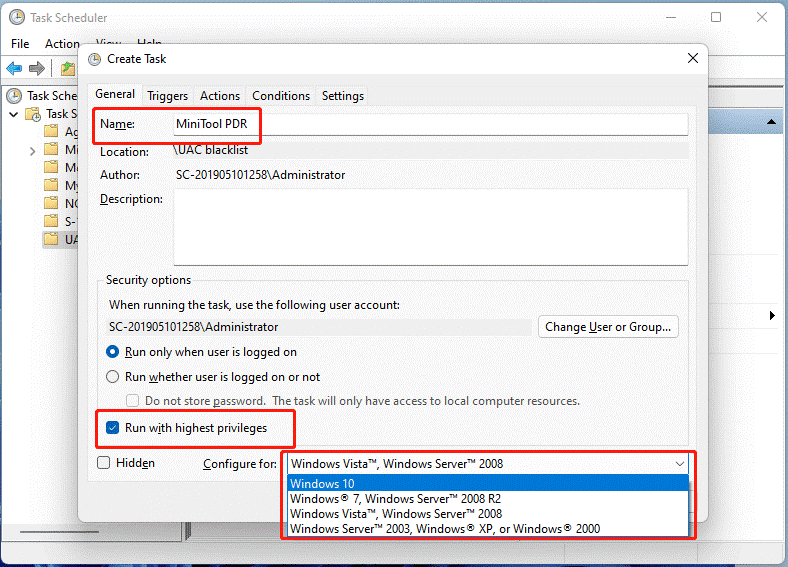
Step 5: Add a descriptive name to the task.
Step 6: Open Security Options. Choose the “Run with highest Privileges” option.
Step 7: Then, open the “Configure for” option and choose the currently active Windows OS.
Step 8: Click on the “OK” button.
Step 9: Another prompt would appear; again, click OK.
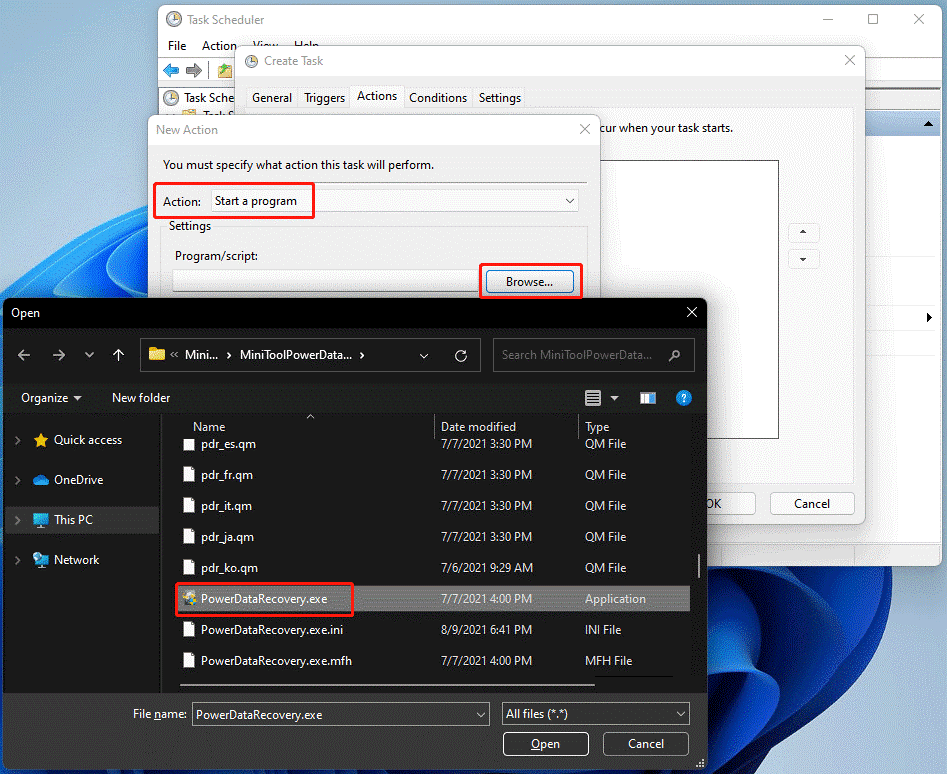
Step 10: On the next page, find the “Actions” section and click on the “New” option. Choose the “Start a Program” option in the next window.
Step 11: Choose the “Browse” option and choose the .exe file from the target app inside the computer. For the information about the file location, right-click the cursor on the app shortcut on the screen. Choose “Open File Location” to get the location details.
Step 12: While operating on a laptop with Windows 11 OS, the user has to open the “Conditions” tab. Then, uncheck the option for starting tasks while the computer is running via AC power.
Step 13: Create the app shortcut for the application on your desktop.
Method 4: Disable UAC Windows 11 with the Local Group Policy Editor
In case the Registry Editor method is not suitable, users can utilize the Local Group Policy Editor app instead if it is available.
How to do this?
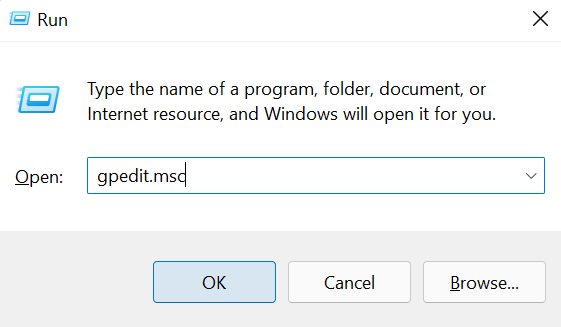
Step 1: Click on the Win + R keys on your keyboard. This would open the Run dialog box. Add the gpedit.msc command in the field and click on the OK button.
Step 2: Select the “Computer Configuration” option from the left panel on the next window. Then, choose Windows Settings and open the Security Settings. Under that, select the Local Policies > Security Options. Find the location.
Step 3: Double-click on the “User Account Control: Run all administrators in Admin Approval Mode” option in the right-hand side panel.
Step 4: Change the policy setting to Disabled on the following prompt. Activate the changes by pressing the “OK” button.
Conclusion
Carry out the steps as mentioned to disable the UAC function on your Windows 11 device securely. Keep the Acronis Cyber Protect Cloud installed for additional system protection and optimization. You can do this temporarily and activate the feature later after the new software installation.
Please go through our other posts and let us know your thoughts if you found this helpful.
Popular Post
Recent Post

Advanced SystemCare: Tool To Clean Your PC
Your computer slows down over time. Files pile up, junk builds inside the system, and things start to feel sluggish. You open a browser, and it takes forever. Programs crash without warning. This is a sign that your PC needs a good cleanup. Many users ignore these signs. They think buying a new computer is […]

Top 10 PC Cleaning and Optimization Tools For Windows 11/10
Discover the best PC cleaning and optimization tools for Windows 11 and 10. Remove junk files, improve speed, and keep your PC healthy with trusted cleaners.

Clear Microsoft Teams Cache On Windows PC [Complete Guide]
Learn how to clear Teams cache on Windows PC with 3 easy methods. Fix slowdowns, glitches, and errors fast. A simple guide for every Windows 11 user.

How To Clear Browsing History on PC: Chrome, Edge, Firefox, Opera
Learn how to clear browsing history on PC across Chrome, Edge, Firefox, and Opera with easy steps, tips, pros, and FAQs.

Clear Cache and Cookies: Complete Guide For Windows 11/10
Learn how to clear cache and cookies on Windows 10 and 11. This complete guide covers Chrome, Edge, and Firefox with simple, step-by-step instructions for every user.

How To Clean PC Trackpad/Touchpad Without Damaging It
Learn how to clean PC trackpad and clean PC touchpad safely with simple steps. Improve performance, remove dirt, and keep your laptop surface smooth and responsive.

How To Clean Your GPU/Graphics Card [Complete Guide]
Introduction A graphics card is one of the most important parts of a computer. It handles visuals, gaming, video editing, and design work. Over time, dust builds up inside it. This dust blocks airflow and traps heat. When heat increases, performance drops. In some cases, the system may even crash. That is why learning how […]

How To Clean PC Power Supply Unit Safely Without Damaging
Follow simple, safe steps to clean your computer’s power supply unit. Improve cooling, reduce overheating, and protect your PC’s performance.

How To Clean a CPU Without Damaging It [Complete Guide]
Learn how to clean a CPU safely without damage. Follow simple steps, precautions, and methods to improve cooling, boost performance, and extend your computer’s life.

How To Clear Browser Cache On Windows 11/10 [Chrome, FireFox, Edge]
Learn how to clear browser cache on Windows 11 and 10. Follow simple steps to clean browser cache, fix slow browsing, and improve performance easily.
