How to Install Windows 11 on an Unsupported CPU?
Since Windows 11 launched in 2021, this Microsoft development has been the talk of the town. Many Microsoft users have installed OS 11, but many are still waiting. That’s because they have an old Windows computer that doesn’t support the new update.
If you also have an old computer and wish to install Windows 11, your wish has come true today. It is possible to install Windows 11 on an unsupported CPU.
Yes, there are some hacks that you can follow to install Windows 11 on your unsupported CPU. This guide has awesome methods to run Windows 11 on your old PC. So, let’s get moving.
Is It Possible to Install Windows 11 on an Unsupported CPU?
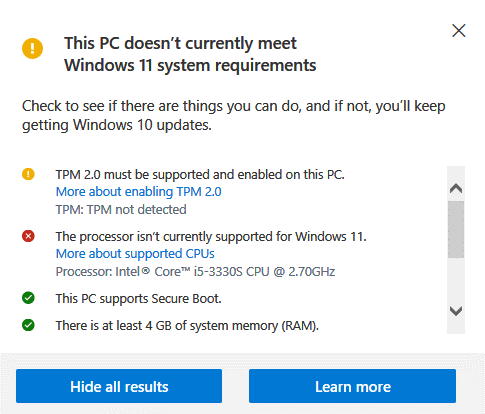
Microsoft doesn’t recommend installing Windows 11 on a computer that does not meet the minimum system requirements for Windows 11.
Furthermore, they stated that you should be comfortable with the risk of encountering compatibility issues if you install Windows 11 on hardware incompatible with the operating system.
However, installing Windows 11 on an unsupported processor did not harm our device.
Can You Install Windows 11 on an Old PC?
Even though Microsoft discourages it, if you are determined, you can install Windows 11 on an older computer system.
There are many conversations and errors about Windows 11 prevailing around, with everyone wanting to express their opinion about this operating system.
Furthermore, we believe you will be surprised to learn that Windows 11 performs better and faster on older computers.
Technical Support Required to Install Windows 11
Here’s a checklist if you want to know the minimum system requirements for running Windows 11 on your computer:
- Processor: The processor in your computer should run at 1 gigahertz (GHz) or higher and have two or more cores on a compatible 64-bit processor.
- RAM: The RAM size on the PC should be at least 4 gigabytes (GB).
- Storage: A 64 GB* or larger storage capacity is required to install this Windows.
- It will help if you remember that downloading updates and enabling specific features may necessitate additional storage space.
- Graphics card: It must be DirectX 12 or later compatible with a WDDM 2.0 driver.
- UEFI system firmware with Secure Boot capability.
- TPM 2.0: Trusted Platform Module (TPM).
- Display: 720p high definition display.
5 Methods to Install Windows 11 on an Unsupported CPU
Okay, so let’s get to the main point: “how to install Windows 11 on an unsupported CPU”. There are several ways to twiddle with Windows 11 and make it run on your old processor. However, the best and safest methods are:
Method 1. Use WinPass11 or Force Windows 11 Install
If you can’t install Windows 11 because your computer or laptop does not meet the TPM version and processor requirements, there are two utilities available on GitHub that can assist you.
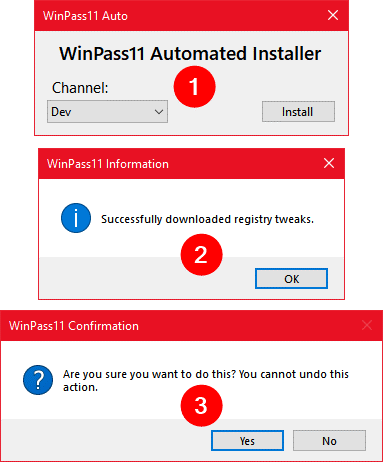
WinPass11: Auto
WinPass11: Auto, created by ArkaneDev on GitHub, is a fantastic tool that allows you to install Windows 11 on an unsupported CPU. This one-click Windows 11 installer is only available if you are already a member of the Windows Insider Release Preview channel. Simply download WinPass11Auto.exe, run it as administrator, and follow the on-screen instructions. Even if your PC does not meet the minimum system requirements, it will download the registry tweaks and install Windows 11.
Force Windows 11 Install
Another excellent GitHub repository is Force-Windows-11-Install. This tool, created by JosephM101, takes an existing Windows 11 installer ISO and modifies it to bypass system requirement checks while installing the OS. It includes a registry hack that circumvents the CPU and TPM checks. The Force-Windows-11-Install modified ISO contains a patch that forces Windows 11 to install all feature updates on an unsupported CPU.
Method 2. Tweak with the Registry Editor
The most common roadblocks between an old PC and Windows 11 are:
- Insufficient processing power.
- The lack of a secure boot.
- An older version of TPM.
Fortunately, a simple Registry hack can be used to make the new Windows 11 ignore such incompatibilities. However, because this method involves creating new entries in the Registry Editor, it’s a good idea to create a system restore point first.
Bypass TPM and Secure Boot Check in the Registry
TPM 2.0 and Secure Boot are essential for Windows 11. If your computer lacks TPM or Secure Boot, you can configure the Windows 11 installer to ignore this shortcoming. You just need to make changes to the Registry Editor to fix the problem.
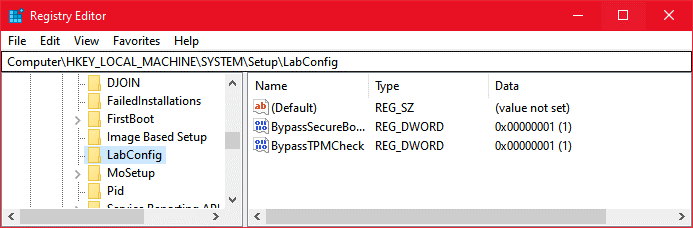
Step 1. To open the Run app, press the Windows logo key + R, type “Regedit” in the text box, and click Open.
Step 2. Navigate to the following location when the Registry Editor window opens.
HKEY_LOCAL_MACHINE\SYSTEM\Setup
Step 3. Right-click Setup and choose New > Key.
Step 4. Rename the newly created New Key #1 to LabConfig after it is created in Setup.
Step 5. Right-click LabConfig and choose New > DWORD (32-bit) Value.
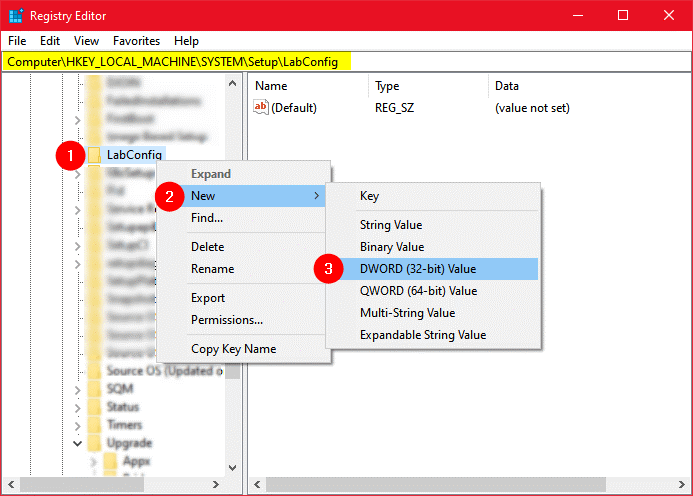
Step 6. Give this new registry entry the name BypassSecureBootCheck. Next, change the Value data to 1. Change the registry entry data value to 1 by double-clicking this entry.
Step 7. Now, right-click on LabConfig again, select New > DWORD (32-bit) Value, and name your new entry BypassTPMCheck. Set the value of the new file by double-clicking it.
Step 8. Now, you have 2 new entries under HKEY_LOCAL_MACHINE\SYSTEM\Setup\LabConfig. BypassSecureBootCheck and BypassTPMCheck will ensure Windows 11 installers won’t look for Secure Boot and TPM 2.0.
Use Regedit to Install Windows 11 on an Unsupported CPU
If you have an old PC with an incompatible CPU but TPM 1.2, you can still use the following Registry hack to install Windows 11 on an unsupported CPU.
Step 1. In the Registry Editor, navigate to HKEY LOCAL MACHINE > SYSTEM > Setup > MoSetup.
Step 2. Select New > DWORD (32-bit) Value from the context menu when you right-click on MoSetup.
Step 3. AllowUpgradesWithUnsupportedTPMOrCPU is the new name for the New Value #1 entry you just created.
Step 4. Now, double-click this file and change the value of Allow Upgrades with Unsupported TPM or CPU to 1.
Step 5. After you’ve made your change, click OK to save it.
You are now all set to install Windows 11 on your old laptop or desktop that contains unsupported hardware. Simply open the Windows 11 ISO in File Explorer and double-click setup.exe to begin.
Method 3. Enable TPM 2.0 from the UEFI
If your PC has the right processor for Windows 11, but the TPM 2.0 is a problem, you can use the suggestions below. In this section, we’ll look at how to enable TPM 2.0 in UEFI BIOS (PC firmware). If you bought your Windows PC within the last 5-6 years, it most likely already has TPM 2.0, but it is disabled in the BIOS.
As a result, even if you receive the message “TPM 2.0 must be supported and enabled on this PC” while checking requirements, there is a way to enable TPM 2.0. While the registry hack described above is sufficient to prevent Windows 11 Installer from checking for TPM, enabling it from the BIOS menu is still preferable.
To see if your PC has TPM support, open Windows Search, type “tpm.msc,” and then select the tpm.msc or Open option from the results.
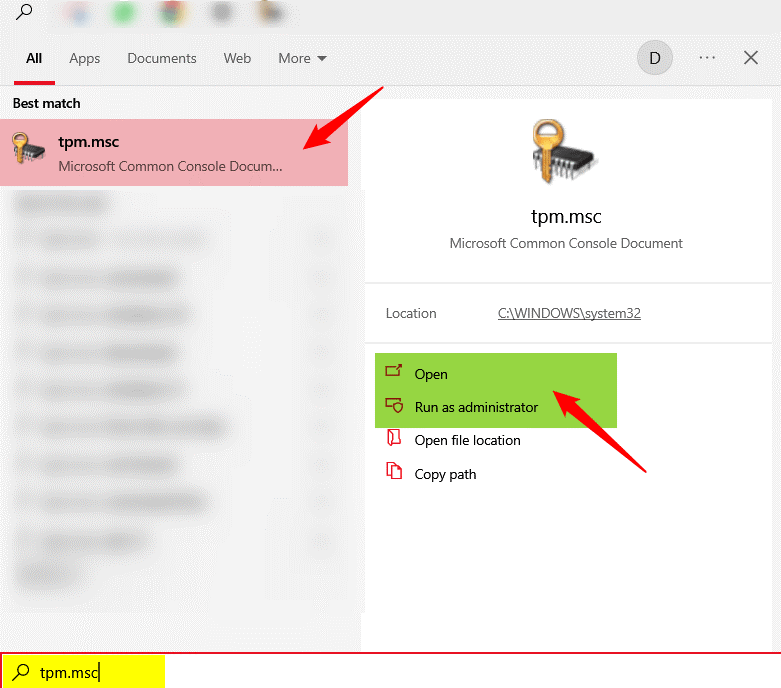
It’s all good if you see “TPM is ready for use” and Specification Version 2.0 in the TPM Management on the Local Computer window. If you get the “Compatible TPM cannot be found” warning, try enabling it from the BIOS security options.
Step 1. Open Windows Search, type “Recovery Options” into the search box, click it and then choose Restart. Alternatively, go to Settings > Update & Security > Recovery > Restart now. You can also obtain the BIOS settings by restarting the computer normally and pressing the F1, F2 (Dell), F10, or F12 keys (HP).
Step 2. When the recovery options appear on the screen, select Troubleshoot > Advanced Options > UEFI Firmware Settings and Restart now.
Step 3. Look for Advanced Security or Trusted Computing on the BIOS settings screen. According to the manufacturer of your computer, the option to enable the TPM may be labeled one of the following:
- Dell/HP security
- Chip for security (Lenovo)
- TPM Support for State Security Devices
- AMD PSP fTPM\sAdvanced\ Advanced PCH-FW Configuration for AMD fTPM (Asus)
- PTT Intel
- Platform Trust Technology from Intel
Step 4. Simply enable TPM 2.0, save your changes, and then exit the Boot menu.
Now, in File Explorer, open the Windows 11 ISO (Win11 English x64v1.iso) and run setup.exe to install Windows 11.
Method 4. Use Windows 10 Bootable Drive
The Regedit method is sufficient for installing Windows 11 on unsupported hardware, particularly incompatible CPU and TPM. However, there is another way to trick the installer into thinking it is installing Windows 10 when it is installing Windows 11. Even if your computer contains all the requirements for Windows 10, you can install Windows 11. The method, of course, entails downloading the ISO files for Windows 10 and Windows 11.
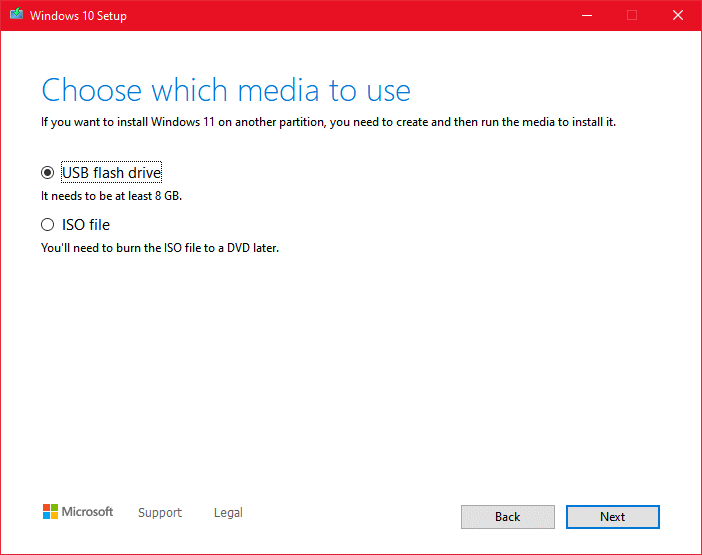
Before this method, ensure you have the following items on hand:
- ISO image of Windows 11
- A USB flash drive (8 GB)
- Media Creation Tool for Windows 10
- Data connection that is quick
Let’s get started once you have all of the above items ready.
Connect the USB drive to your computer. Remember all your data on the USB drive will be erased during the process. Next, select the USB flash drive by double-clicking the MediaCreationTool21H2.exe file.
When prompted, click Next, agree to the terms and conditions, and keep clicking Next until you reach the finish line, “Your USB flash drive is ready.”
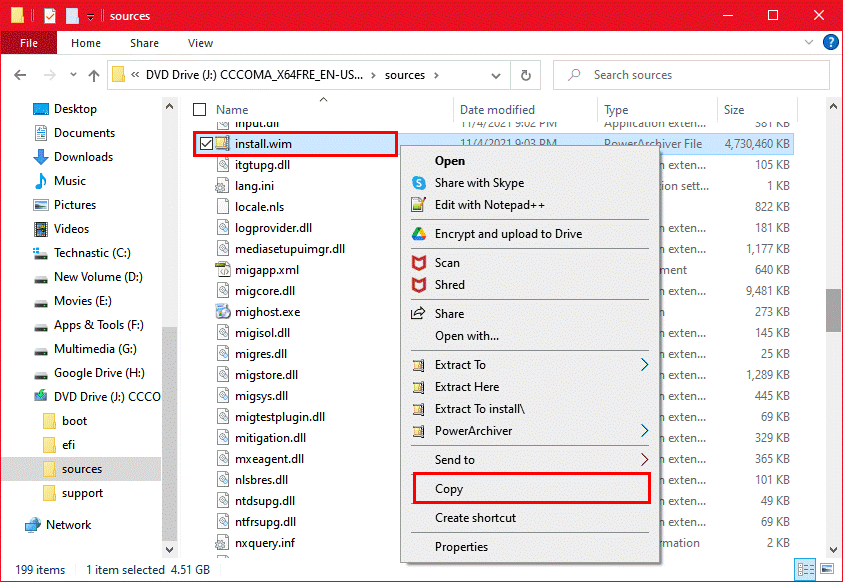
After you’ve created the bootable USB drive, right-click on the Windows 11 ISO file (Win11 English x64v1.iso) and choose Mount before clicking the Open button.
You can now see files under the Windows 11 ISO. Locate and copy the file ‘install.wim’ in the sources folder.
Now, in File Explorer, open the Windows 10 USB flash drive and double-click the sources folder. Look for ‘install.esd’ and delete it before pasting ‘install.wim’ (from the Windows 11 ISO) into this folder.
Return to the bootable USB flash drive and right-click the setup.exe file to run it as administrator to install Windows 11 on an unsupported CPU via USB.
Method 5. Use Rufus
Rufus is a tool for creating a bootable USB drive. You can use it to install Windows 11 from USB on unsupported hardware without requiring a TPM. This is, in our opinion, the simplest way to install Windows 11 on old PCs that don’t support TPM or secure boot. To use this method, make sure to have the following items ready ahead of time:
Rufus can be downloaded
A USB drive with at least 8GB of space
ISO image of Windows 11
Let’s get started right away!
Step 1. Connect the USB drive to your computer.
Step 2. As an administrator, run the Rufus tool. The app will detect and display the USB drive in the Device section.
Step 3. Select the Windows 11 ISO file and add it to Rufus by clicking the Select button.
Step 4. Select Extended Windows 11 Installation (no TPM / no Secure Boot) by clicking the box under the Image option section.
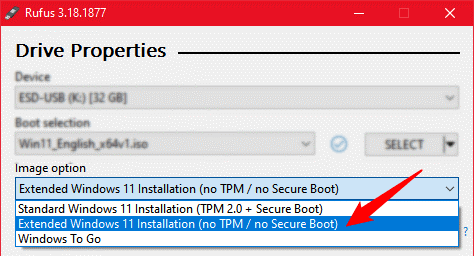
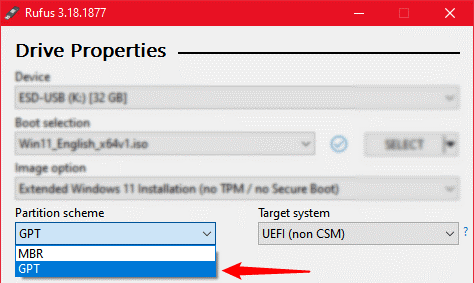
Step 5. Now, go to the Partition scheme section and choose GPT (GUID Partition Table).
Step 6. Finally, check the Rufus window to ensure that everything is configured correctly. Go ahead and press the Start button now.
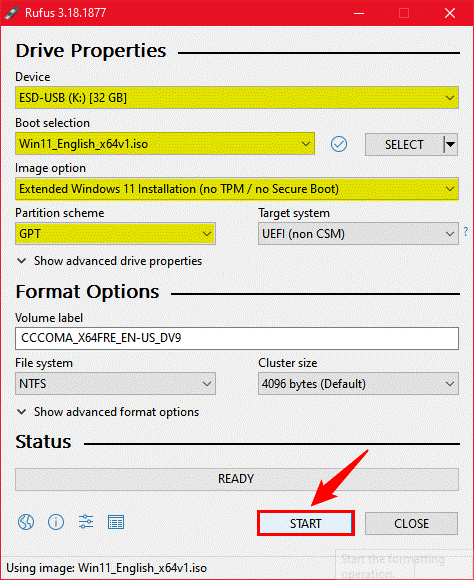
That’s all! Simply wait for Rufus to finish creating a Windows 11 bootable USB drive. This bootable USB can install Windows 11 on PCs that have no TPM and Secure Boot.
Parting Remarks
Finally, it’s time to call this article a wrap. We’ve just gone over 5 methods to install Windows 11 on an unsupported CPU. To install Windows 11 on an old PC, you can either use the Regedit hack method or simply create a bootable USB drive with no requirements check using Rufus. Which method did you attempt? Please share your ideas with us.
Meanwhile, don’t forget to check other Windows guides on this website.
Popular Post
Recent Post

Advanced SystemCare: Tool To Clean Your PC
Your computer slows down over time. Files pile up, junk builds inside the system, and things start to feel sluggish. You open a browser, and it takes forever. Programs crash without warning. This is a sign that your PC needs a good cleanup. Many users ignore these signs. They think buying a new computer is […]

Top 10 PC Cleaning and Optimization Tools For Windows 11/10
Discover the best PC cleaning and optimization tools for Windows 11 and 10. Remove junk files, improve speed, and keep your PC healthy with trusted cleaners.

Clear Microsoft Teams Cache On Windows PC [Complete Guide]
Learn how to clear Teams cache on Windows PC with 3 easy methods. Fix slowdowns, glitches, and errors fast. A simple guide for every Windows 11 user.

How To Clear Browsing History on PC: Chrome, Edge, Firefox, Opera
Learn how to clear browsing history on PC across Chrome, Edge, Firefox, and Opera with easy steps, tips, pros, and FAQs.

Clear Cache and Cookies: Complete Guide For Windows 11/10
Learn how to clear cache and cookies on Windows 10 and 11. This complete guide covers Chrome, Edge, and Firefox with simple, step-by-step instructions for every user.

How To Clean PC Trackpad/Touchpad Without Damaging It
Learn how to clean PC trackpad and clean PC touchpad safely with simple steps. Improve performance, remove dirt, and keep your laptop surface smooth and responsive.

How To Clean Your GPU/Graphics Card [Complete Guide]
Introduction A graphics card is one of the most important parts of a computer. It handles visuals, gaming, video editing, and design work. Over time, dust builds up inside it. This dust blocks airflow and traps heat. When heat increases, performance drops. In some cases, the system may even crash. That is why learning how […]

How To Clean PC Power Supply Unit Safely Without Damaging
Follow simple, safe steps to clean your computer’s power supply unit. Improve cooling, reduce overheating, and protect your PC’s performance.

How To Clean a CPU Without Damaging It [Complete Guide]
Learn how to clean a CPU safely without damage. Follow simple steps, precautions, and methods to improve cooling, boost performance, and extend your computer’s life.

How To Clear Browser Cache On Windows 11/10 [Chrome, FireFox, Edge]
Learn how to clear browser cache on Windows 11 and 10. Follow simple steps to clean browser cache, fix slow browsing, and improve performance easily.
