How To Clean a Computer Motherboard [Mainboard] Without Damage
Abstract: This page provides complete details on how to clean a motherboard without damaging it and also tips for expanding its lifespan.
The motherboard is one of the most important parts of your computer. Cleaning and maintaining it regularly is extremely crucial to ensure that it functions properly and delivers optimal performance. However, a major challenge is that it is slightly fragile. Therefore, you need to be extra careful while handling the motherboard.
If you want to clean the motherboard, do it carefully to prevent the risk of permanent damage. Right from removing the components to cleaning and eventually arranging them back, make sure to handle every component carefully. This blog guides you through a detailed procedure on how to clean the computer motherboard without damaging it.
Part 1: Why Clean Computer Motherboards?
You must clean the motherboard to maintain optimal system performance. Dust accumulation on the motherboard can lead to component failure, overheating, and short circuits. Regularly cleaning the motherboard is crucial to avoid these issues.
You need to clean your system once every six months, but this doesn’t mean that you should not clean it at all during this month. Regular dusting is advisable during this time to prevent accumulation and eventual short circuit. Dust accumulation can also heat the system.
Part 2: Equipment Needed for Motherboard Cleaning
When cleaning a motherboard, you need simple tools only, some of which include:
- Head screwdriver
- Blower bulb
- Cotton swabs or balls
- Cleaning brush
- Thermal brush
- Isopropyl alcohol (99%)
- Canned air duster
- Anti-static may
- Anti-static wrist strap
- Anti-static plastic sheet

Part 3: Steps to Clean a Computer Motherboard
You need to follow a step-wise procedure for cleaning the motherboard carefully. Whether it is dismantling everything or using isopropyl alcohol, you must be mindful. You should wash your motherboard regularly, dusting and brushing it once or twice a month. Keeping the system motherboard in best condition is crucial to ensure a long-lasting, exceptional performance.
Referring to your motherboard manual can be of great help for faster cleaning. Here’s a detailed procedure on how to clean a system motherboard without damaging it:
Step 1: Removing the Motherboard
Wear the anti-static wrist wrap and then start unplugging the components from the back of the PC. Make sure that you’re unplugging them somewhere spacious for better cleaning.
Open the side panel and remove power to the graphics card. After that, unscrew the graphics cards and push the latch that is locking your graphics card. After that, you must lift the graphics card from one end. It is recommended to use both hands while removing the graphics card. Once you’re done removing the graphics card, you can unlatch and then remove the RAM sticks.
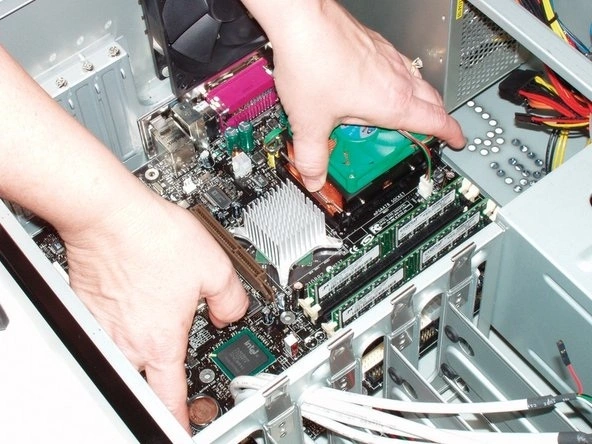
Click a picture of all the motherboard connectors and then unplug them. These connectors are usually plugged with the texts in the opposite direction of the motherboard. If you are going to apply the thermal paste, it is recommended to remove the CPU cooler.
Unscrew the CPU cooler from the processor following a cross pattern. For easy removal, loosen every corner so that it can be taken out easily. Always twist the cooler back and forth for easy removal rather than putting extra force to pull it off. After removing everything, unscrew your motherboard and place it on an anti-static mat.
Step 2: Dusting the Motherboard
Use a light brush for dusting the motherboard. You must clean the VRM heat sink area too. However, it is advisable that you brush lightly and not with additional force as it can rip the wires. After that, you may use a blower bulb or compressed air for removing any loose dust that may be there on the system.

Compressed air is often an ideal choice if there’s excessive dust accumulation. However, if there are stubborn dust particles, you must use cotton swabs. You may use a good-quality contact cleaner too and then wipe the area using a cotton cloth.
Step 3: Thermal Paste Application
You must apply the thermal paste if you have removed the CPU. After applying the thermal paste, you must also remove it from the cooler or CPU using a cotton ball soaked in 99% isopropyl alcohol. Rub the damp ball over the stain in circular motions.
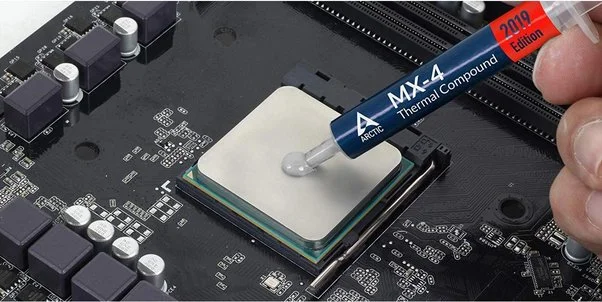
After cleaning, if alcohol streaks are still left, wash them using an alcohol ball. You must use only a small amount of thermal paste on your CPU. After that, you can arrange the cooler properly before pressing it to prevent uneven spreading. Next, screw every corner properly in a cross position and align the placement to avoid the risk of uneven spreading.
Step 4: Arranging it Again
After you’re done with everything, you will have to arrange it back again. It will take some time, especially the screwing process, so make sure that you’re doing it properly. You must screw the front header panels and refer to the photographs you took earlier for reference.
You can refer to your motherboard manual to understand how to attach it back. However, if the manual is not present, you can extract the information online as well using your motherboard’s model number.

You should be extra careful while putting back the RAM, graphics card and CPU cooler. After that, you must plug the power connectors to your graphics card and motherboard. Finally, you must focus on the smallest connectors. It is recommended to check for fan connectors as well and not miss out on any important detail.
Part 4: Things to Avoid While Motherboard Cleaning
While cleaning the motherboard, there are specific things you must be mindful of. If you do these, you’ll be causing irreparable damage. Some of the key things to avoid are as follows:
- Never pour any type of liquid on your motherboard directly. Even if your system isn’t plugged in, you should avoid pouring liquid as it can seep into tight spots and it will evaporate.
- For cleaning the motherboard, you must not use anything apart from contact cleaner, isopropyl alcohol, and distilled water. You must use solvents that can easily evaporate so you can put back the components together after cleaning.
- You must not use a vacuum ever for cleaning the motherboard. Vacuums can lead to static charge, which will potentially damage the motherboard when it is not plugged. Instead of vacuums, you may use blowers.
- Do not use hard brushes as it may rip off the wiring damaging the entire motherboard.

Part 5: How to Expand Motherboard Lifespan?
Follow the tips below to expand the lifespan of the motherboard:
- Keep the motherboard clean: A clean motherboard isn’t prone to overheating and ensures proper power supply. Dust and dirt accumulation prevent communication across all components, thereby having a negative impact on power supply.
- Maintain the cool: Even if the motherboard is extremely clean, it can be prone to overheating issues due to lack of ventilation. It is recommended to keep the system cool and keep it away from any heat sources like a radiator or heating vent.
- Use a surge protector: You must use a surge protector to maintain the system motherboard. Sudden electricity surges or lightning can damage the motherboard.
- Keep an eye on the power supply: Always check the power supply as unstable voltage can damage your system. You should keep an eye out for PSU failure, like abrupt shutdowns or noise coming from the unit. In this case, you must change the unit immediately to avoid the risk of power failure.
Conclusion
If you are not planning to upgrade your system, especially the motherboard, it is advisable to clean it regularly. A clean motherboard is less prone to errors. However, if you have a dirty motherboard, it can destroy the entire system. A motherboard plays a crucial role in improving the performance of your system. You must adhere to the dos and don’ts of cleaning the motherboard to prevent the risk of permanent damage.
FAQs
- How to clean the motherboard without damaging it?
When cleaning the motherboard, it is advisable to be extra cautious. You must use short bursts of compressed air to remove dust.
- Can I use thinner to clean a motherboard?
No, you must never use a thinner for cleaning the motherboard. These thinners can damage electronic components. Instead, you must use solvents that do not cause harm to the motherboard.
- What is the best cleaner for a motherboard?
A regular dry toothbrush works the best for cleaning a motherboard. However, it is still advisable that you’re extra careful with it.

Author Bio:
Dinesh Lakhwani, the entrepreneurial brain behind “TechCommuters,” achieved big things in the tech world. He started the company to make smart and user-friendly tech solutions. Thanks to his sharp thinking, focus on quality and the motto of never giving up, TechCommuters became a top player in the industry. His commitment to excellence has propelled the company to a leading position in the industry.
Popular Post
Recent Post
BleachBit PC Cleaner Tool: Complete Review After Running Tests
A PC never stays clean on its own. Every app you open, every website you visit, and every file you download leaves something behind. Weeks turn into months, and suddenly your storage feels tight, and your PC feels slower, with no clear reason why. The usual fix is a cleaning tool. But the market is […]

Iolo System Mechanic Review: Full Breakdown and Honest Take
Iolo System Mechanic is designed for users who want their PC to feel fresh and responsive again. With just a few clicks, it digs into the system, clears out unnecessary clutter, and delivers noticeable speed improvements. The interface is straightforward and beginner‑friendly, making it easy to navigate without confusion. But this tool goes beyond simple […]

Clean Master for PC Tested: A Full Breakdown of Its Tools
A computer doesn’t slow down overnight. Right? It happens bit by bit. Extra downloads, leftover cache, startup apps piling up. Soon the fast machine you loved feels sluggish. Boot times drag, programs freeze, and even opening a browser tab feels heavy. This slow decline is common, caused by junk files, cluttered registries, and hidden tasks […]
How To Clean Your PC/Laptop: Guide for Beginners to Experts
A computer never announces that it needs help. Well, yes! It just gets slower, hotter, and noisier, one day at a time, until you finally stop and wonder what changed. Nothing changed overnight. What happened is dust and clutter, working quietly in the background for months. Dust settles inside fans and vents, trapping heat and […]

Wise Care 365 PC Cleaner Tool: A Hands-On Review
Every Windows user knows the feeling. Your computer runs fast on day one. Then months pass. Files pile up. The registry gets messy. Startup takes longer. Apps freeze more often. This slow decline is normal, but it is also annoying. Most people just live with it. Some restart their PC often, hoping it helps. It […]
Glary Utilities PC Cleaner: Complete Review [Tested and Trusted]
Glary Utilities is one of the most popular PC optimization tools available today. It combines cleaning, repair, and performance‑boosting features into a single suite. The goal is simple: keep your computer running fast and stable without needing multiple separate programs. In this review, we’ll look at how Glary Utilities performs in real use, what features […]
Microsoft PC Manager: Complete In-Depth Review
A slow computer can ruin your whole day. Files pile up. Startup apps multiply. Before you know it, your once fast machine feels sluggish and tired. Most people search for a fix, but many tools out there are bloated, pushy, or full of ads. Microsoft PC Manager was built to solve this exact problem. It […]
AVG TuneUp Guide: Features, Pros, Cons, and Pricing
PC performance often drops with time. Junk files build up. Startup programs increase. Storage fills up. As a result, your computer may take longer to boot, feel sluggish, or run out of space. The good news is that these problems are usually easy to fix. AVG TuneUp is a PC optimization tool for Windows. It […]

Ashampoo WinOptimizer: Features and Process [Complete Guide]
Ashampoo WinOptimizer is built for users who want a faster, cleaner, and safer PC. In this review, I’ll walk through its features and how the optimization process works. The software promises one‑click fixes, smart automation, and tools that go beyond basic cleanup. The PC cleaning and optimization tool covers performance tuning, privacy protection, and system […]

Top 10 PC Cleaning and Optimization Tools For Windows 11/10 [2026]
Discover the best PC cleaning and optimization tools for Windows 11 and 10. Remove junk files, improve speed, and keep your PC healthy with trusted cleaners.
