How to Fix “Zoom Share Screen Not Working” on Windows 11
Zoom is the most important app today to conduct virtual meetings and share presentations. But unfortunately, Zoom is not a perfect video conferencing tool. Many users have complained about the error code 105035 while sharing the screen on Zoom.
The Zoom screen share not working is a pretty common and fixable problem. Often small issues like outdated Windows versions, an outdated Zoom app or an unstable network connection can cause screen sharing problems.
However, some of the issues are a bit deeper and require technical assistance. And that’s when you refer to this post to fix the Zoom screen not sharing. So, let’s dig in.
How to Fix Zoom Share Screen Not Working on Windows 11?
The Zoom share screen not working can be caused due to several reasons. Thus, we recommend you use the best fix according to your problem. However, if you don’t know what is causing Zoom screen share not to work on your computer, you can try all these solutions:
Solution 1. Optimize Zoom Settings
If you have recently changed your Zoom app settings or updated the app, you might need to reconfigure your settings to fix Zoom screen share not working on your PC. Follow these steps to configure Zoom app settings:
Step 1. Right-click on the Zoom icon from the Taskbar and select Exit. This will remove the temporary cache that might have been causing the problem.
Step 2. Now, relaunch the Zoom app and go to Settings from the top-right gear icon.
Step 3. Click on the Share Screen tab and check the option stating “Enable remote control of all applications.”
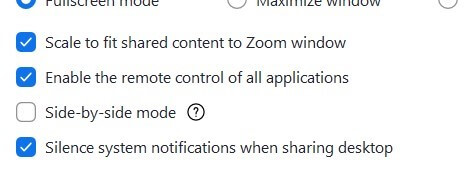
Step 4. Exit the app. Right-click on the Zoom icon and select Run as administrator.
Step 5. Click on the Advanced options and select a value below them ten from the dropdown menu. Tick the “Limit your screen share to (_) frames-per-second” checkbox.
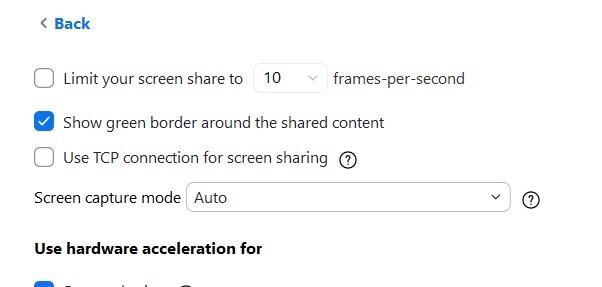
Step 6. Now, exit and relaunch the Zoom app to see if the screen share is working now.
Solution 2. Remove the Preferred Graphics Processor Settings
By default, Windows 11 has enabled automatic switching GPUs to save battery life. This may lead to Zoom screen share not working. Thus, you can disable this setting as follows:
Step 1. Press Windows + S keys to launch the Windows Search bar and type NVIDIA Control Panel.
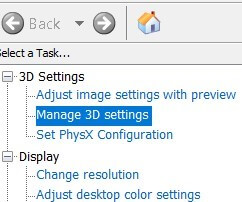
Step 2. From the left pane, click on the Manage 3D settings.
Step 3. Under the Program Settings tab, click on the Add.
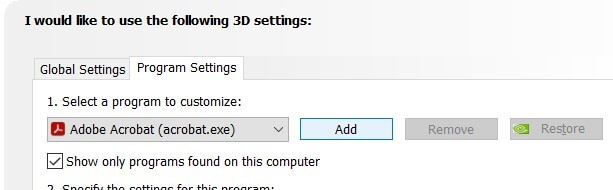
Step 4. Go to Zoom’s installation directory.
Step 5. Next, navigate to the Zoom > Bin Folder > .EXE > Open. Double-click on the CptHost.exe application to add the file.
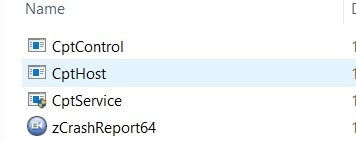
Step 6. Go to the Manage 3D Settings window. There you will find the file you have just selected.
Step 7. Select “Integrated graphics” from the dropdown menu.
Step 8. Click on Apply to save all the changes.
Solution 3. Update Graphics Drivers
If you have an outdated graphics driver on your PC, it can trouble Zoom screen sharing. So, update your graphics drivers as follows to fix the issue:
Step 1. Press Windows + R keys to open the Run dialogue box.
Step 2. Type devmgmt.msc and press the OK button.
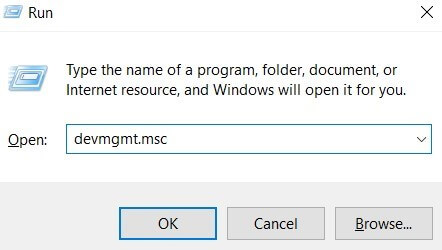
Step 3. Expand the Display adapters menu, and select Update Driver Software after right-clicking on the Graphics card name.
Step 4. Select Automatically to search for new driver software. Now, the latest drivers will be automatically installed on your computer.
However, you can use Driver Easy to automatically update your graphics driver. The software can scan your system and automatically update all the correct drivers.
Solution 4. Enable App Permissions
There is a possibility that you have not given camera and microphone usage permissions to Zoom. This can be the main reason for the problem. Thus, you can cross-check your app permissions to fix the Zoom screen share not working. So, check the settings as follows:
Step 1. Press Windows + I keys to open the Windows Settings.
Step 2. Select Privacy and navigate to the Camera settings under App permissions.
Step 3. Switch on these two options — “Allow access to this device’s camera” and “Allow apps to access your camera.”
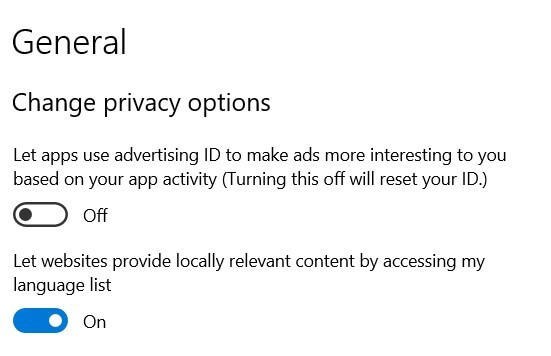
Step 4. In addition, enable the “Allow desktop programs to access your camera” option. Repeat the process with the microphone settings.
Solution 5. Reinstall the Zoom app
In many cases, the Zoom app has not been installed properly. Or, the app is outdated, leading to a buggy interface. Thus, you can uninstall and reinstall the app to fix the issues related to the app. To do so:
Step 1. Press Windows + S, type Control Panel, and hit Enter.
Step 2. Look for the Zoom app under the Installed Programs and Features, and then right-click on it and select Uninstall.
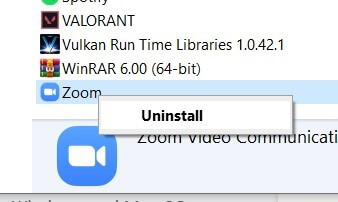
Step 3. Once the uninstallation process is done, go to the Microsoft Store and search for Zoom. After that, download and install it on your computer.
Solution 6. Ensure Participants’ Screen Sharing Is Enabled
If the Zoom meeting host has disabled the “Screen sharing by participants” for the meeting, you can not share your screen. So, you have to request a host to allow all participants to share their screens. If you are hosting the meeting, you can enable screen sharing for all participants as follows:
Step 1. Click on the Advanced Sharing Options next to the Share Screen button.
Step 2. Check the All Participants under the Who can share option.
Solution 7. Enable the Share Computer Sound Option
It is essential to check the Share Computer Sound option if your Zoom call is not working. Usually, this setting is turned off to eliminate interruptions from your computer. Here’s how you can activate this option:
Step 1. Click on the Share Screen icon and look for the Share Computer Sound.
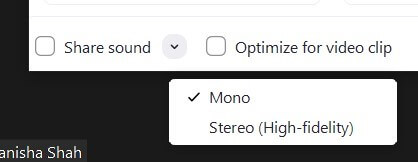
Step 2. If it is disabled, check the box next to it to enable the Share Computer Sound. Also, enable the Optimize Screen Sharing for Video Clip setting located next to the sound option.
Solution 8. Stop Zoom Call Before Screen Sharing
Zoom app’s performance totally depends on your internet speed. Thus, if you have a slow internet speed, first stop your Zoom video call and then share the screen. That’s because video conferencing consumes more bandwidth.
Simply select Share Screen from the bottom once you stop the video call. In addition, if you enter the Zoom room with the video already turned on, Zoom screen share will not work.
So, only activate audio while sharing a screen when your internet connection is not powerful enough.
Solution 9. Give All the Essential Permissions
Zoom might not share a screen when you have not given specific permissions to it. Screen sharing relies upon various resources, including screen recordings, audio, camera, microphone, etc.
Thus, check all the audio and video-related settings to ensure Zoom can easily initiate screen sharing.
Bottom Line
Zoom is an integral part of your personal and professional life. And screen sharing is extremely important to host webinars, make virtual presentations or simply share your personal information.
Thus, when the Zoom share screen is not working in Windows 11, don’t panic. Simply follow the solutions discussed in the post and easily share your screen.
Happy Zooming, people! And don’t forget to check other interesting guides on this website.

Author Bio:
Dinesh Lakhwani, the entrepreneurial brain behind “TechCommuters,” achieved big things in the tech world. He started the company to make smart and user-friendly tech solutions. Thanks to his sharp thinking, focus on quality and the motto of never giving up, TechCommuters became a top player in the industry. His commitment to excellence has propelled the company to a leading position in the industry.
Popular Post
Recent Post
BleachBit PC Cleaner Tool: Complete Review After Running Tests
A PC never stays clean on its own. Every app you open, every website you visit, and every file you download leaves something behind. Weeks turn into months, and suddenly your storage feels tight, and your PC feels slower, with no clear reason why. The usual fix is a cleaning tool. But the market is […]

Iolo System Mechanic Review: Full Breakdown and Honest Take
Iolo System Mechanic is designed for users who want their PC to feel fresh and responsive again. With just a few clicks, it digs into the system, clears out unnecessary clutter, and delivers noticeable speed improvements. The interface is straightforward and beginner‑friendly, making it easy to navigate without confusion. But this tool goes beyond simple […]
Clean Master for PC Tested: A Full Breakdown of Its Tools
A computer doesn’t slow down overnight. Right? It happens bit by bit. Extra downloads, leftover cache, startup apps piling up. Soon the fast machine you loved feels sluggish. Boot times drag, programs freeze, and even opening a browser tab feels heavy. This slow decline is common, caused by junk files, cluttered registries, and hidden tasks […]
How To Clean Your PC/Laptop: Guide for Beginners to Experts
A computer never announces that it needs help. Well, yes! It just gets slower, hotter, and noisier, one day at a time, until you finally stop and wonder what changed. Nothing changed overnight. What happened is dust and clutter, working quietly in the background for months. Dust settles inside fans and vents, trapping heat and […]
Wise Care 365 PC Cleaner Tool: A Hands-On Review
Every Windows user knows the feeling. Your computer runs fast on day one. Then months pass. Files pile up. The registry gets messy. Startup takes longer. Apps freeze more often. This slow decline is normal, but it is also annoying. Most people just live with it. Some restart their PC often, hoping it helps. It […]
Glary Utilities PC Cleaner: Complete Review [Tested and Trusted]
Glary Utilities is one of the most popular PC optimization tools available today. It combines cleaning, repair, and performance‑boosting features into a single suite. The goal is simple: keep your computer running fast and stable without needing multiple separate programs. In this review, we’ll look at how Glary Utilities performs in real use, what features […]
Microsoft PC Manager: Complete In-Depth Review
A slow computer can ruin your whole day. Files pile up. Startup apps multiply. Before you know it, your once fast machine feels sluggish and tired. Most people search for a fix, but many tools out there are bloated, pushy, or full of ads. Microsoft PC Manager was built to solve this exact problem. It […]
AVG TuneUp Guide: Features, Pros, Cons, and Pricing
PC performance often drops with time. Junk files build up. Startup programs increase. Storage fills up. As a result, your computer may take longer to boot, feel sluggish, or run out of space. The good news is that these problems are usually easy to fix. AVG TuneUp is a PC optimization tool for Windows. It […]
Ashampoo WinOptimizer: Features and Process [Complete Guide]
Ashampoo WinOptimizer is built for users who want a faster, cleaner, and safer PC. In this review, I’ll walk through its features and how the optimization process works. The software promises one‑click fixes, smart automation, and tools that go beyond basic cleanup. The PC cleaning and optimization tool covers performance tuning, privacy protection, and system […]
Top 10 PC Cleaning and Optimization Tools For Windows 11/10 [2026]
Discover the best PC cleaning and optimization tools for Windows 11 and 10. Remove junk files, improve speed, and keep your PC healthy with trusted cleaners.
