How to Check Hard Disk Health in Windows – Complete Guide
Your hard disk is the heart of your PC. It stores all the important data and keeps your PC running smoothly. Unfortunately, that means the bad health of your hard disk can make your computer very slow and sluggish. Thus, checking hard disk health in Windows regularly for a high-performing computer system is important.
But how can I check hard disk health in Windows?
There are several ways to perform health checkups in Windows 10/11. From built-in Windows tools to your HDD manufacturer’s diagnostic tools. So, let’s explore all the possible ways to examine your hard drive health.
How to Check Hard Disk Health in Windows?
Poor hard disk health can impact your PC’s overall performance. For example, it can make it hard to run applications, play games, browse the web, and more.
So, ensure to check your hard disk health frequently to fix the problem as soon as it arises. Here’s how to check hard disk health in Windows:
Solution 1. Use BIOS
If you use a relatively modern motherboard, you can check your hard drive’s health in the BIOS. There is no operating system interference required to use this solution.
You simply have to reboot your PC and, afterward, switch it on and off repeatedly. And press Delete + F2 + F12 buttons or other buttons that will take you to your BIOS screen.
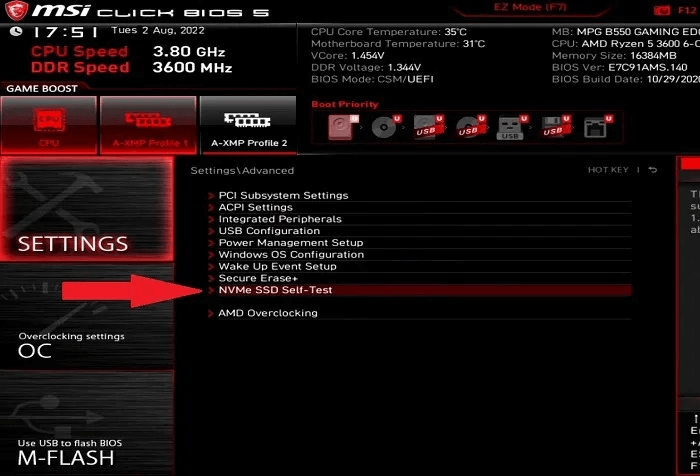
On the BIOS screen, you have to follow the on-screen instructions based on your motherboard’s manufacturer. For example, on the MSI Mortar WiFi B550M, go to Settings > Advanced > N.V.M.E. Self-Test to check the health of the N.V.M.E. drives.
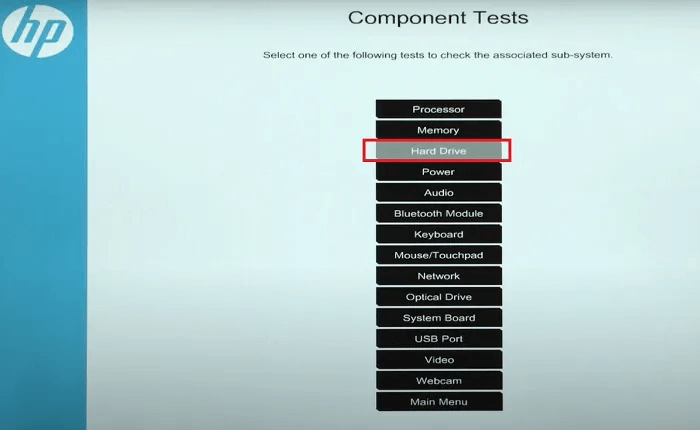
On the latest laptops, a separate UEFI diagnostic tool is available. To access it, press F2 during the boot and then go to Component Tests > Hard Drive to run a checkup on one or more drives.
Solution 2. Optimize and Defrag
Modern S.S.D. (solid state drives) might be faster and more powerful than traditional SATA hard drives. But still, many people prefer to use it for storing data as they are less expensive.
S.S.D.s never need defragmentation because fragmentation is related to where data is physically stored on the drive, and that’s not the case on S.S.D. But they still need optimization.
When you find your non-SSD hard drive slowing down, you can fragment it using the built-in Windows defrag tool:
Step 1. From the Taskbar, open the Search and type disk defrag.
Step 2. Select Defragment and Optimize Drives from the results.
Step 3. Click on your drive and then click on Optimize. It runs a scan for fragmented files and automatically optimizes your drive for better performance.
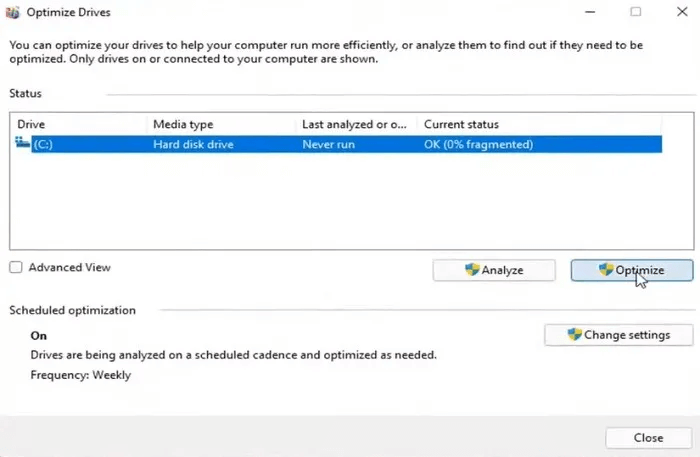
You need to optimize your drive if you are using an S.S.D. on Windows. Again, though, the system will take care of the process automatically.
There are also free defrag tools like Defraggler available to help you. It can detect and reduce fragmentation better. It is the best solution for people who are not comfortable using the built-in defrag tool.
Solution 3. Use Your HDD Manufacturer’s Tools
Most significant hard drive manufacturers offer free, reliable tools to track the health and performance of your hard drive. Knowing the brand of your hard drive is, of course, the first step in determining which one to use.
You can skip this section if you already know the hard drive. If not, follow these steps to find it out:
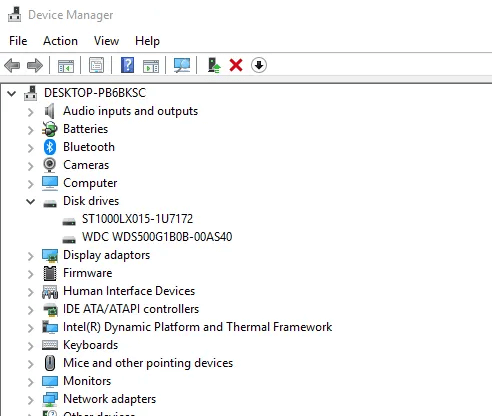
Step 1. Press the Windows key, enter “device manager,” then click the result when it appears in the search results.
Step 2. Unstack the “Disk drives” option in Device Manager and write down the hard drive’s model number.
Step 3. After that, enter the model number into Google to get results that will reveal the hard drive’s manufacturer. Then, look for the hard drive utility on the manufacturer’s support page.
Solution 4. Try Windows C.H.K.D.S.K. Tool
The Windows C.H.K.D.S.K. tool is another built-in Windows tool that allows you to scan your hard disk to detect system errors and bad sectors. It also helps to check hard disk health in Windows.
The best part is that the tool can scan and fix problems. It will also let you manually fix the bigger problem that it can’t fix. For example, you can use this tool to check disk health and fix bad areas with possible solutions.
Here’s how you can use the Windows C.H.K.D.S.K. tool:
Step 1. Click on the Search from the Taskbar and type cmd.
Step 2. Open the Command Prompt as an administrator.
Step 3. Enter chkdsk at the prompt and press Enter. This will run a basic scan for you.
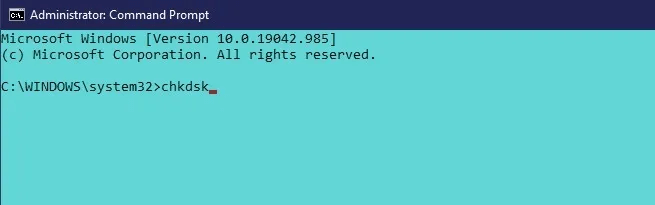
Step 4. You can use this command to fix bad sectors and recover any readable data:
chkdsk /f /r
Step 5. Alternatively, you can use this command to check your hard disk health:
chkdsk /f /r/x
Solution 5. Use the S.M.A.R.T. Tool
W.M.I.C. can help you with various administrative duties, like checking the status of a hard disc. SMART (Self-Monitoring, Analysis, and Reporting Technology) is used to examine the health of a hard drive and deliver a concise verdict. Windows has it built in by default since it’s convenient, even though it’s a simple command with few options.
What you should do is this:
Step 1. Use the shortcut Windows key + R to bring up the Run window. In Windows 10/11, if you press “Enter” after typing cmd, you’ll be taken to the command prompt.
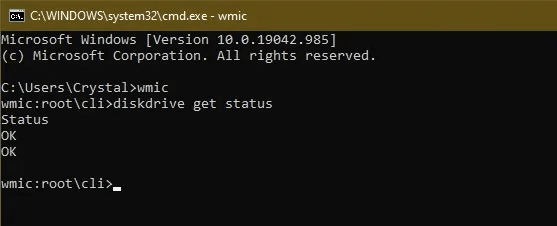
Step 2. Press the “Enter” key after typing “wmic” to run the command.
Step 3. When the prompt appears, enter “disk drive get status” and hit “Enter.”
Solution 6. Use a Third-party Tool
A third party’s hard disc health checking tool will provide you with much more data than just the simple “good” or “bad” status. These programs, including W.M.I.C., rely on the hard drive’s built-in “S.M.A.R.T” system to retrieve information. So instead of simply displaying green or red, they give much more information.
CrystalDiskInfo is an extremely straightforward yet potent utility for this task. The program is free to use, very lightweight, and provides comprehensive data like temperature, health status, hard disc type, and features.
When you’re ready to extract the files, make sure you use the appropriate program for your version of Windows. DiskInfo64, the 64-bit variant, is what you should use here. On the other hand, “DiskInfo32” is an option if you prefer. As a result, the program will launch without requiring further configuration.
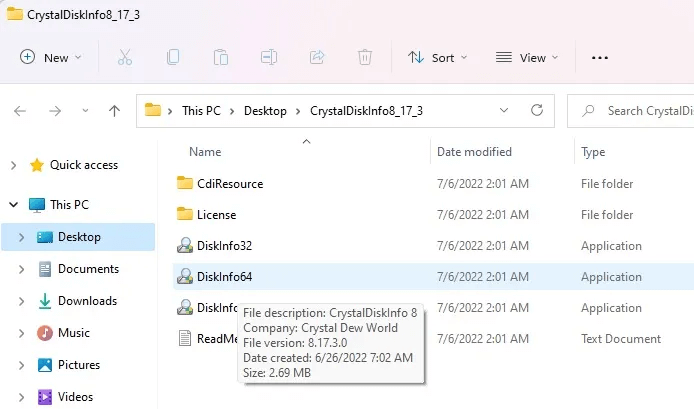
It might seem nothing is happening for about 10 seconds after you launch the tool before you see the full report.
More sophisticated settings are accessible via the “Function” menu. On boot, you can even have it perform a disc health check.
Hard Disk Sentinel and HDDScan are just two examples of the many external hard disc health checking tools available. Of course, many more sophisticated options with awesome features are available, but for the average user, CrystalDiskInfo should do the trick.
The programs mentioned above are useful for determining the status of your hard drive in Windows. The Windows built-in tools should suffice if you don’t require additional information.
What To Do When Your Hard Drive Is Failing?
Naturally, don’t wait if the outcomes of any of the above checks are less than positive. Please act right away. When you discover your hard drive is failing, there are a few things you should do immediately.
Make a copy of all your important data. Begin by making a copy of your most important files if your hard drive is already experiencing serious problems. An entire disc image might have to be skipped if the drive dies before it’s finished.
Gather together the product keys and a list of all the software you have installed. Making a list of everything you need to install and any product keys will simplify migrating from an old drive to a new one.
Regularly save your progress. Make sure you regularly back up any open files to an external drive or cloud storage service if you’re trying to squeeze out the last bit of life from your drive.
It’s a good idea to have a backup drive or device handy. You can go one of two ways. First, a replacement hard drive can be purchased and used on the same computer. This is ideal if your device is still fairly new, such as one or two years. For older devices, it may be time to consider a new computer.
Conclusion:
There you have it! You can now check hard disk health and ensure your computer always performs well.
However, don’t stop at finding problems with your hard disk. Also, try to fix those issues and take precautionary steps to ensure the hard disk always runs perfectly.
That’s it for now. For more Windows guides, keep on following the B.C.C.

Author Bio:
Dinesh Lakhwani, the entrepreneurial brain behind “TechCommuters,” achieved big things in the tech world. He started the company to make smart and user-friendly tech solutions. Thanks to his sharp thinking, focus on quality and the motto of never giving up, TechCommuters became a top player in the industry. His commitment to excellence has propelled the company to a leading position in the industry.
Popular Post
Recent Post
BleachBit PC Cleaner Tool: Complete Review After Running Tests
A PC never stays clean on its own. Every app you open, every website you visit, and every file you download leaves something behind. Weeks turn into months, and suddenly your storage feels tight, and your PC feels slower, with no clear reason why. The usual fix is a cleaning tool. But the market is […]

Iolo System Mechanic Review: Full Breakdown and Honest Take
Iolo System Mechanic is designed for users who want their PC to feel fresh and responsive again. With just a few clicks, it digs into the system, clears out unnecessary clutter, and delivers noticeable speed improvements. The interface is straightforward and beginner‑friendly, making it easy to navigate without confusion. But this tool goes beyond simple […]

Clean Master for PC Tested: A Full Breakdown of Its Tools
A computer doesn’t slow down overnight. Right? It happens bit by bit. Extra downloads, leftover cache, startup apps piling up. Soon the fast machine you loved feels sluggish. Boot times drag, programs freeze, and even opening a browser tab feels heavy. This slow decline is common, caused by junk files, cluttered registries, and hidden tasks […]
How To Clean Your PC/Laptop: Guide for Beginners to Experts
A computer never announces that it needs help. Well, yes! It just gets slower, hotter, and noisier, one day at a time, until you finally stop and wonder what changed. Nothing changed overnight. What happened is dust and clutter, working quietly in the background for months. Dust settles inside fans and vents, trapping heat and […]

Wise Care 365 PC Cleaner Tool: A Hands-On Review
Every Windows user knows the feeling. Your computer runs fast on day one. Then months pass. Files pile up. The registry gets messy. Startup takes longer. Apps freeze more often. This slow decline is normal, but it is also annoying. Most people just live with it. Some restart their PC often, hoping it helps. It […]
Glary Utilities PC Cleaner: Complete Review [Tested and Trusted]
Glary Utilities is one of the most popular PC optimization tools available today. It combines cleaning, repair, and performance‑boosting features into a single suite. The goal is simple: keep your computer running fast and stable without needing multiple separate programs. In this review, we’ll look at how Glary Utilities performs in real use, what features […]
Microsoft PC Manager: Complete In-Depth Review
A slow computer can ruin your whole day. Files pile up. Startup apps multiply. Before you know it, your once fast machine feels sluggish and tired. Most people search for a fix, but many tools out there are bloated, pushy, or full of ads. Microsoft PC Manager was built to solve this exact problem. It […]
AVG TuneUp Guide: Features, Pros, Cons, and Pricing
PC performance often drops with time. Junk files build up. Startup programs increase. Storage fills up. As a result, your computer may take longer to boot, feel sluggish, or run out of space. The good news is that these problems are usually easy to fix. AVG TuneUp is a PC optimization tool for Windows. It […]

Ashampoo WinOptimizer: Features and Process [Complete Guide]
Ashampoo WinOptimizer is built for users who want a faster, cleaner, and safer PC. In this review, I’ll walk through its features and how the optimization process works. The software promises one‑click fixes, smart automation, and tools that go beyond basic cleanup. The PC cleaning and optimization tool covers performance tuning, privacy protection, and system […]
Top 10 PC Cleaning and Optimization Tools For Windows 11/10 [2026]
Discover the best PC cleaning and optimization tools for Windows 11 and 10. Remove junk files, improve speed, and keep your PC healthy with trusted cleaners.
