How To Clean Your PC/Laptop: Guide for Beginners to Experts
A computer never announces that it needs help. Well, yes! It just gets slower, hotter, and noisier, one day at a time, until you finally stop and wonder what changed.
Nothing changed overnight. What happened is dust and clutter, working quietly in the background for months. Dust settles inside fans and vents, trapping heat and putting extra strain on every part it touches. At the same time, cache files, forgotten downloads, and apps you installed once and never opened again pile up inside the software, eating away at memory and storage.
Neither problem announces itself. Both just sit there, growing, until the machine that once felt fast starts to feel like a chore to use.
This guide fixes both sides of the problem, and it does not assume you already know where to start. Part 1 walks through digital cleaning, from emptying the recycle bin to clearing out the registry. Part 2 walks through physical cleaning, from wiping a monitor to opening the case and cleaning the GPU.
Each part is split into three levels, beginner, intermediate, and expert, so you can start small and work your way up whenever you are ready. Nothing here needs special training, just a little time and the right steps for where you are starting from.
-A Quick Overview Of This Guide-
| Section | What It Covers |
| Introduction | Why a clean machine matters |
| Common Signs Your PC or Laptop Needs Cleaning | What to look for before you start |
| Tools You Will Need | What to keep ready |
| Precautions to Clean PC/Laptop | Safety rules for physical and digital cleaning |
| — For Physical Cleaning | 8 rules for handling hardware safely |
| — For Digital Cleaning | 8 rules for handling files and software safely |
| Part 1: How to Clean PC Digitally | Step by step digital cleaning methods |
| — Section A: Beginner | Recycle bin, uninstalling software, browser history, temp files, junk files, thumbnail cache, old photos and videos |
| — Section B: Intermediate | Duplicate files, large files, system files, old ISO/DMG/ZIP files, startup programs, PUPs, background apps |
| — Section C: Expert | Windows update cleanup, registry, delivery optimization files, malware scan, drive optimization |
| Part 2: How To Clean PC Physically | Step by step hardware cleaning methods |
| — Section A: Beginner | Monitor, keyboard, mouse, ports and vents, speakers |
| — Section B: Intermediate | PC cabinet, cooling fans, cables, dust filters, laptop vents |
| — Section C: Expert | GPU, power supply unit, CPU and thermal paste, motherboard, RAM |
| PC Cleaning Mistakes You Should Avoid | Common mistakes and why they cause harm |
| Advantages of Regular PC Cleaning | Why cleaning helps performance, lifespan, and security |
| Disadvantages to Keep in Mind While Cleaning PC | Risks, costs, and time involved |
| Conclusion | Final thoughts and a simple maintenance habit |
| FAQs | 3 common questions answered |
__________________________________________________________________________________
Common Signs Your PC or Laptop Needs Cleaning
Before we get into the steps, it helps to know what to look for. These signs usually mean it is time for a cleaning session.
- The fan sounds louder than usual, or it runs constantly.
- The case or base feels warmer than normal, even during light use.
- Programs take longer to open than they used to.
- The system freezes or slows down without a clear reason.
- Dust is visible around vents, ports, or the keyboard.
- Battery life on a laptop has dropped noticeably.
If you notice two or more of these signs, it is a good time to work through this guide.
Tools You Will Need
Most cleaning tasks in this guide use simple, low-cost tools. Having these ready before you start makes the whole process smoother.
- A can of compressed air, for blowing dust out of tight spaces.
- A microfiber cloth, for wiping screens, cases, and surfaces.
- A small, soft-bristle brush, for loosening stuck dust.
- Isopropyl alcohol and cotton swabs, for cleaning ports and connectors.
- A screwdriver set, for opening a desktop case or a laptop back panel.
With these on hand, you are ready to start cleaning your PC or laptop from the outside in.
Precautions to Clean PC/Laptop:
A little caution goes a long way, especially once you move past simple wiping. These rules apply across every level in this guide, so keep them in mind no matter where you start.
1. For Physical Cleaning:
Physical cleaning means working close to real hardware, so a few careful habits protect both you and your machine. Most of these rules take no extra time, but skipping them is how small mistakes turn into real damage.
- Turn off and unplug first. Always shut down and disconnect the machine before touching any internal part, so there is no live power running through the components you are cleaning.
- Avoid direct liquid contact. Never spray liquid straight onto a screen, keyboard, or circuit board. Spray onto a cloth first, then wipe, so moisture never seeps into a port or gap.
- Ground yourself before touching internals. Touch a metal part of the case, or use an anti static wrist strap, before handling anything inside, since static electricity can quietly damage sensitive parts.
- Handle fans with care. Hold a fan steady while blowing compressed air across it, since letting it spin freely at high speed can strain or damage the motor over time.
- Never force screws or panels. If a screw will not turn or a panel will not lift, stop and check for a hidden clip or a screw you missed, instead of pushing harder.
- Check warranty terms first. Look up your laptop’s warranty before opening it yourself, since some manufacturers void coverage the moment the case is opened.
- Work on a clean, flat surface. Clear the area before you start, so small screws or parts do not roll away or get lost in clutter.
- Keep track of every screw and part. Use a small tray or a labeled container while disassembling anything, so reassembly goes back together correctly.
2. For Digital Cleaning:
Digital cleaning means changing files, settings, and programs, so a wrong move here can affect your data instead of your hardware. These habits keep the process safe without slowing you down.
- Back up important files first. Save copies of anything important before running a deep cleanup or registry tool, in case a step removes something you still needed.
- Use trusted software only. Stick to cleaning tools and antivirus programs from well known, reputable sources, since unfamiliar tools can carry their own hidden risks.
- Avoid unknown files and entries. Do not delete files, registry entries, or settings you do not recognize, especially inside system folders, since some of them are needed for the machine to run properly.
- Run one antivirus at a time. Keep a single antivirus program active on your system, since two running together can conflict and even slow the machine down further.
- Restart after major changes. Reboot your PC or laptop after a big cleanup or software update, so every change takes full effect before you continue working.
- Read prompts before clicking through. Pay attention to what a cleaning tool is about to delete or change, instead of clicking next without checking, since default settings are not always the safest choice.
- Update software regularly. Keep your operating system, browser, and security tools updated, since outdated software is more likely to have gaps that put your cleanup efforts at risk.
- Schedule cleaning during downtime. Run deeper digital cleaning when you do not need the machine right away, since some tools require a restart or a short period where the system is unavailable.
Part 1: How to Clean PC Digitally
Section A: Beginner Level Cleaning
Method 1: Clean Recycle Bin
The recycle bin holds every file you delete. It does not empty on its own. Over weeks, it can fill up with old files and take up real space on your drive.
Step 1: Right click on the recycle bin icon on your desktop.
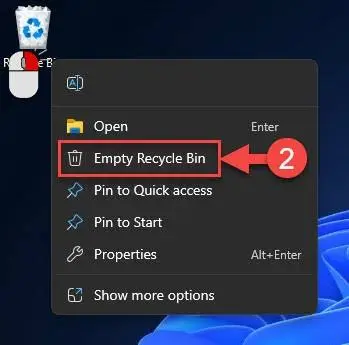
Step 2: Select “Empty Recycle Bin“, then confirm.
Method 2: Remove/Uninstall Software
Many programs sit unused for months. They still take up space, and some even run quietly in the background. Removing them frees storage and speeds up your system.
Step 1: Open the control panel or settings app, then go to apps and features.
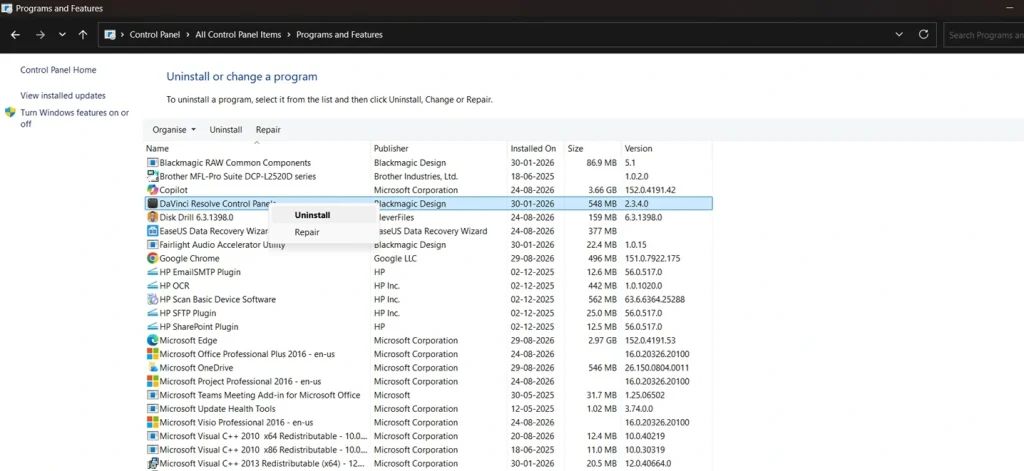
Step 2: Select the program you no longer use, then click uninstall.
Method 3: Clear Browser History
Your browser saves cache and history to load pages faster. Over time, this pile of saved data grows large and can even slow browsing down instead of speeding it up.
Step 1: Open your browser settings and find the privacy or history section.
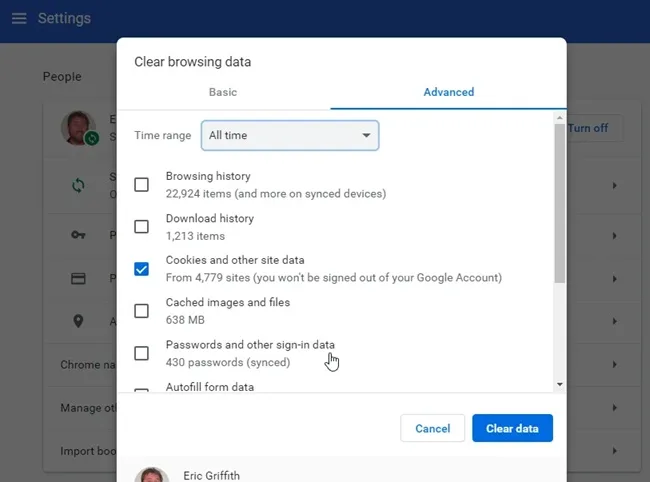
Step 2: Select clear browsing data, choose history, then confirm.
Method 4: Delete Temp Files
Windows creates temporary files while apps run. These files are meant to be short lived, but many stay behind long after the app closes.
Step 1: Press Windows key plus R, type temp, then press enter.
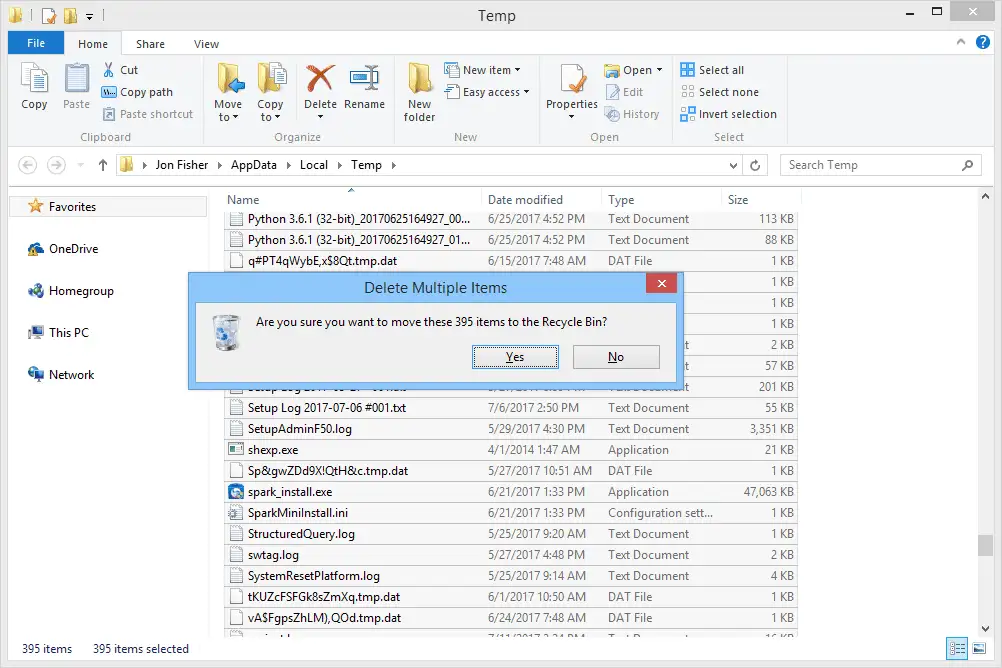
Step 2: Select all files in the folder and delete them.
Method 5: Clean Junk Files
Junk files build up from everyday use. This includes leftover install files, crash logs, and other small files apps leave behind without asking.
Step 1: Open a trusted cleaning tool and run a junk file scan.
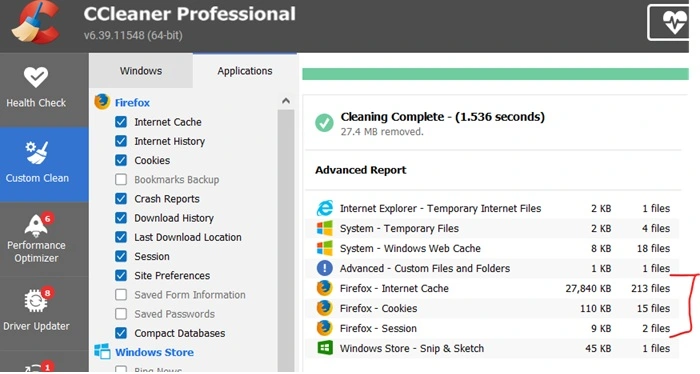
Step 2: Review the results, then let the tool clear them out.
Method 6: Clear Thumbnail Cache
Windows saves a small preview image for every photo and video you open. Over time, this thumbnail cache grows large without you noticing.
Step 1: Open disk cleanup and select your main drive.
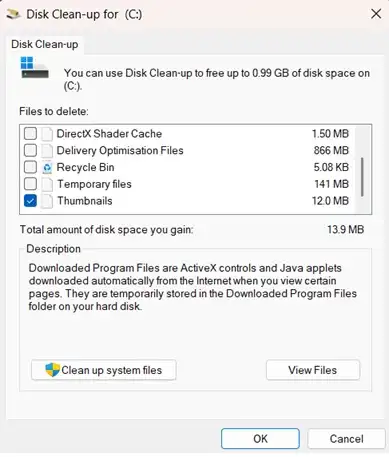
Step 2: Check thumbnails in the list, then click OK to clear it.
Method 7: Clean Up Old Photos and Videos
Photos and videos take up more space than most other file types. Old, unused ones from years back often sit forgotten in folders.
Step 1: Open your pictures and videos folders in file explorer.
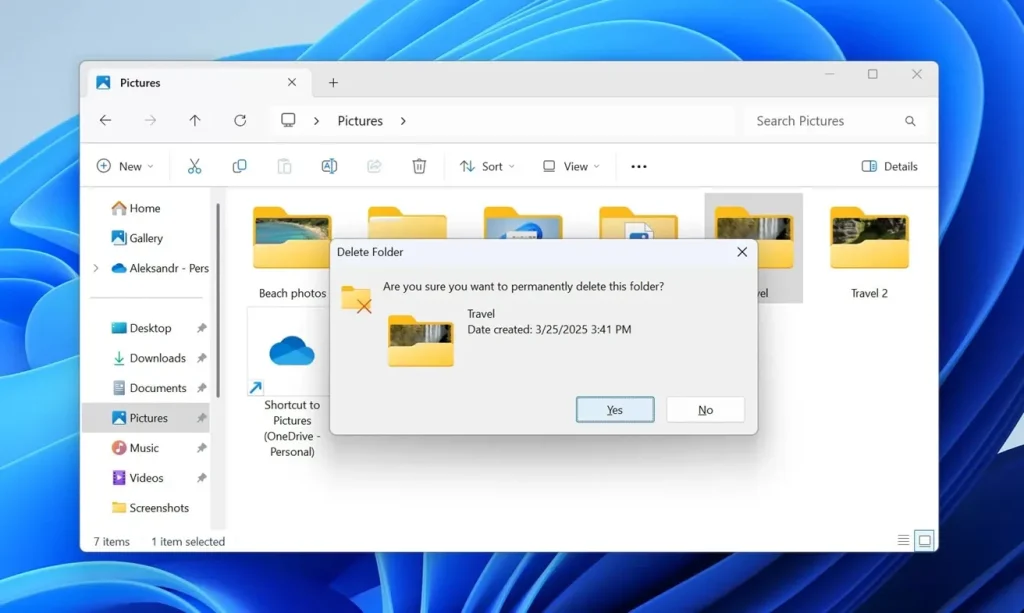
Step 2: Sort by date, then delete or move old files you no longer need.
Section B: Intermediate Level Cleaning
Method 1: Clean Duplicate Files
Duplicate files build up over time, especially in folders like pictures and documents. They quietly take up double or triple the space they should.
Step 1: Open a trusted duplicate file finder tool and scan your main folders. Many PC cleaning tools like CCleaner, Advanced System Care, AVG PC Cleanup also have this feature.
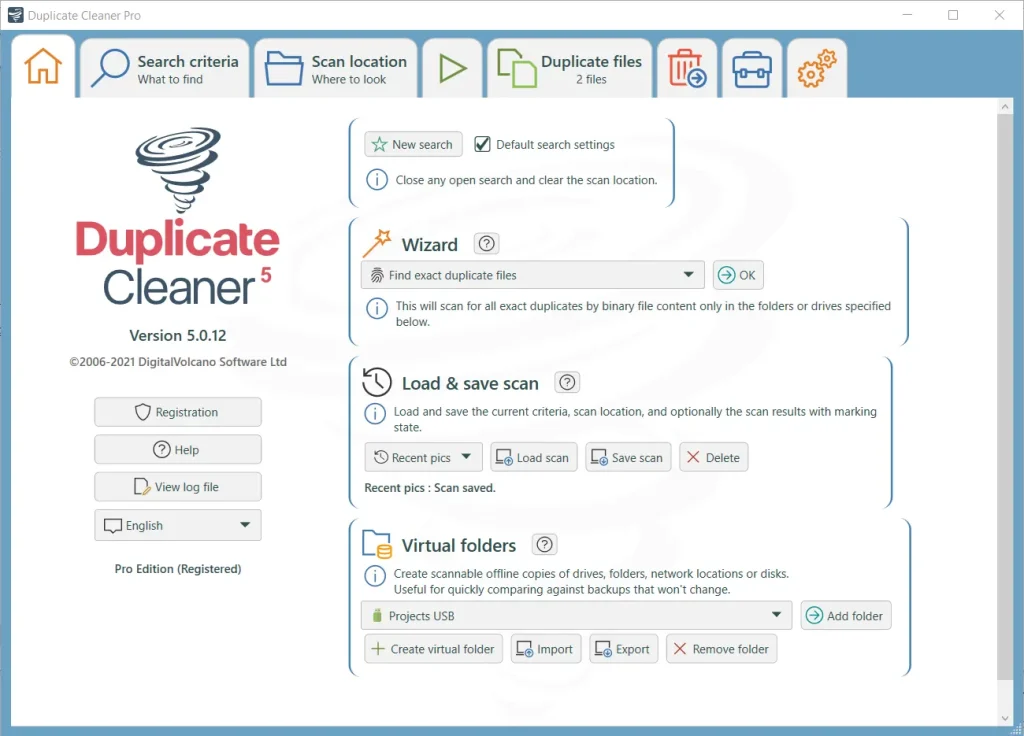
Step 2: Review the results, then delete the extra copies it finds.
Method 2: Find and Remove Large Files
Large files, like old videos or install packages, take up far more space than smaller files. A few of them can eat up a large chunk of your drive.
Step 1: Open file explorer and search using a large file size filter.
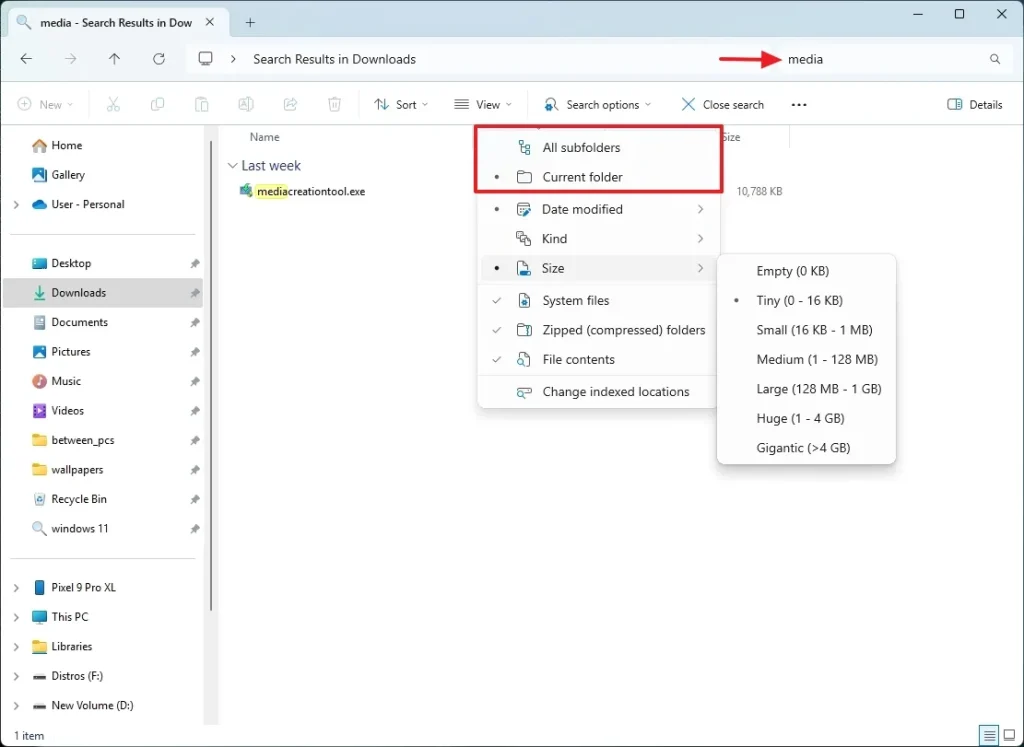
Step 2: Review the results, then delete or move the ones you no longer need.
Method 3: Clean System Files
Beyond regular junk, Windows keeps its own system level files that build up over time. Clearing them out safely frees a good amount of space.
Step 1: Open disk cleanup, then click clean up system files.
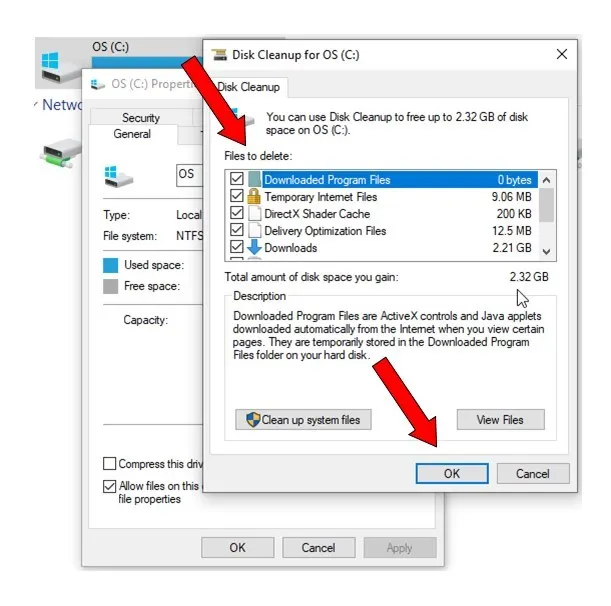
Step 2: Check the system file categories listed, then click OK.
Method 4: Delete Old ISO, DMG, and ZIP Files
Installer files and compressed archives are often downloaded once and forgotten. They tend to be large and sit untouched for months or years.
Step 1: Search your drive for file types like .iso, .dmg, and .zip.
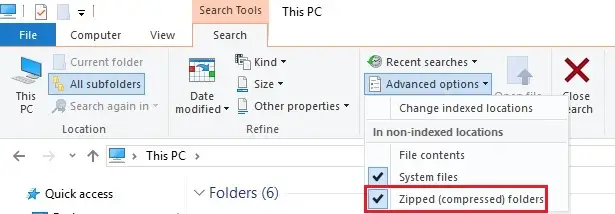
Step 2: Open each one to confirm it is no longer needed, then delete it.
Method 5: Manage Startup Programs
Every program set to launch at startup adds to your boot time. Many of these are not needed the moment you turn the PC on.
Step 1: Open task manager, then go to the startup tab.
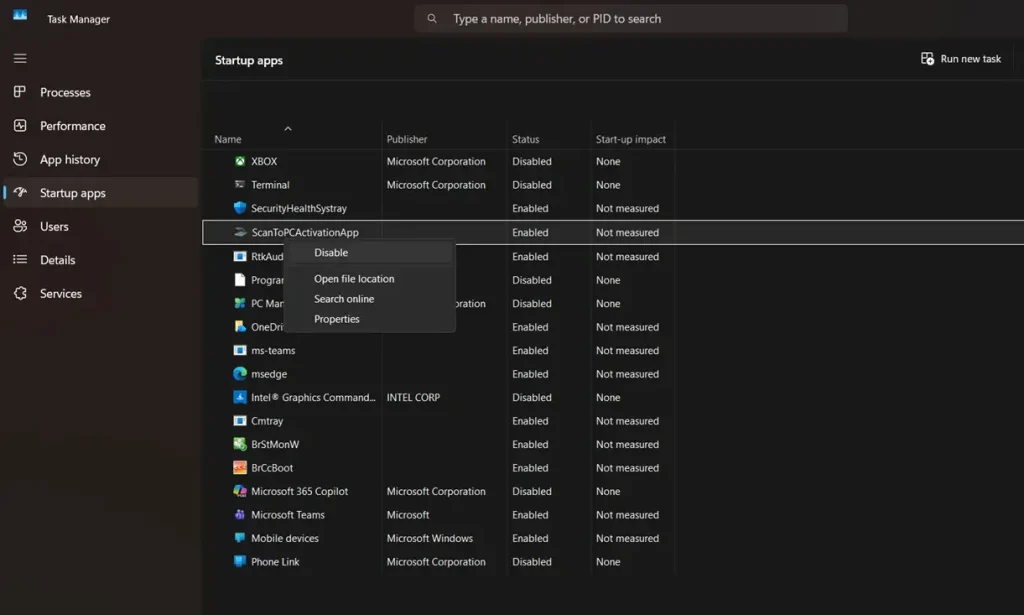
Step 2: Select any program you do not need at startup, then click disable.
Method 6: Remove PUP (Potentially Unwanted Programs)
PUPs often install alongside other software without a clear heads up. They are not always harmful, but they use space and can slow the system.
Step 1: Run a scan using a trusted cleaning or antivirus tool.
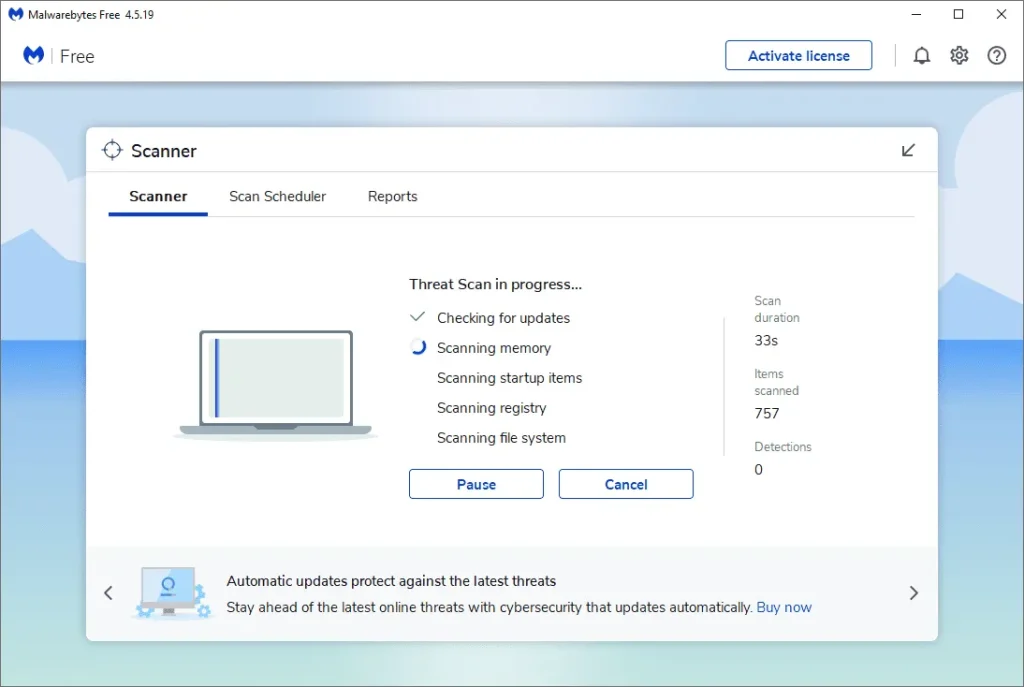
Step 2: Review the list of PUPs found, then remove the ones you do not want.
Method 7: Close Background Apps to Free RAM
Apps running in the background use RAM even when you are not touching them. Closing the ones you do not need frees that memory right away.
Step 1: Open task manager and go to the processes tab.
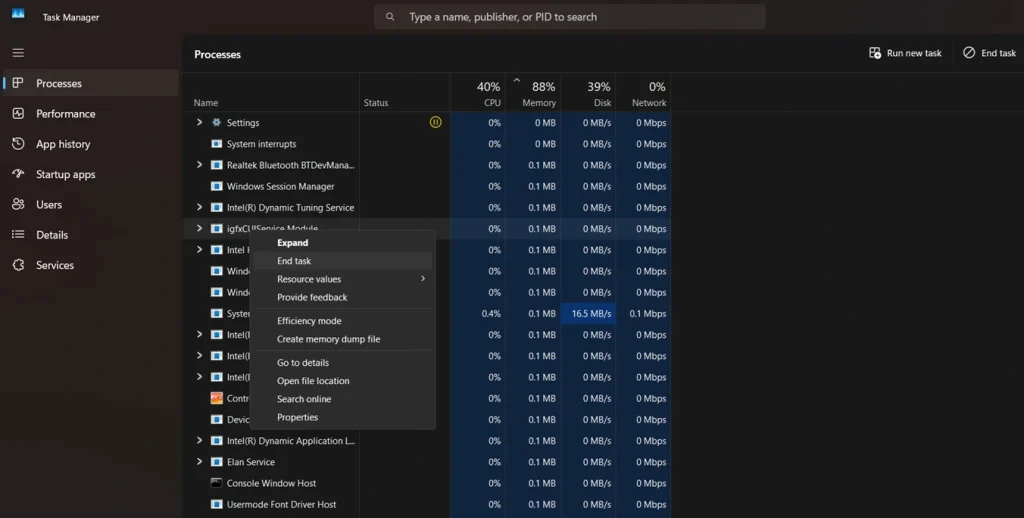
Step 2: Select any background app you are not using, then click end task.
Section C: Expert Level Cleaning
Method 1: Clean Windows Update Files
Windows stores old update files after every install. These files are rarely needed again, but they stay on the drive and quietly take up space.
Step 1: Stop the Windows update service through the services app.
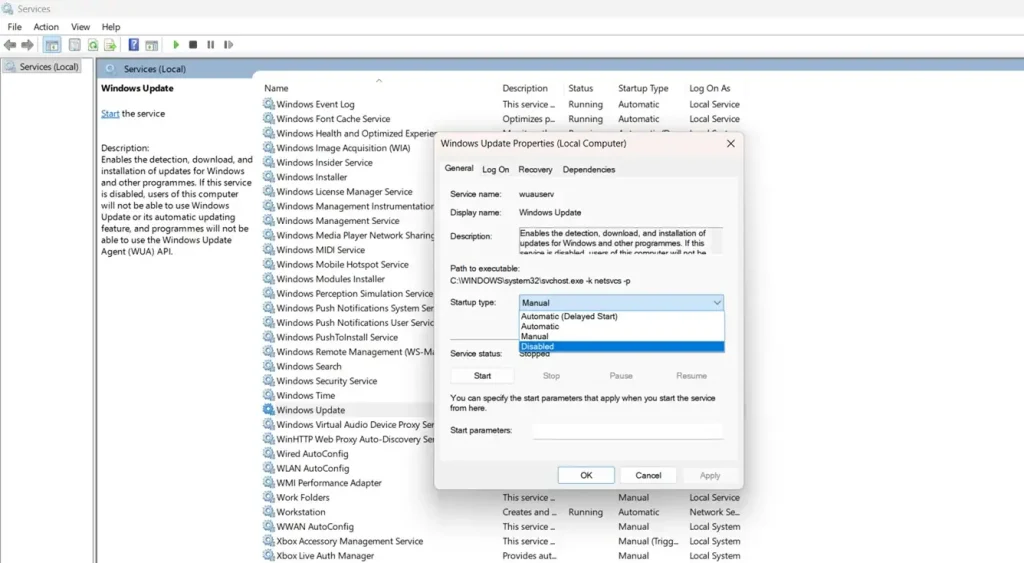
Step 2: Open the software distribution download folder and delete its contents.
Method 2: Clean Registry
The registry stores settings for Windows and your installed programs. Old, unused entries can build up over years and slightly affect performance.
Step 1: Open a trusted registry cleaning tool and run a scan.
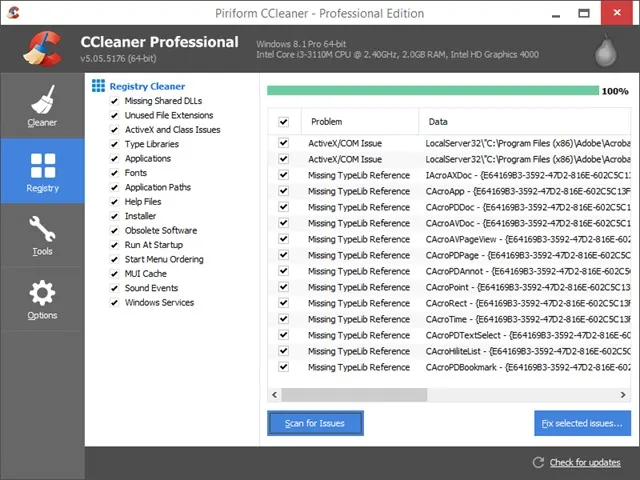
Step 2: Review the flagged entries, then let the tool remove the safe ones.
Method 3: Clear Delivery Optimization Files
Windows uses delivery optimization to share update files between devices on your network. Over time, these cached files build up and take more space than most people expect.
Step 1: Open disk cleanup, then select clean up system files.
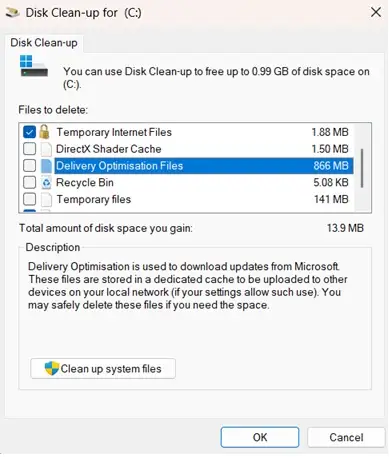
Step 2: Check delivery optimization files in the list, then click OK.
Method 4: Run a Deep Malware Scan
A quick scan checks common areas for threats, but a deep scan checks every file on the drive. This catches threats that a basic scan can miss.
Step 1: Open your antivirus tool and select full or deep scan.
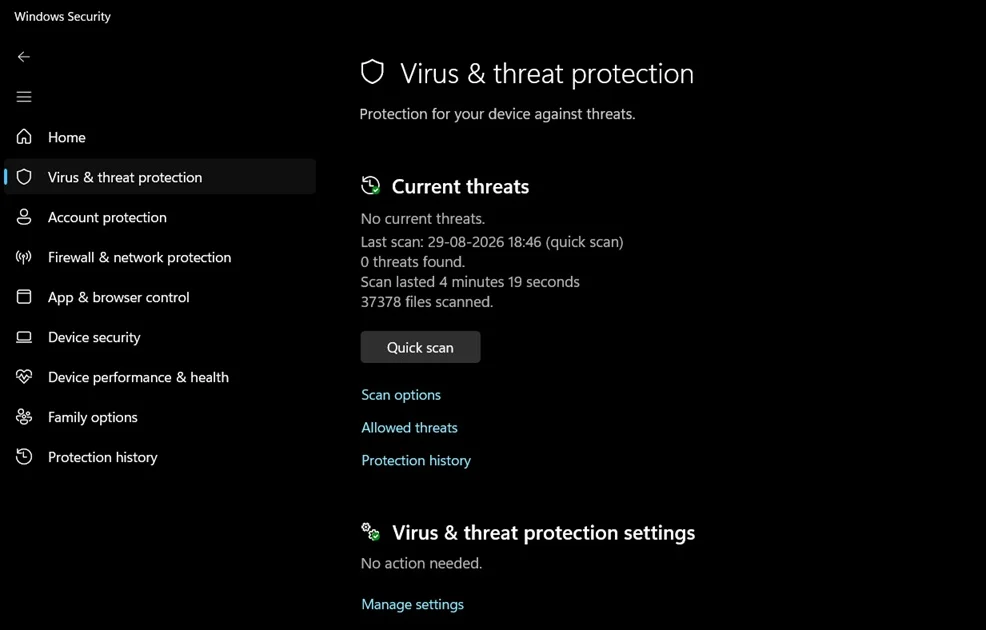
Step 2: Let the scan run completely, then remove or quarantine anything it finds.
Method 5: Optimize or Defragment the Drive
Over time, files get split into pieces scattered across a hard drive. This slows down how fast the drive can read them.
Step 1: Search for “Defragment and Optimize drives” in the start menu.
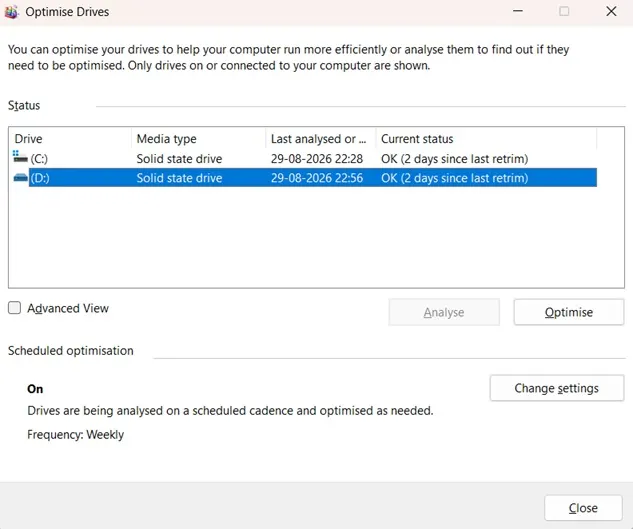
Step 2: Select your drive, then click optimize.
Part 2: How To Clean PC Physically
Section A: Beginner
Method 1: Clean the Monitor/Screen
Screens collect dust, fingerprints, and smudges fast. A dirty screen is not just distracting, it can also strain your eyes over long use.
Step 1: Turn off the monitor, then wipe it with a dry microfiber cloth.
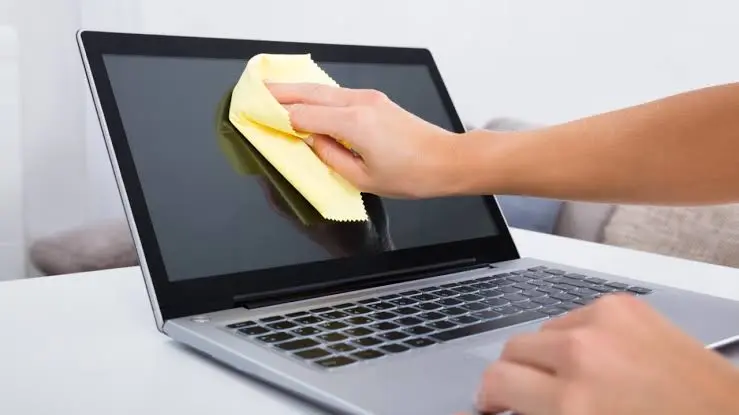
Step 2: For tougher smudges, lightly dampen the cloth with water and wipe again.
Method 2: Clean the Keyboard
Crumbs, dust, and skin oils build up between the keys every day. Left alone, this can even affect how keys press and respond.
Step 1: Turn the keyboard upside down and shake it gently over a trash can.
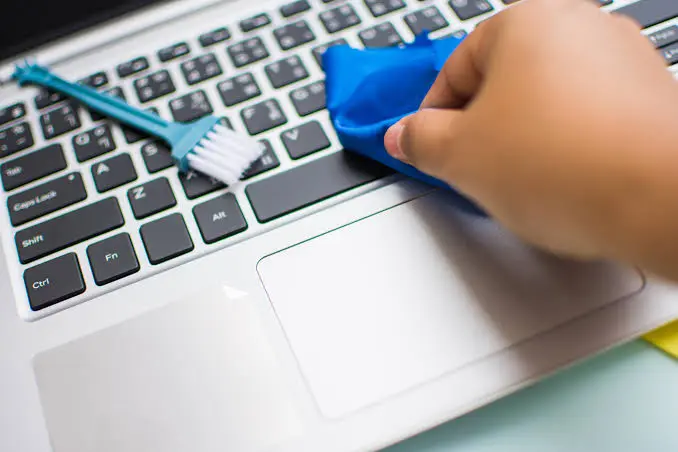
Step 2: Use compressed air between the keys to clear out remaining dust.
Method 3: Clean the Mouse
The mouse picks up oil from your palm and dust from your desk surface. This buildup can make the sensor and buttons feel less responsive.
Step 1: Wipe the outer shell with a slightly damp cloth.
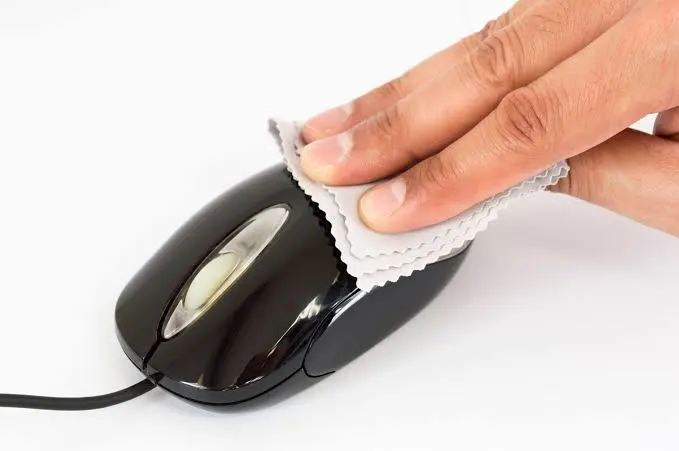
Step 2: Clean the sensor at the bottom with a dry cotton swab.
Method 4: Clean External Ports and Vents
Dust gathers in ports and vents even when the machine looks clean from the outside. Blocked vents especially can trap heat inside.
Step 1: Turn off and unplug the PC or laptop first.
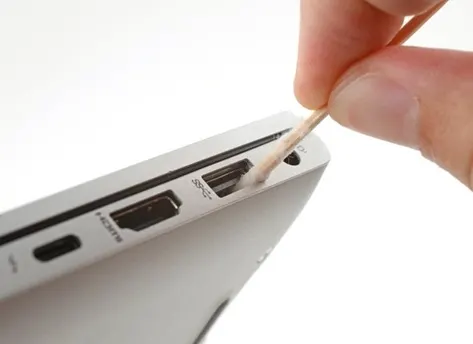
Step 2: Use compressed air in short bursts to clear out ports and vents.
Method 5: Clean Speakers
Dust can settle into speaker grilles and slightly muffle the sound over time. This is easy to miss since the change happens slowly.
Step 1: Use a soft brush to loosen dust from the grille.
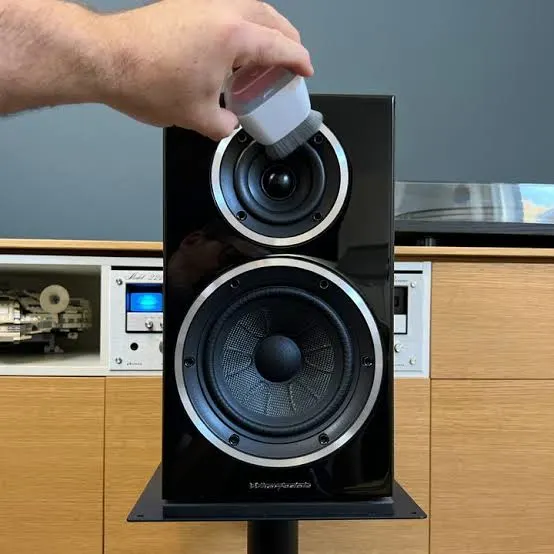
Step 2: Use a vacuum on low power to gently pull the dust out.
Section B: Intermediate
Method 1: Open and Clean the PC Cabinet with Compressed Air
Opening the cabinet lets you reach dust that builds up deep inside, especially near the fans and edges of the case. This step applies mainly to desktops.
Step 1: Turn off, unplug the PC, then remove the side panel with a screwdriver.
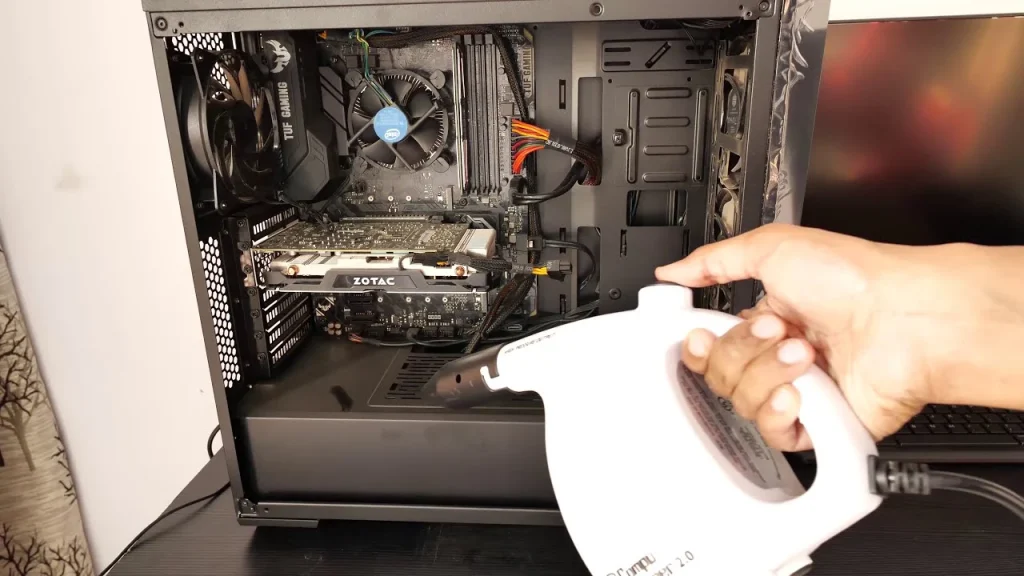
Step 2: Use compressed air in short bursts to blow dust out of the case.
Method 2: Clean the Cooling Fans
Fans work harder when coated in dust, and this raises the internal temperature over time. Cleaning them keeps airflow steady.
Step 1: Hold each fan steady, then spray compressed air across the blades.
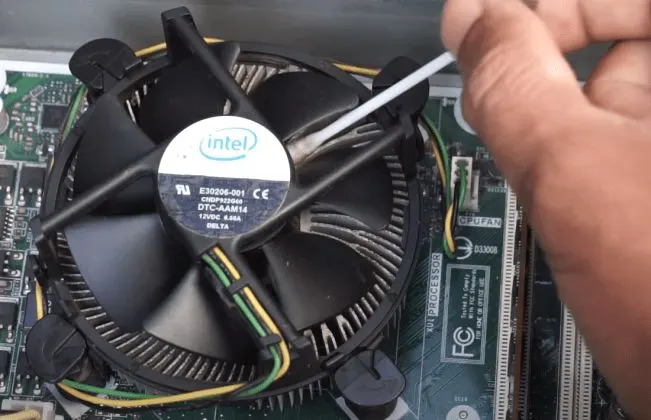
Step 2: Wipe any remaining dust off the fan frame with a dry cloth.
Method 3: Clean and Organize Cables
Tangled, dusty cables can block airflow inside a case and make the inside harder to clean properly.
Step 1: Wipe down each cable with a dry cloth.
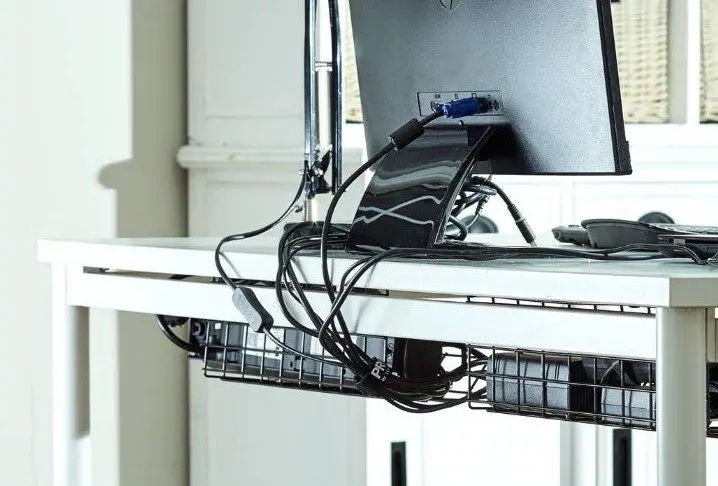
Step 2: Untangle and route the cables so air can move freely inside.
Method 4: Clean Dust Filters
Dust filters catch a large share of the dust before it reaches the inside of the case. A clogged filter blocks airflow just as much as a dusty fan.
Step 1: Remove the dust filters from the front or side of the case.
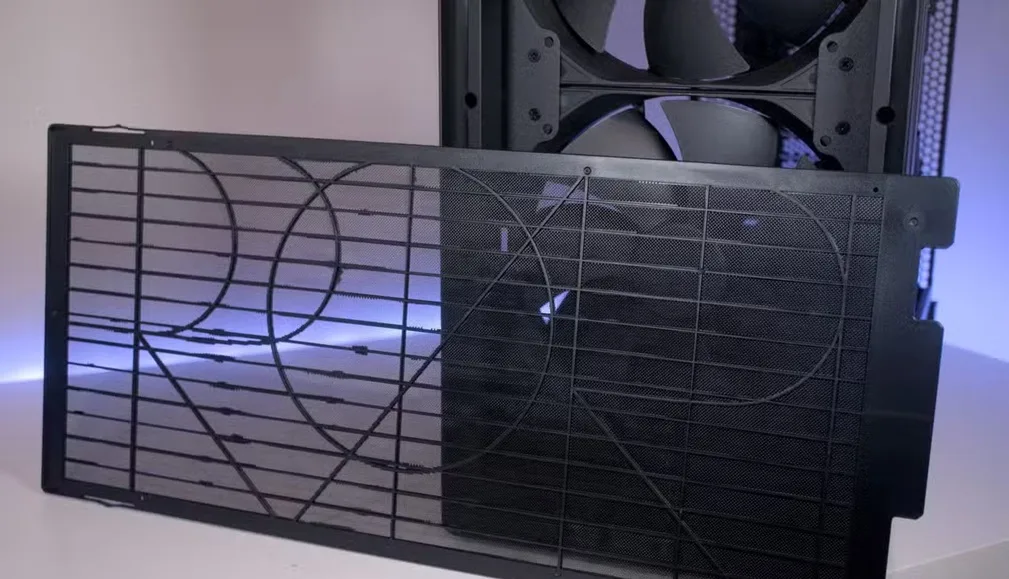
Step 2: Rinse them with water, then let them dry fully before placing them back.
Method 5: Clean the Laptop Vents and Base
Laptops pull air through small vents on the base or sides. These narrow gaps clog with dust faster than most people expect.
Step 1: Turn off and unplug the laptop, then place it on a flat surface.
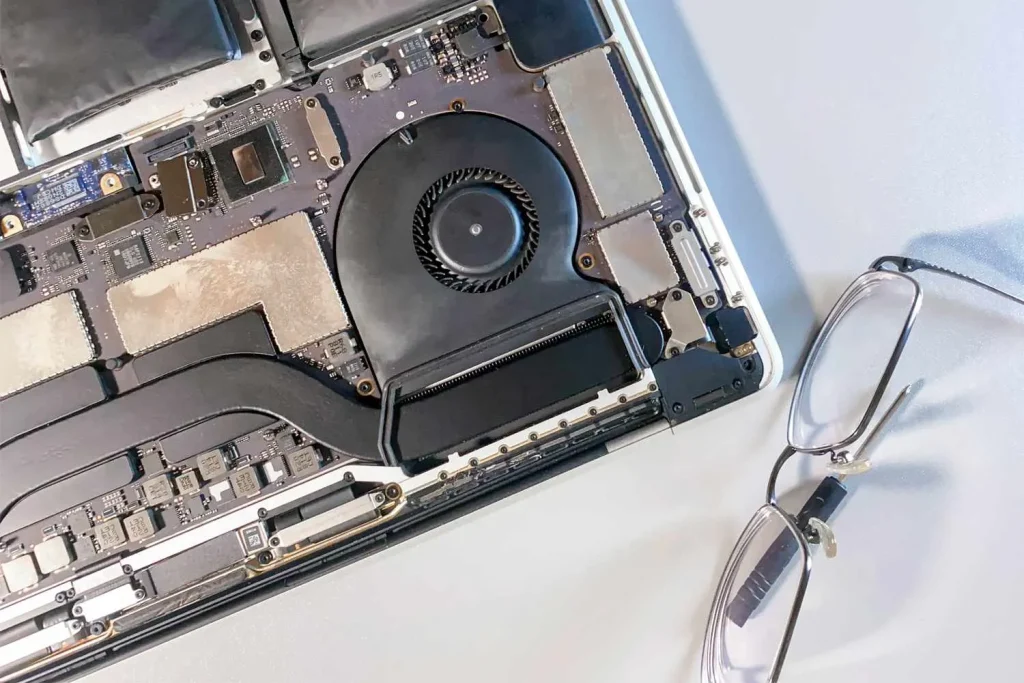
Step 2: Use compressed air at an angle to clear dust out of the vents.
Section C: Expert Level Cleaning
Method 1: Clean the GPU
The graphics card pulls air through its fans constantly, so it collects dust fast. A dusty GPU runs hotter and can throttle its own performance.
Step 1: Power down the PC, then carefully remove the GPU from its slot.
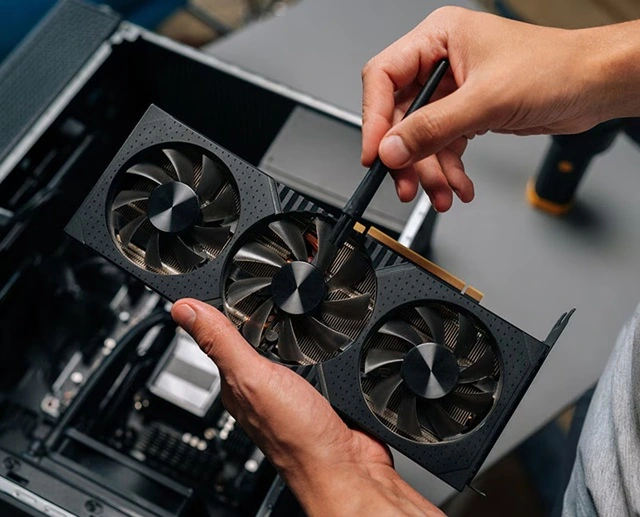
Step 2: Use compressed air on the fans and heatsink, holding each fan steady as you spray.
Method 2: Clean the Power Supply Unit
The PSU pulls in dust through its own fan and vents. It should never be opened, since it can hold a charge even when unplugged.
Step 1: Unplug the PC fully, then locate the PSU vents on the back of the case.
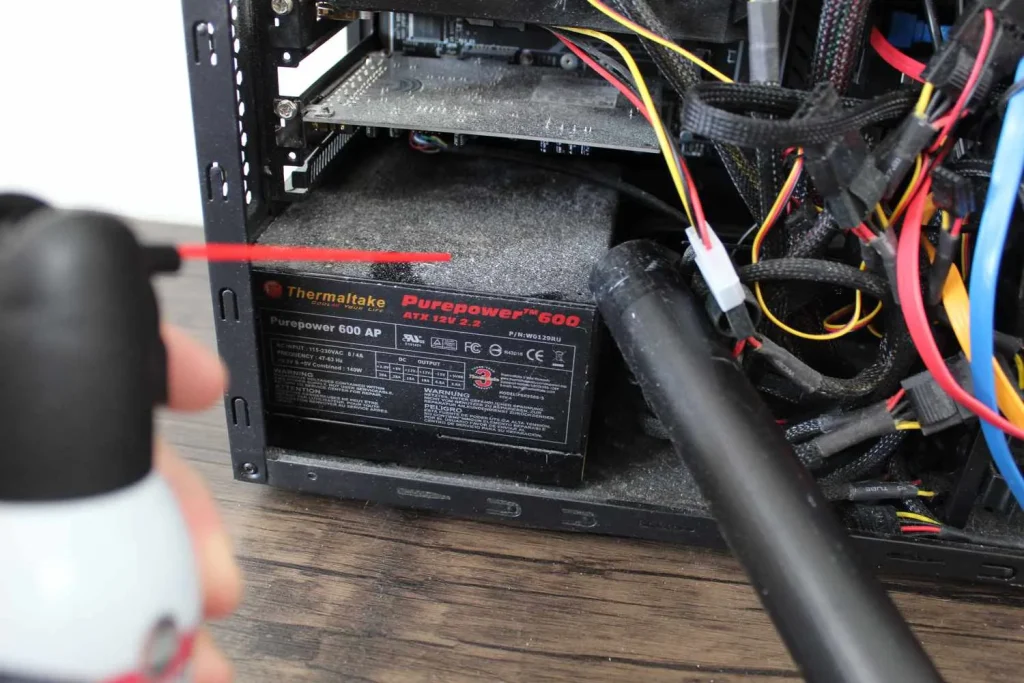
Step 2: Use compressed air on the outer vents only, without opening the unit.
Method 3: Clean the CPU and Re-apply Thermal Paste
The CPU sits under a cooler that collects dust over time. Old, dried thermal paste also stops transferring heat as well as it should.
Step 1: Remove the CPU cooler, then wipe away dust and old thermal paste.
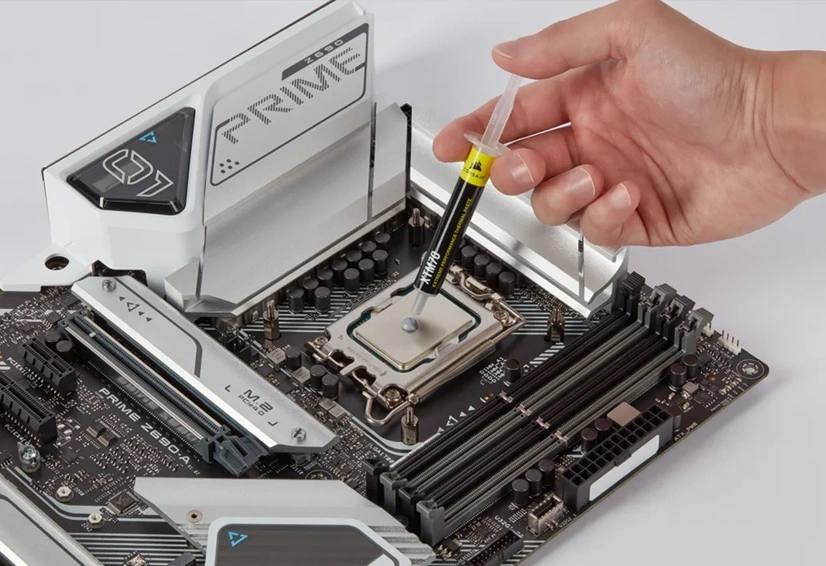
Step 2: Apply a small, even amount of new thermal paste, then reattach the cooler.
Method 4: Clean the Motherboard
Dust settles across the motherboard just like every other part inside the case. Left too long, it can trap heat around sensitive components.
Step 1: Use a soft brush to loosen dust across the board.
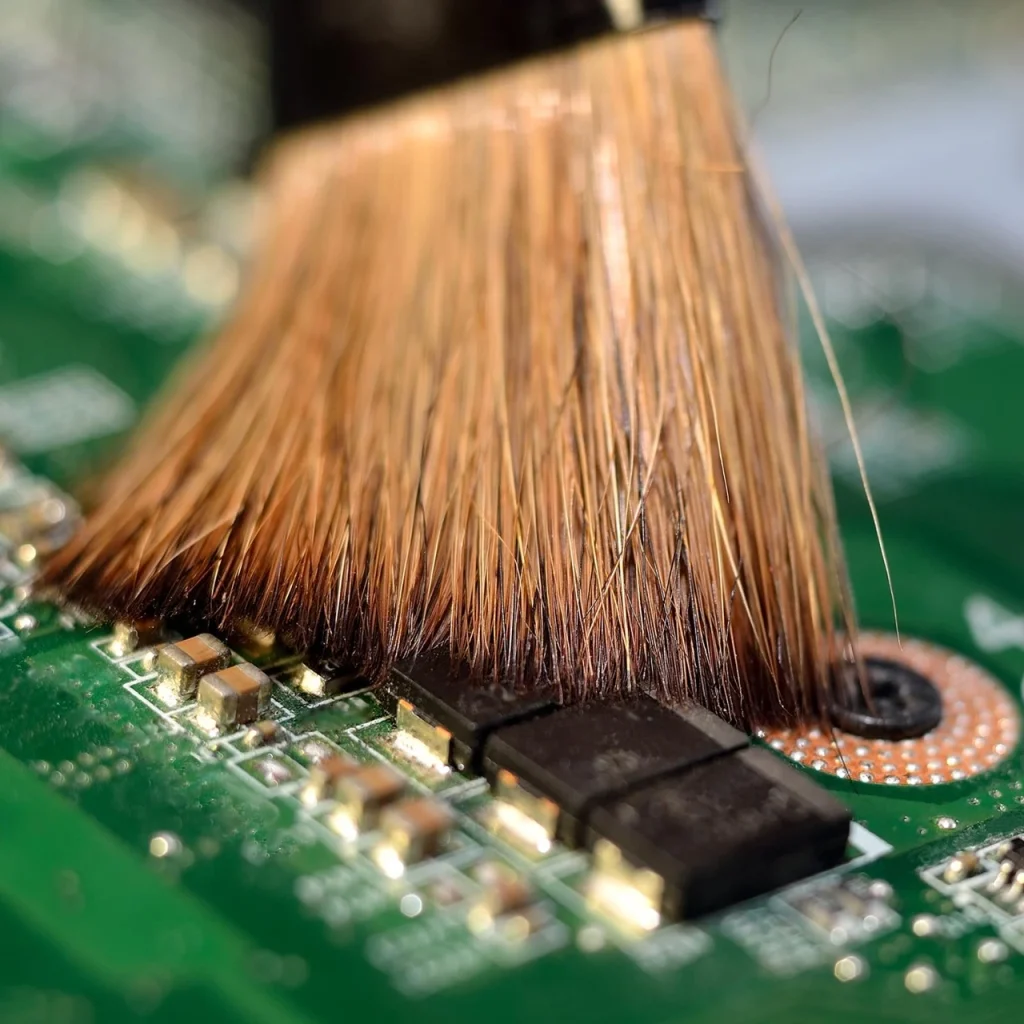
Step 2: Follow with short bursts of compressed air to clear it away completely.
Method 5: Clean and Reseat the RAM
Dust and oxidation on the RAM contacts can sometimes cause minor connection issues over time.
Step 1: Power down the PC, then carefully remove each RAM stick.
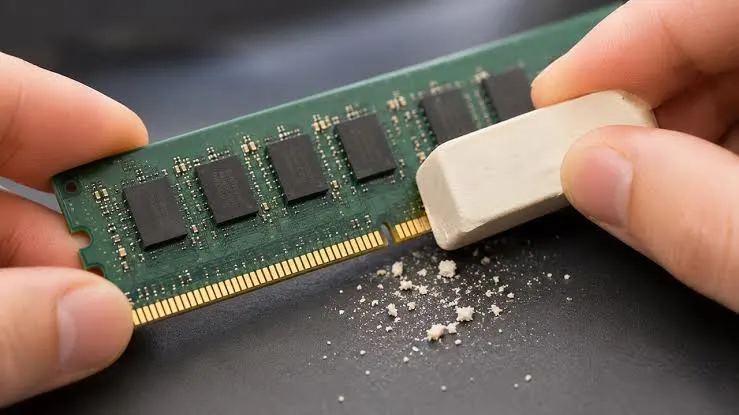
Step 2: Wipe the gold contacts with a dry cloth, then reseat the sticks firmly.
PC Cleaning Mistakes You Should Avoid
Even with the best intentions, a cleaning session can do more harm than good if you skip the right precautions or rush through the steps. Some mistakes damage hardware right away, while others quietly cause problems that only show up weeks later.
Knowing what to avoid is just as important as knowing what to do, so here are the most common mistakes people make when cleaning a PC or laptop.
- Cleaning without turning off the machine. Working on a powered PC or laptop, even for a quick wipe, raises the risk of a short circuit or an electric shock, especially if any liquid is involved.
- Using a vacuum cleaner directly on components. A regular household vacuum can build up static electricity strong enough to damage sensitive parts, and its suction is often too strong for delicate fans and connectors.
- Spraying liquid straight onto the screen or keyboard. Liquid sprayed directly can seep into gaps and reach the electronics underneath, leading to permanent damage instead of a simple clean.
- Touching internal parts without grounding yourself. Skipping this step lets static electricity build up in your body and discharge into the hardware, which can silently damage circuits without any visible sign.
- Deleting unknown files or registry entries. Removing anything you do not recognize, just because a tool flagged it, can break needed system files or stop a program from working correctly.
- Ignoring dust filters and vents. Focusing only on visible surfaces while skipping filters and vents leaves the real source of overheating untouched, so the machine stays hot even after a cleaning session.
- Running two antivirus programs at once. Having more than one active antivirus tool can cause them to conflict with each other, which slows the system down instead of speeding it up.
- Cleaning too often or too aggressively. Opening the case every few days, or running heavy cleanup tools too frequently, adds unnecessary wear to parts and connectors that were never designed to be handled that often.
Advantages of Regular PC Cleaning
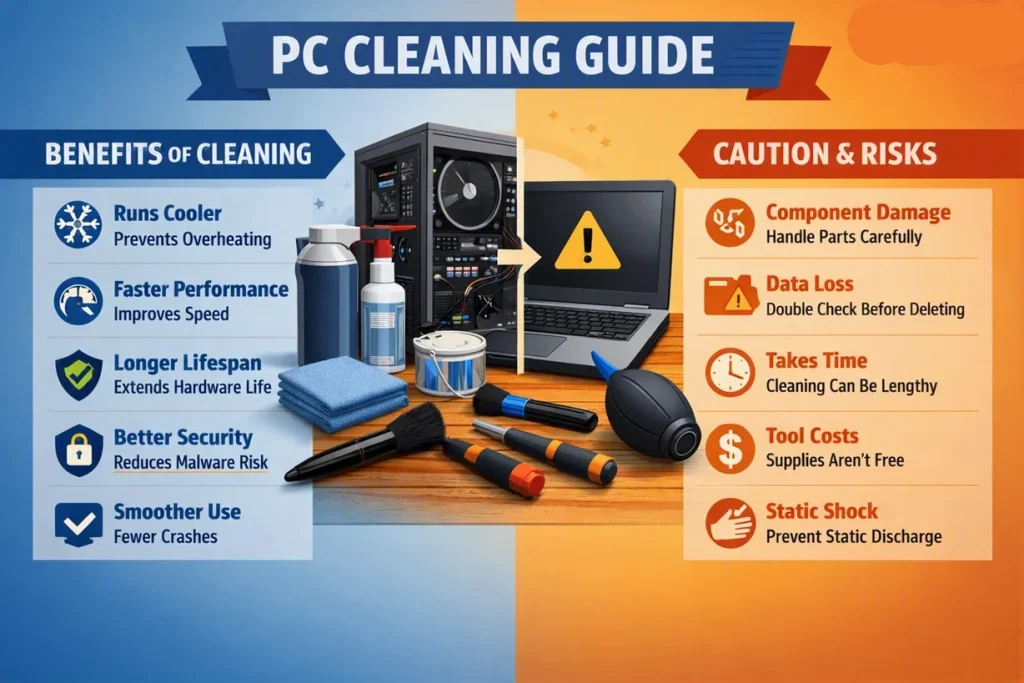
- Cooler system — Dust-free fans and vents move air more easily, lowering the risk of overheating and hardware damage.
- Better performance — Removing junk files, unwanted programs, and excess background processes makes the system faster and more responsive.
- Longer lifespan — Dust buildup is a leading cause of early hardware failure, so keeping components clean protects your investment.
- Improved security — Malware scans and browser cleanups reduce risks of data theft and privacy issues.
- Smoother use — Fewer crashes, quicker load times, and a tidy desktop create a better daily experience.
- Financial savings — A well-maintained machine needs fewer repairs, and cooler parts fail less often, saving money over time.
Disadvantages to Keep in Mind While Cleaning PC
- Physical risks — Opening a laptop can void warranties or damage delicate parts if done carelessly.
- Digital risks — Automated tools may delete files you still need, so always double-check before removing anything.
- Time required — A full physical and digital clean can take hours, which not everyone can spare regularly.
- Small costs — Compressed air, cleaning kits, or premium software are not always free, though usually cheaper than repairs.
- Over-cleaning — Constantly opening cases or running aggressive cleanup tools too often can cause wear instead of benefits.
- Static electricity — Touching internal parts without grounding yourself can damage components. Using an anti-static strap or touching the case helps prevent this.
Conclusion
Keeping your PC or laptop clean is not a one-time task. It is a habit. Well, yes! A quick wipe and a software scan every week can prevent bigger problems down the road. A deeper clean every few months, covering fans, cables, and internal parts, keeps everything running the way it should.
Start small if you are new to this. Try the beginner steps first, both physical and digital. As you get comfortable, move up to the intermediate and expert levels. Whether you are learning how to clean your laptop for the first time or maintaining a desktop you have had for years, the steps in this guide will help you keep your machine fast, cool, and reliable.
Think of it as routine maintenance, similar to servicing a car. You would not wait for the engine to fail before checking the oil. The same logic applies here. A few minutes of dusting, a quick software scan, and an organized desktop can prevent hours of frustration later. Set a reminder on your calendar, even once a month, and treat it as a habit rather than a chore.
Over time, this small routine will save you money on repairs, protect your files from sudden crashes, and keep your daily work running without interruption.
FAQs
How often should I clean my PC or laptop?
For most people, a light physical wipe down and a basic software cleanup once a month is enough. If you live in a dusty area or use your machine for gaming or heavy tasks, aim for every two to three weeks. Deeper cleaning, like opening the case or removing parts, is usually needed only every six months to a year, depending on how dusty your environment is and how hot your machine tends to run.
Is it safe to open my laptop to clean it myself?
If you want to clean your laptop yourself, it can be safe as long as you are careful, since laptops are more delicate than desktops. Many laptops have panels that open easily for basic dust removal, while others are sealed and require special tools. If your laptop is still under warranty, opening it yourself might void that warranty, so check the terms first. When in doubt, a professional cleaning service is a safer choice for laptops than for desktops.
Can digital cleaning tools actually make a difference?
Yes, trusted cleaning tools can make a real difference, especially if you have not cleaned your system in a while. They handle cache, junk files, unwanted programs, and startup items faster than doing it manually. That said, not every tool is equally reliable, so it helps to research and choose one with a good reputation. Combined with regular manual habits, like clearing browser history and managing startup programs, these tools keep your PC or laptop running smoothly over time.

Author Bio:
Dinesh Lakhwani, the entrepreneurial brain behind “TechCommuters,” achieved big things in the tech world. He started the company to make smart and user-friendly tech solutions. Thanks to his sharp thinking, focus on quality and the motto of never giving up, TechCommuters became a top player in the industry. His commitment to excellence has propelled the company to a leading position in the industry.
Popular Post


Recent Post
Defencebyte Computer Optimizer: An In-Depth Review
Slow startup, delayed app launches, and freezing windows are among the most common complaints from Windows users. In many cases, the cause is not failing hardware. It is the gradual buildup of leftover data. Uninstalled programs leave registry entries behind. Temporary files and logs collect in system folders. Broken file paths and unused extensions stay […]
Windows Storage Sense For PC Cleaning: Everything You Need To Know
The low disk space warning always shows up at the worst time. A big update is waiting to install. A file refuses to save. The storage bar in Settings has turned red, and nobody remembers what filled it. Most people react by hunting for a cleaner to download. Many never notice that Windows already has […]
EaseUS CleanGenius Reviewed: Features, Pricing, and Real Results
Nobody notices the first temporary file. Nobody notices the hundredth either. Then one day the drive is almost full, the browser drags, and Windows takes ages to start. Clutter builds in quiet ways. Installers leave leftovers. Browsers store cache and cookies. Apps write logs that nobody reads. Programs add themselves to startup without asking. None […]
Advanced SystemCare: Tool To Clean Your PC [Complete Review]
The first thing I notice is how the startup screen hangs. The fan kicks in fast and stays loud. If I open a simple folder, the whole system pauses for a moment. It does not look like a clear hard failure, yet the PC feels heavy and slow. This is not usually one big problem. […]
CCleaner PC Cleaning Tool: An In-Depth Review
Learn how to clean your PC with CCleaner. This complete guide covers features, step-by-step instructions, pros, cons, pricing, and FAQs to help you decide.
Avira PC Speed Up Tool: Is It Actually Worth It?
A fresh Windows install feels like a different world. Isn’t it? Everything opens fast. Menus snap into place. Then a year passes, sometimes less, and that same machine starts to feel heavy for no clear reason. Nothing dramatic happened. No single event caused it. It was just months of small leftovers stacking up quietly in […]
Avast PC Cleanup Tool: A Detailed Review
Computers do not slow down overnight. Well, yes! That’s right! It happens in small steps. A temporary file here. A leftover installer there. A browser cache that quietly grows for months without anyone noticing. Add a few startup programs that load automatically, and soon your once fast machine feels like it is wading through mud. […]

Outbyte PC Repair and Cleanup Tool: A Detailed Review
The laptop took nearly two minutes to open one folder. Chrome froze twice. The fan sounded like a tiny jet engine. Most of us have lived through a day like this. Right? Don’t worry! The machine is not dying. It is just tired and messy. A good cleanup can often bring back some of the […]
WMaster Cleanup PC Cleaner Tool: A Detailed Review
Your PC was fast on day one. Right? Every click felt instant, every app opened in a snap, and the fan barely made a sound. Then came the browser tabs, the half-finished downloads, and the apps you tried once and forgot to remove. Slowly, without any warning, that same machine started to feel tired. Boot-ups […]
BleachBit PC Cleaner Tool: Complete Review After Running Tests
A PC never stays clean on its own. Every app you open, every website you visit, and every file you download leaves something behind. Weeks turn into months, and suddenly your storage feels tight, and your PC feels slower, with no clear reason why. The usual fix is a cleaning tool. But the market is […]
