How to add a printer to Mac?
Introduction
Many people use digital means to transfer documents, files, and such data to other users. Solutions currently allow e-signatures and document editing, but the need for printing is still important in some industries. Whether for professional or personal use, investing in printers is valuable for people who need to create physical copies of their files, like photo printing, documents for school, etc.
However, while Mac users do get a printing functionality, it is more complicated to add a printer to a Mac device. You must follow specific processes like Bluetooth, WiFi, USB, etc., to connect the printer to the Mac system. Learn about all of the related steps in this post.
Why is connecting printers to Mac devices considered to be complex?
The setup sequence for Macintosh printers could be more user-friendly. Instead, users need to focus on configuring the printers specifically with the device model one is using for the right connections.
The instructions are not the same for all of the printer types available, like all-in-one/printer-only devices, those with monochrome/color settings, etc.,) connection type (Bluetooth/WiFi/USB), the manufacturer, etc. The modern printer devices for Mac with the AirPrint printing feature of Mac are easy to use typically.
So, learning about how a user can add a printer to a Mac is valuable for users.
Best Ways to Add a Printer to Mac
Multiple ways are available depending on the device’s software and hardware conditions. After carefully trying out each version, here are the findings on how each method works for the printer-to-Mac connection.
Method 1: Add a printer to Mac via WiFi
One of the most common methods for adding a printer device to the Mac is connecting it via the WiFi Protected Setup or WPS. This is suitable for users who want to add a printer to a Mac wirelessly and if you have a printer that supports WiFi connectivity.
How to do it?
Step 1: Get your printer and tap on the button with the WiFi or Wireless icon. Do the same on the router device you are using for the WPS button.
Remember that the steps here to activate the Wireless connection and WPS can differ for the router and printer models one uses. So, go through the user guide of these devices you own to understand how to switch them on.
Step 2: Tap on the Apple menu and go to System Preferences.
Step 3: Then click on Printers & Scanners.
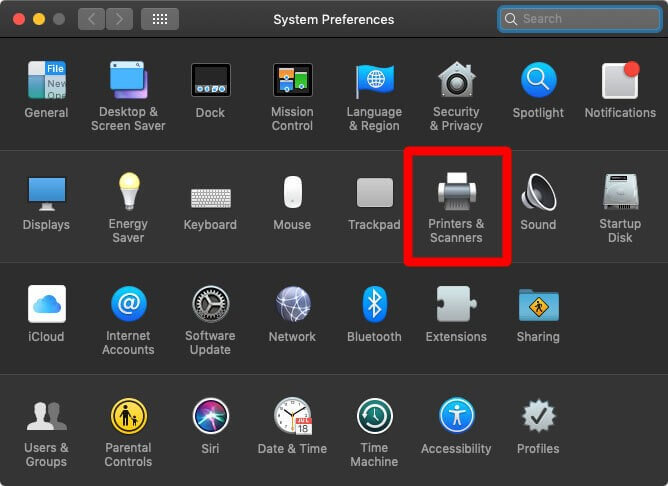
Step 4: From the lower-left side of the screen, click on the add (+) icon.
Step 5: Choose your preferred printer. See that printer’s driver option or software under the “Use” field. Three variations are common:
- AirPrint: Apple-centric technology that allows a full-quality printing mechanism without additional software installation.
- Auto-Select– Some printers come with the Auto Select option for instant printer driver downloading and activation benefits.
- Available Printer driver– The installed driver for printers can appear in the “Use” category.
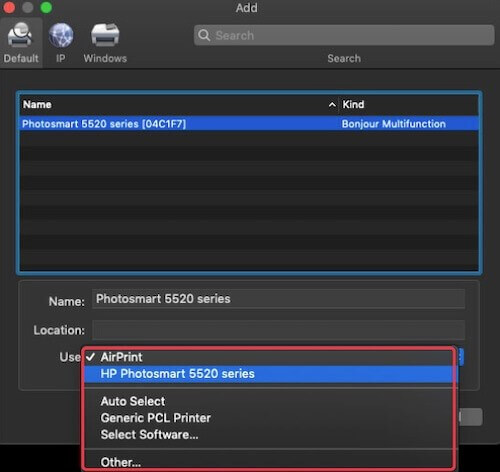
Step 6: Click the Add button.
Method 2: Add network printer type via IP address
For users trying to add a printer to a Mac that is of the network printer variety but it is not easily visible in the list, inserting it in the form of an IP printer is suitable. Printers that support specific printing protocols are eligible here. These protocols include HP Jetdirect (Socket), AirPrint, Internet Printing Protocol (IPP), and Line Printer Daemon (LPD).
Remember that some printers with these printing protocols have limited features, so choose carefully. For the connection process, take note of the printing protocol of your chosen printer, hostname/IP address, and name of the printer software/model number. If it works with a queue system, learn the queue name too.
How to use this?
Step 1: On the Mac device, see the manufacturer page online for the device to check for updates. For users with the AirPrint printer type, this step is unnecessary.
Step 2: Follow the instructions in the printer’s manual to set it up properly, like installing the toner/ink and adding the paper. Then, turn the device on and check for errors.
Step 3: Continue with the given instructions for connecting the printer to the network for your respective printer model. This varies for diverse printer types, so read the manual for your device specifically in this step.
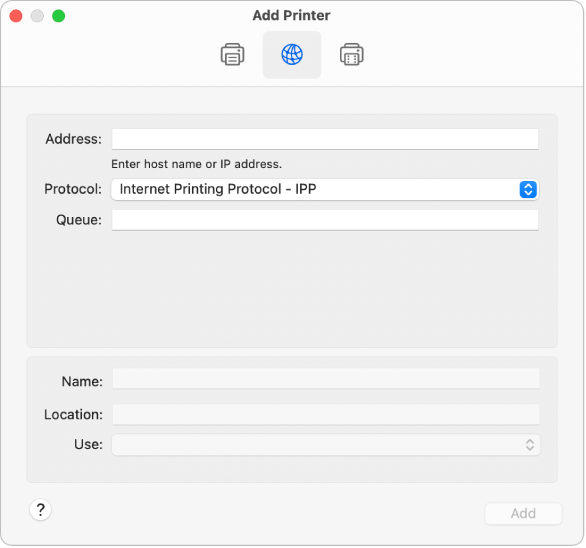
Step 4: On the Mac, go to the Apple menu, choose System Settings/System Preference (depending on the macOS version), and go to Printers & Scanners.
Step 5: From the right, tap the “Add Printer, Scanner, or Fax” button > IP button. Insert all information related to the IP printer here.
Method 3: Add a printer to Mac using a USB cable
Some printer types are rare with network or Bluetooth connectivity support. For these devices, syncing via USB is the available option.
Plug the printer into the Mac device using the USB cable. After the two devices connect, the Mac system detects the printer device and acquires the respective driver automatically into the system.
You must manually handle some steps if the printer does not automatically download and connect to the driver.
How to do this?
Step 1: Open the Apple menu > System Preferences.
Step 2: Choose Printers & Scanners.
Step 3: Tap the add (+) icon and choose the printer.
Step 4: Press the Add button.
Method 4: Add the printer to Mac via Bluetooth
Some Mac devices have Bluetooth connectivity support. Or, in some cases, users are working with the USB Bluetooth adapter. In these cases, it is possible to attach the printer to the Mac system via Bluetooth and activate the printing process.
How to do this?
Step 1: On your computer, check the manufacturer’s page for the printer you use to check for any available updates.
Step 2: Follow the instructions given in the manual that came with your printer system to understand how to unpack the device and add toner/ink/paper. Switch it on and follow the instructions for connecting the device via Bluetooth.
Step 3: Go to Apple menu > System Settings > Printers & Scanners.
Step 4: Tap on the “Add Printer, Scanner or Fax” button > Default.
Step 5: Choose your Bluetooth printer and tap on Add.
Step 6: A prompt for downloading new software will appear after connecting. Download it and then install it.
Method 5: Add a mobile/WiFi printer to Mac with a Configuration Profile
In some network printer types, the user must prepare a configuration profile for installation. When users are operating the AirPrint technology, this makes the printer discoverable via the network. So, if you get the prompt to install the configuration profile on your system, copy or download the printer profile and install it on your Mac.
How to do this?
Step 1: Open your Mac computer and double-click on the profile to launch it.
Step 2: Tap on Continue when the prompt for profile installation comes up.
Step 3: Next, another prompt will come for installation confirmation. Tap on Install, then.
Step 4: The profile will be accessible via General > Profiles.
Add your printer to the list via the Apple menu > System Settings > Printers & Scanners. Next, tap on “Add Printer, Scanner or Fax” > Default.
Step 5: Choose AirPrint Profile under the Printers section and press Add.
Bonus: How to Remove Printer from Mac?
After adding and using the printer on Mac, it is possible to remove it as well. Disconnecting the printer after usage is necessary if you are not using the device non-stop and then free space in the computer.
Printers can create many extra files during installation and usage, so use suitable software like CleanMyMac X to remove junk files.
How to do it?
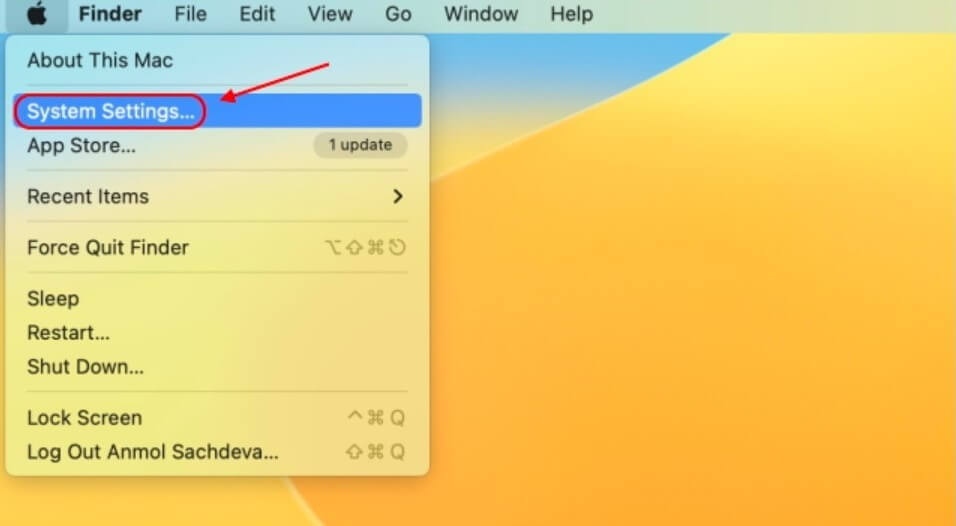
Step 1: Go to Apple menu > System Preferences > Printers & Scanners.
Step 2: Choose the printer to remove and click on the minus (-) button beside it. Confirm again.
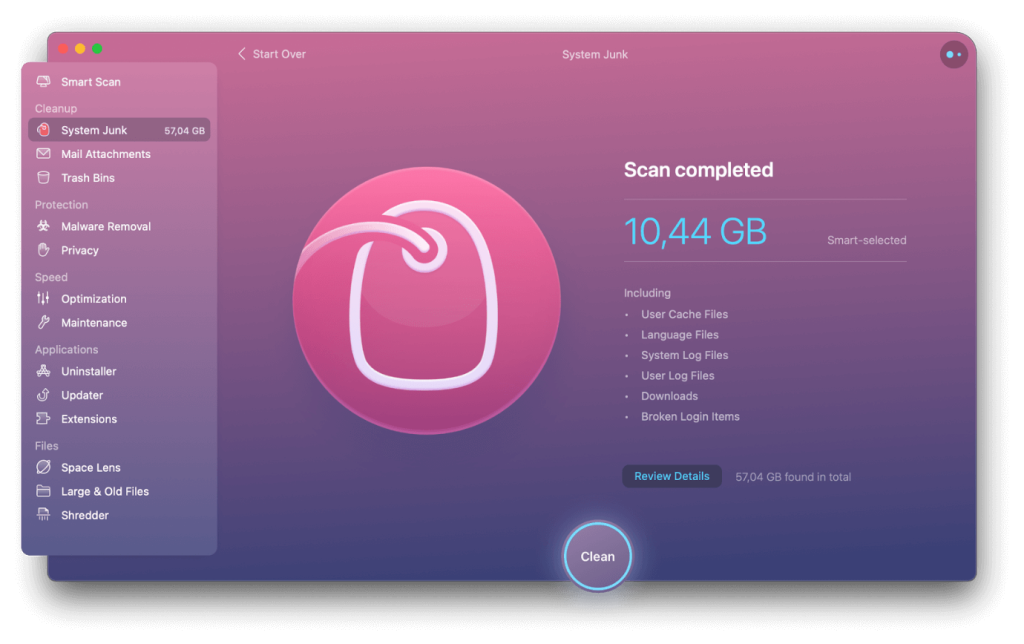
Step 3: Launch the CleanMyMac X software after installation on your device. Choose Cleanup > System Junk.
Step 4: Tap the Scan button to search for unnecessary printer files.
Step 5: Hit the Clean button to remove.
Conclusion
To sum up, integrating the printer solution with a Mac device is complex and requires a focused approach with different available techniques. First, consider which one you can use on your device, like if you prefer to use WiFi or a USB for an offline connection.
Also, check the specifications of the printer device to understand if it is compatible with your Mac. Then, proceed with which method of connecting the printer you find suitable.
Popular Post


Recent Post
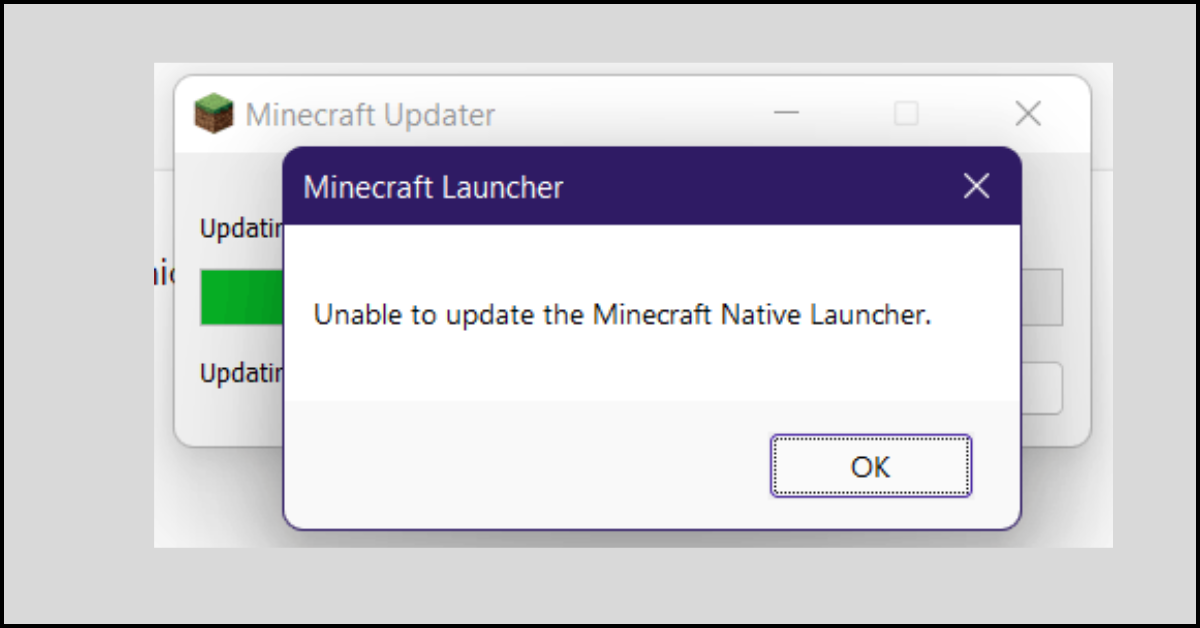
How to Fix Unable to update the Minecraft Native Launcher Windows 11
The “Unable to update the Minecraft Native Launcher” issue can be frustrating. However, there are many ways to fix it. Here, we will discuss some effective ways to fix this problem.

Troubleshooting Guide: How To Fix Copy And Paste Not Working On Windows 10/11
Fix the copy and paste not working issue on Windows 10/11 hassle-free with this comprehensive guide. Here you’ll find effective tried and tested methods that can troubleshoot and permanently resolve the problem.
How to Force Quit on Windows 11 and Windows 10
Encountering unresponsive programs or frozen applications on our Windows devices can be a frustrating experience. When a program hangs or stops responding, it can disrupt our workflow and hinder productivity. This is where the ability to force quit a program comes in handy. Here, we will explore different methods to force quit on Windows 11 […]

How to Enable Secure Boot Windows 11 and Windows 10
One of the key features that can significantly enhance the security of your Windows operating system is Secure Boot. By enabling Secure Boot on your Windows 11 or Windows 10 system, you can protect your device against malware and unauthorized operating systems. Benefits of Enabling Secure Boot in Windows 11 And 10 1. Protection Against […]

How to Change Administrator on Windows 10 and Windows 11
In Windows operating systems, the administrator account holds the highest level of privileges and control over the system. Sometimes, you may need to change the administrator account for various reasons such as security, ownership transfer, or simply to give someone else access to the system. Here, we will explore different methods to change the administrator […]

How to Open BIOS Windows 11 and Windows 10
Here are the best ways to Open BIOS Windows 11 and Windows 10. These steps are very easy.

How to Convert HEIC to JPG on Windows 11 and Windows 10
Learn the best ways to convert HEIC to JPG on Windows and Windows 10 computers.

How to Fix Valorant not uninstalling Windows 11 – Remove Valorant Completely
Online gaming has become increasingly popular, with many gamers enjoying multiplayer games. One such game that has gained a significant following is Valorant. However, like any software, Valorant is not immune to technical issues, and one common problem that players encounter is the difficulty in uninstalling the game, particularly on the Windows 11 operating system. […]
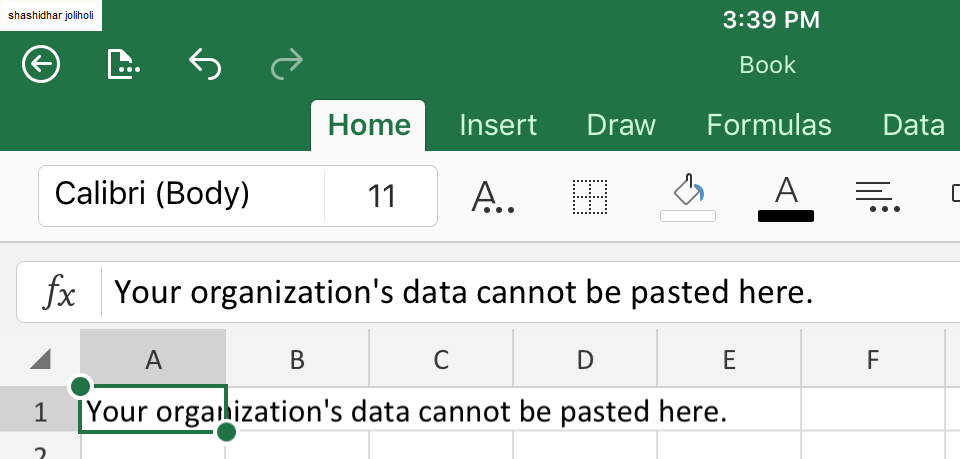
Your Organization’s Data Cannot Be Pasted Here: 7 Ways to Fix It
Encountering the “Your organization’s data cannot be pasted here” error can be frustrating, but armed with the right knowledge and troubleshooting steps, you can quickly overcome this hurdle.
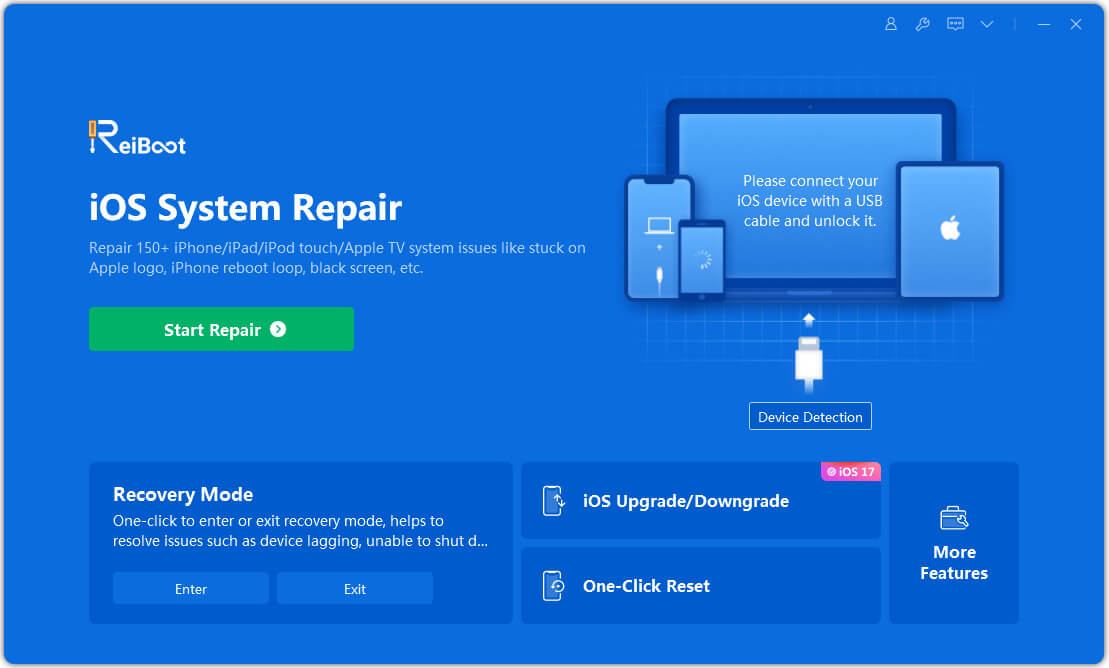
Tenorshare Reiboot Review 2024 [Fully Unbiased]
Read The Complete Unbiased Review of Tenorshare Reiboot

