How to Remove Watermarks from Your Photo

So, watermark! It is one of the easiest methods to copyright your images. Simply put your logo or company name on your photos, and voila, your photos are safe online.
But are they really safe online after adding watermarks?
Let’s face it; if you put a small logo on the corner of a photo, anyone can crop and use it. On the contrary, if you go for the big print all over your photo, it will reduce the photo’s quality.
Since watermarking photos is doing nothing much for you, it is better to remove watermarks from your photos and use other methods to protect your copyright.
This guide helps you with simple methods to remove watermarks from your photos so you can repurpose them in multiple ways. So, let’s remove some watermarks.
Why Should You Remove Watermarks From Your Photos?
Before learning how to remove watermarks from photos, let’s understand why don’t you need watermarks in the first place:
No Protection from Piracy
Watermarks are the lousiest attempt at protecting your photos from piracy. As we already mentioned, anyone can easily crop your logo or name from the photo and use it unless you use a full-image watermark like stock photography companies.
Looks Unprofessional
Most creative artists and photographers are against using watermarks. The reason? The watermarks create disruption in the photo and reduce the photo’s quality. Thus, never use poor quality watermarks done on Microsoft Word. If you truly want to add watermarks and look professional, hire a designer to create a small, hidden watermark.
Reduce Your Chances of Getting Featured
Watermarks block all opportunities to get your photos shared on social media or featured in popular publications. That’s because no company has time to first remove a watermark and then feature your photos.
Ruin the Photo Composition
You probably have spent big bucks on developing a stunning photo with a perfect composition. Then, why would you ruin the entire photo’s composition by adding a distracting watermark across your photo?
Not a Signature
Many people confuse watermarks with digital signatures. But that’s not correct. The purpose of the signature is to assure the authenticity of a print. It is never meant to add a distraction to the print. On the contrary, watermarks are just meaningless distractions.
How to Remove Watermarks from Photos Manually?
Since watermarks add no value to your photos and reduce their quality, it is better to remove them. It is pretty easy to remove watermarks from your photos without any tool. Here’s how you can do it:
Method 1. Remove a Watermark the Way You Have Added It
Obviously, if you reverse the steps to add a watermark, you can remove them. For instance, if you have used common programs like Microsoft Word or PowerPoint to add a watermark, you can use them to remove it, like this:
Step 1. Launch the Microsoft Word or any other tool you have used to add a watermark in the first place.
Step 2. After that, upload the watermarked image on the tool.
Step 3. Simply select the watermark text or picture and delete it. Now, right-click on the photo and select Save as Picture.
Method 2. Crop and Remove the Watermark
Today, there is no photo editor without a crop option. Even your phone’s basic camera editor comes with a crop feature. However, this method only works when you have a small watermark around the edges. It doesn’t work with a full-image watermark.
To crop watermarks, you can follow these simple steps:
Step 1. Go to the Photo Gallery or any other photo editing app.
Step 2. Select the watermarked photo and click on the crop option.
Step 3. Now, carefully drag the crop frame, so you only remove the watermark, not other important parts of the image. Just save the cropped photo once you are done.
How to Remove Watermarks From Photos Using Tools?
It is to remove watermarks from photos manually. But the manual approach is limited. First, you can not remove a full-image watermark, and sometimes cropping disturbs the photo resolution. Plus, removing watermarks from third-party photos is difficult manually.
Thus, you should get the right watermark removing tools to help you out. Here are many great tools available to remove watermarks from your photos, such as:
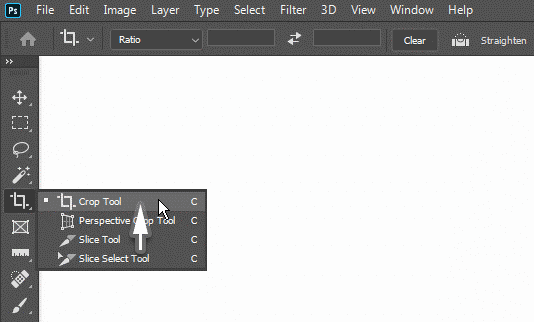
Method 3. Remove Watermarks From Photos Using Photoshop
Adobe Photoshop is one of the top-rated photo editors. It has a wide range of features to enhance the photo quality. It also has a feature to remove watermarks from photos with a click. However, the only issue is that it has a steep learning curve, and users need to get paid subscriptions for the most advanced features.
Photoshop users can get rid of watermarks this way:
Step 1. Launch the software and upload your watermarked photo.
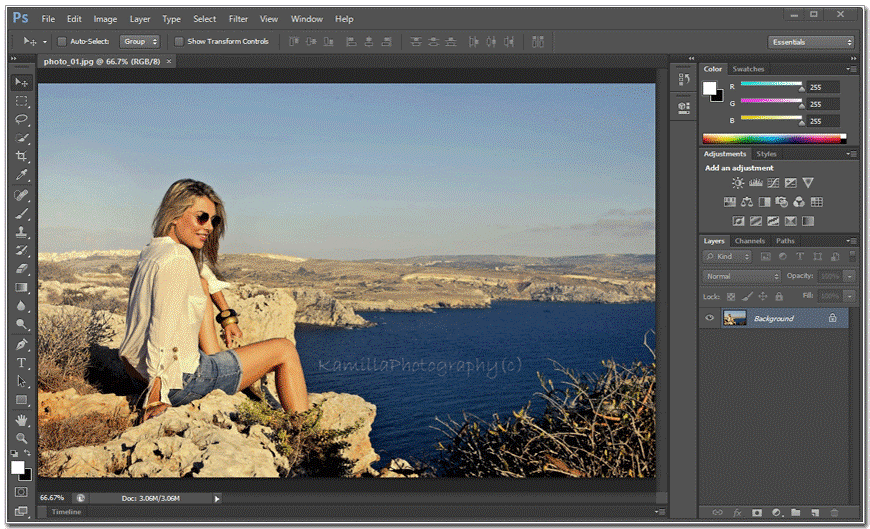
Step 2. From the tool panel, select Clone Stamp and adjust its size. After that, press the Alt key on your keyboard and click on the area next to the watermark.
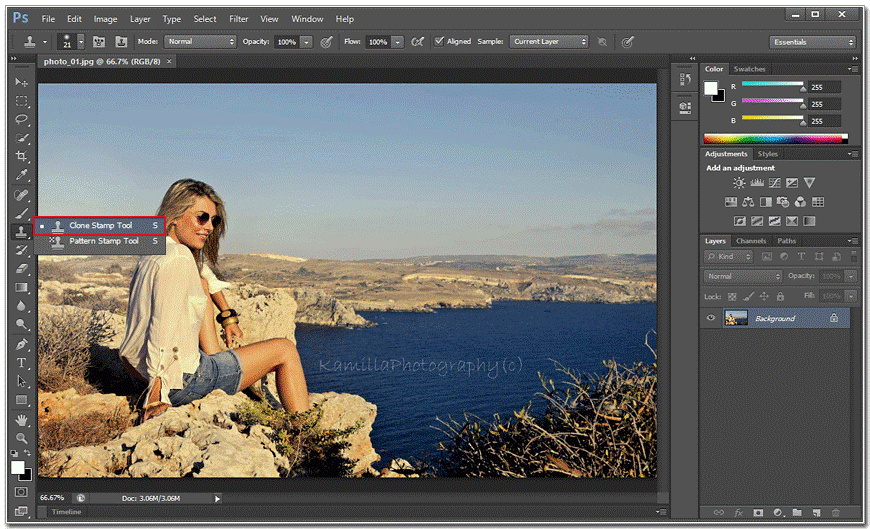
Step 3. Photoshop will now select a sample from the targeted area. Once you start to paint over the text, Photoshop will keep taking pixels from that area and paste them into the place you pointed out.

Method 4. Remove Watermarks From Photos Using Movavi Picverse
Movavi Picverse is an easy to use and intuitive tool. It offers all the basic photo editing options like enhance, rotate, crop, resize, etc. In addition, it is also an AI-powered tool that will help you retouch, restore or add effects to photos.
The software has a nice control of removing complicated watermarks for watermark removal. Here’s how the tool works:
Step 1. Install and run the Movavi Picverse on your computer.
Step 2. Drag and drop the watermarked photo into the software.
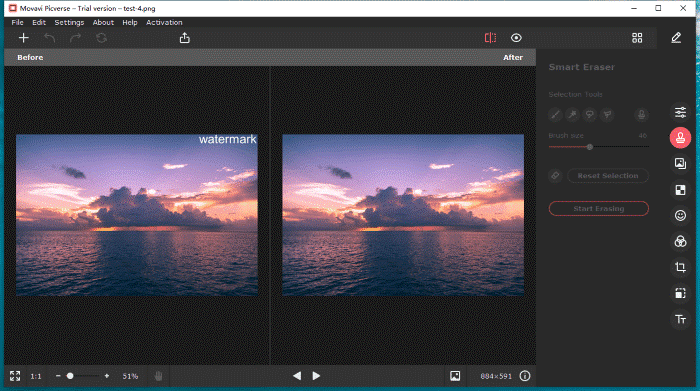
Step 3. Go to Edit > Smart Eraser > Brush Tool. After that, adjust your brush size and move it over the watermark.
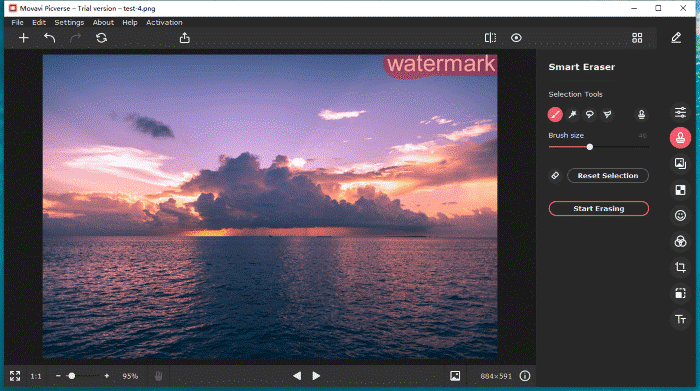
Step 4. Click on Start Erasing.
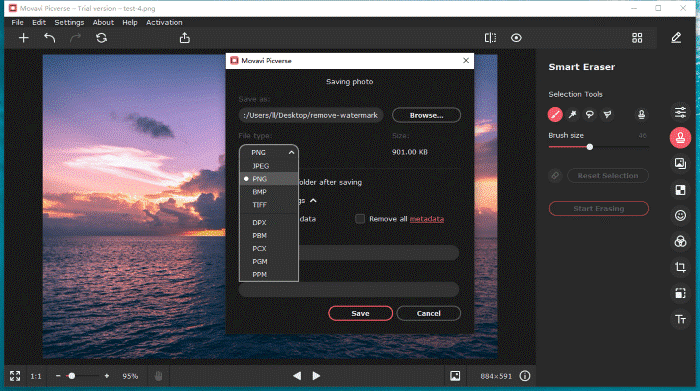
Step 5. Next, go to File > Save the watermark removed photo.
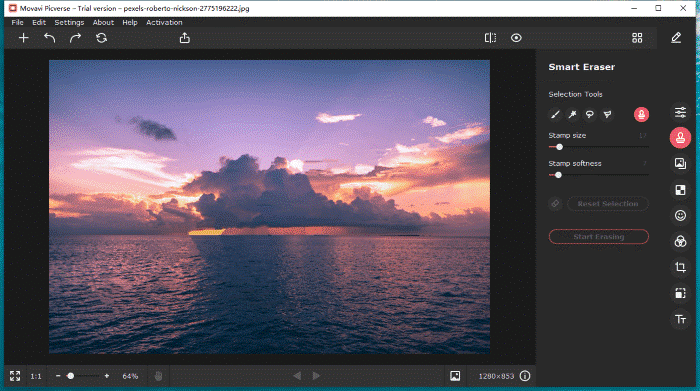
However, if you have a bit complicated watermark, the process will be different, like this:
Step 1. Launch the tool and upload the watermarked photos on it.
Step 2. Go to Edit > Smart Eraser > Select Magic Wand Tool. It will automatically select the watermarked subject of the same color.

Step 4. Click on the watermark, and the selected parts will turn red.
Step 5. Using the scroller on your mouse, you can zoom in or out to check details. Press the spacebar and move your mouse to select all watermark bits.

Step 6. Click on Start Erasing, and the complicated watermark will be removed.
Step 7. If you are not satisfied with the outcome, you can use the Smart Eraser > Clone tool to fix it. Once you are happy with your photo, go to File > Save it.
How to Remove Watermarks From Photos Using Online Tools?
If you don’t want to download a tool on your computer to erase watermarks, online free tools are also available. Then, you simply have to visit the tool’s website and remove watermarks right from your web browsers.
Some of the best online watermark removal tools are:
Method 5. Remove Watermarks From Photos Using Inpaint
Inpaint is an in-browser tool with a simple user interface and dynamic free features. This tool can restore old photos, erase watermarks, logos, and even date stamps. There is also an offline version available for Windows, MacOS and iOS devices.
You can remove the watermark using Inpaint this way:
Step 1. Open the Inpaint website on your web browser and upload the watermarked photo.
Step 2. Using the Market tool, highlight the watermark on your image. You can also use the Magic Wand tool for opaque watermarks and logos.
Step 3. Click on the Erase Button to get rid of the watermark from your photos.
Method 6. Remove Watermarks From Photos Using Apowersoft
Apowersoft is a free online tool to remove watermarks. It also supports batch processing, so you can erase watermarks from multiple photos without ruining the quality. You can also process all types of photo formats to remove date stamps.
For watermark removal, Appwersoft has three tools — Lasso Tool, Brush Tool and Marquee Tool. Here’s how you can use them:
Step 1. Select the Remove watermark from images option.
Step 2. Import the watermarked photos and click on the Add boxes option to select the watermark area.
Step 3. Just tap on the Erase button to remove the watermark.
Parting Remarks
As you can see, it is not hard to remove the watermark from a photo. You can remove a simple watermark using the crop option on any photo editor. However, you can use desktop tools or free online tools for complicated watermarks.
So, let’s now remove watermarks from your photos and make them look professional in no time.
Popular Post


Recent Post
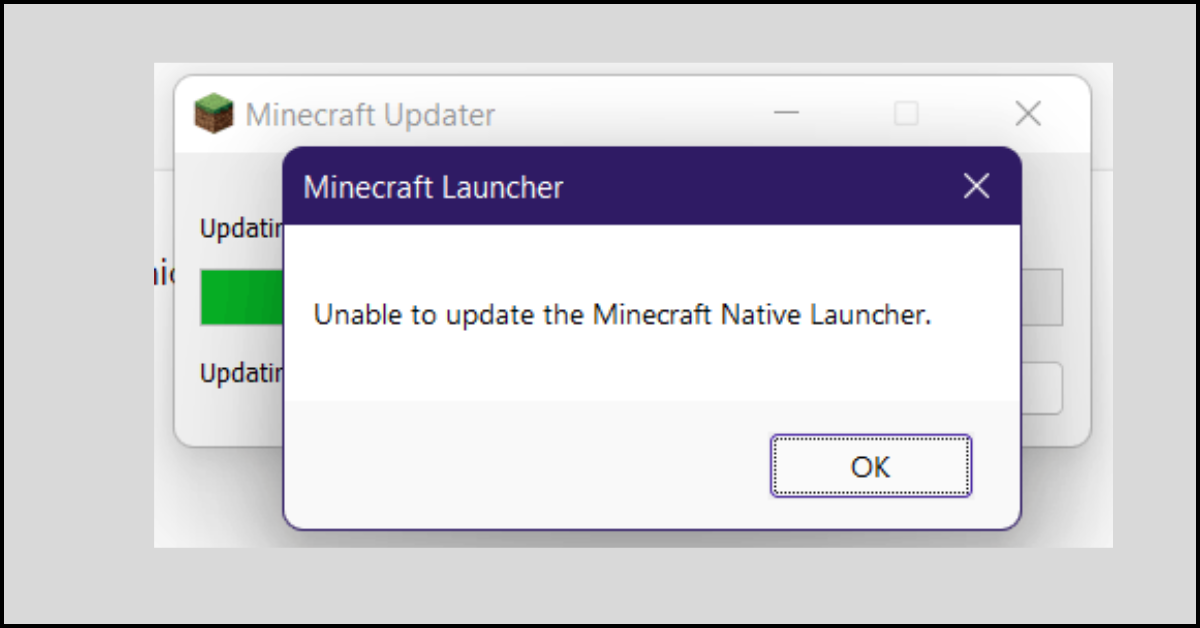
How to Fix Unable to update the Minecraft Native Launcher Windows 11
The “Unable to update the Minecraft Native Launcher” issue can be frustrating. However, there are many ways to fix it. Here, we will discuss some effective ways to fix this problem.

Troubleshooting Guide: How To Fix Copy And Paste Not Working On Windows 10/11
Fix the copy and paste not working issue on Windows 10/11 hassle-free with this comprehensive guide. Here you’ll find effective tried and tested methods that can troubleshoot and permanently resolve the problem.

How to Force Quit on Windows 11 and Windows 10
Encountering unresponsive programs or frozen applications on our Windows devices can be a frustrating experience. When a program hangs or stops responding, it can disrupt our workflow and hinder productivity. This is where the ability to force quit a program comes in handy. Here, we will explore different methods to force quit on Windows 11 […]

How to Enable Secure Boot Windows 11 and Windows 10
One of the key features that can significantly enhance the security of your Windows operating system is Secure Boot. By enabling Secure Boot on your Windows 11 or Windows 10 system, you can protect your device against malware and unauthorized operating systems. Benefits of Enabling Secure Boot in Windows 11 And 10 1. Protection Against […]

How to Change Administrator on Windows 10 and Windows 11
In Windows operating systems, the administrator account holds the highest level of privileges and control over the system. Sometimes, you may need to change the administrator account for various reasons such as security, ownership transfer, or simply to give someone else access to the system. Here, we will explore different methods to change the administrator […]

How to Open BIOS Windows 11 and Windows 10
Here are the best ways to Open BIOS Windows 11 and Windows 10. These steps are very easy.

How to Convert HEIC to JPG on Windows 11 and Windows 10
Learn the best ways to convert HEIC to JPG on Windows and Windows 10 computers.

How to Fix Valorant not uninstalling Windows 11 – Remove Valorant Completely
Online gaming has become increasingly popular, with many gamers enjoying multiplayer games. One such game that has gained a significant following is Valorant. However, like any software, Valorant is not immune to technical issues, and one common problem that players encounter is the difficulty in uninstalling the game, particularly on the Windows 11 operating system. […]
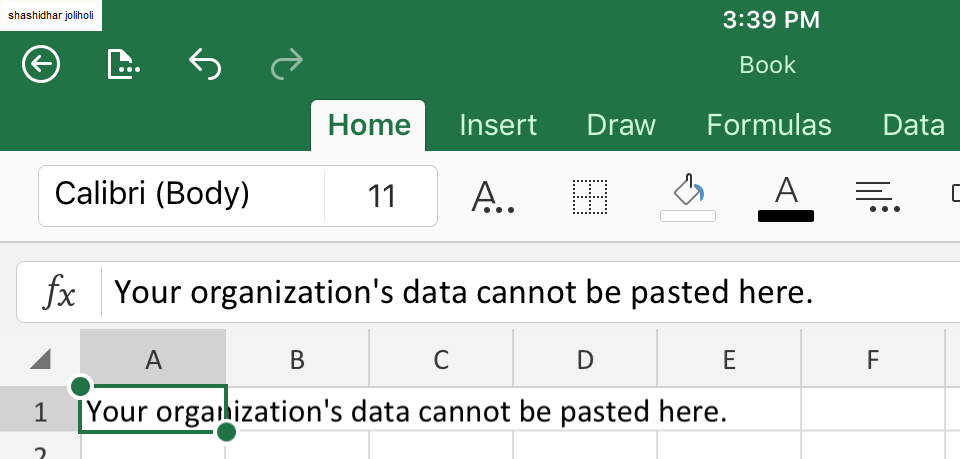
Your Organization’s Data Cannot Be Pasted Here: 7 Ways to Fix It
Encountering the “Your organization’s data cannot be pasted here” error can be frustrating, but armed with the right knowledge and troubleshooting steps, you can quickly overcome this hurdle.

Tenorshare Reiboot Review 2024 [Fully Unbiased]
Read The Complete Unbiased Review of Tenorshare Reiboot

