How to Update DirectX on Windows 11?
Introduction:
Did the thought about the DirectX update just cross your mind? We have got you covered. To improve the multimedia and gaming experience on Windows systems, DirectX is essential. It offers the underlying technology necessary for the smooth operation of graphics, audio, and multimedia applications.
Updating DirectX becomes crucial as Windows 11 continues to gain popularity among gamers and multimedia enthusiasts. We’ll walk you through a step-by-step tutorial on how to update DirectX on Windows 11 in this blog post, ensuring that you have the most recent version and get the best performance for a fluid gaming and multimedia experience.
Why is DirectX Essential on Windows?
For Windows operating systems, including the most recent version, Windows 11, DirectX is a crucial component. It functions as a collection of APIs (Application Programming Interfaces) created by Microsoft to manage multimedia tasks, especially graphics, and audio, on Windows-based computers.
A wide variety of multimedia applications are also included in the scope of DirectX, which goes beyond gaming. It allows for the slick playback of high-definition videos as well as the rendering and processing of audio. DirectX guarantees optimum performance and compatibility with different media formats, whether you’re watching movies, listening to music, or editing multimedia content.
How to Update DirectX on Windows 11?
Here are the steps to follow for the DirectX update on Windows 11:
Step 1: Check the DirectX Version
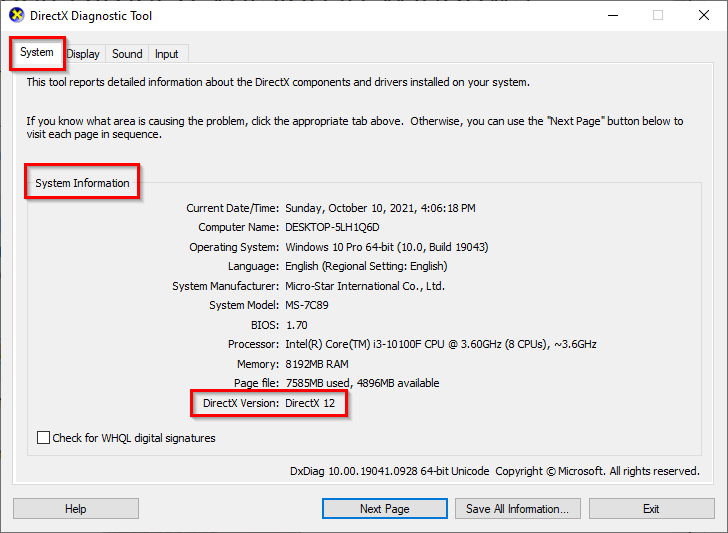
The first step is the check the current version of DirectX installed on your device. Before updating, it’s essential to determine the current version of DirectX installed on your system. To do this, press the Windows key + R to open the Run dialog box, type “dxdiag,” and hit Enter. The DirectX Diagnostic Tool window will appear, displaying the installed DirectX version under the System tab. In this tab, you can check the version of DirectX installed on your PC.
Step 2: Update Windows
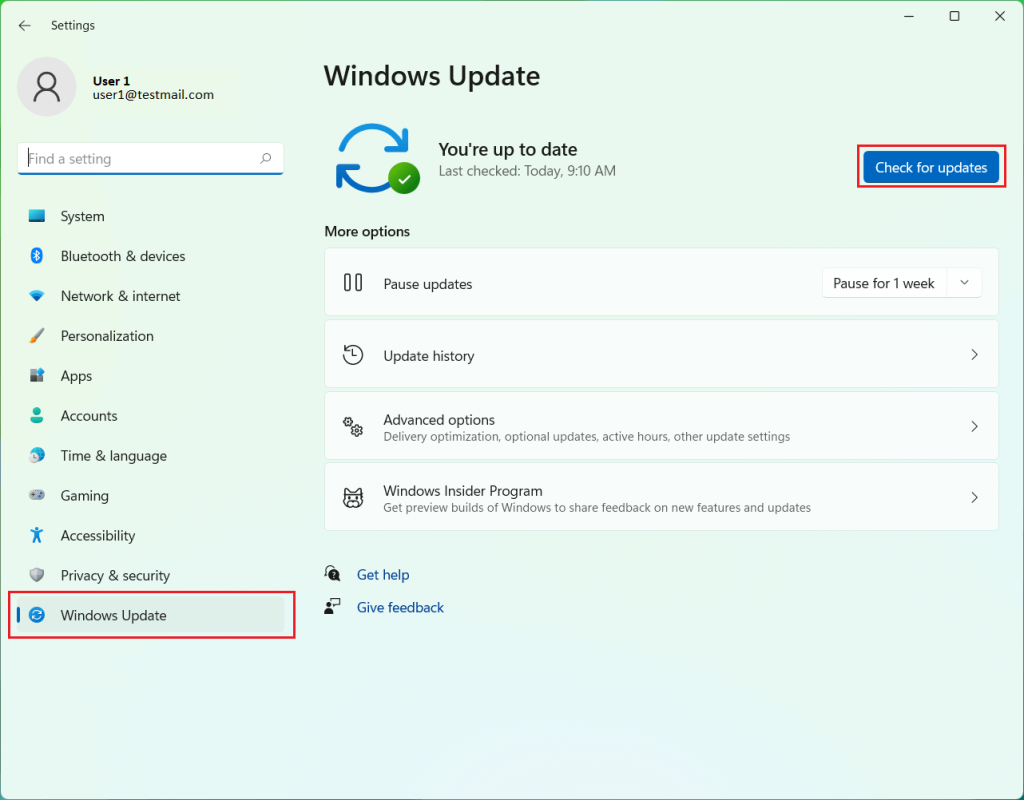
DirectX updates are often included in Windows updates. Therefore, it’s recommended to ensure that your Windows 11 operating system is up to date. Tap on the Windows icon placed on the Taskbar and select “Settings”. In the Settings window, switch to the “Windows Update” section. Click on “Check for updates” button and install any available updates for your system.
Step 3: Download the DirectX Web Installer
If Windows updates didn’t include the latest DirectX version, you can download and install the DirectX End-User Runtime Web Installer from the official Microsoft website.
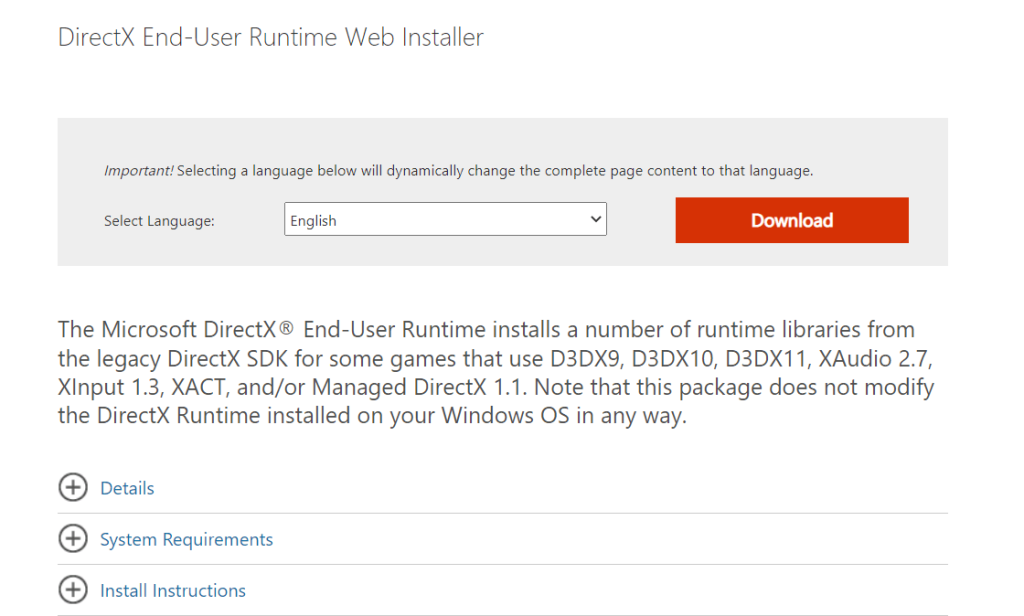
Hit the “Download” button and follow the on-screen instructions to complete the DirectX update process.
Step 4: Verify the DirectX Update
Here comes the final step! After updating DirectX, it’s a good idea to verify that the update was successful. Repeat step 1 to open the DirectX Diagnostic Tool and check the updated DirectX version under the System tab.
Quick Tip: Windows 11 typically handles DirectX updates automatically through Windows Update. By keeping your operating system up to date, you’ll ensure that DirectX receives the necessary updates as well.
Conclusion
Keeping DirectX up to date on your Windows 11 system is vital for an enhanced gaming and multimedia experience. By following the steps outlined in this guide, you can ensure that you have the latest version of DirectX installed.
Checking for Windows updates, using the DirectX End-User Runtime Web Installer, and maintaining an up-to-date operating system are key to obtaining the latest DirectX version. Regularly updating DirectX ensures compatibility with the latest games, improves graphics rendering, and optimizes multimedia performance.
Popular Post
Recent Post

Advanced SystemCare: Tool To Clean Your PC
Your computer slows down over time. Files pile up, junk builds inside the system, and things start to feel sluggish. You open a browser, and it takes forever. Programs crash without warning. This is a sign that your PC needs a good cleanup. Many users ignore these signs. They think buying a new computer is […]

Top 10 PC Cleaning and Optimization Tools For Windows 11/10
Discover the best PC cleaning and optimization tools for Windows 11 and 10. Remove junk files, improve speed, and keep your PC healthy with trusted cleaners.

Clear Microsoft Teams Cache On Windows PC [Complete Guide]
Learn how to clear Teams cache on Windows PC with 3 easy methods. Fix slowdowns, glitches, and errors fast. A simple guide for every Windows 11 user.

How To Clear Browsing History on PC: Chrome, Edge, Firefox, Opera
Learn how to clear browsing history on PC across Chrome, Edge, Firefox, and Opera with easy steps, tips, pros, and FAQs.

Clear Cache and Cookies: Complete Guide For Windows 11/10
Learn how to clear cache and cookies on Windows 10 and 11. This complete guide covers Chrome, Edge, and Firefox with simple, step-by-step instructions for every user.

How To Clean PC Trackpad/Touchpad Without Damaging It
Learn how to clean PC trackpad and clean PC touchpad safely with simple steps. Improve performance, remove dirt, and keep your laptop surface smooth and responsive.

How To Clean Your GPU/Graphics Card [Complete Guide]
Introduction A graphics card is one of the most important parts of a computer. It handles visuals, gaming, video editing, and design work. Over time, dust builds up inside it. This dust blocks airflow and traps heat. When heat increases, performance drops. In some cases, the system may even crash. That is why learning how […]

How To Clean PC Power Supply Unit Safely Without Damaging
Follow simple, safe steps to clean your computer’s power supply unit. Improve cooling, reduce overheating, and protect your PC’s performance.

How To Clean a CPU Without Damaging It [Complete Guide]
Learn how to clean a CPU safely without damage. Follow simple steps, precautions, and methods to improve cooling, boost performance, and extend your computer’s life.

How To Clear Browser Cache On Windows 11/10 [Chrome, FireFox, Edge]
Learn how to clear browser cache on Windows 11 and 10. Follow simple steps to clean browser cache, fix slow browsing, and improve performance easily.
