How To Fix PC Turns On But No Display Error On Windows 11 And Windows 10
Troubleshooting a PC that powers on but displays nothing can be perplexing. Whether you’ve upgraded to Windows 11 or are using Windows 10, encountering a “no display” scenario can be frustrating. Fear not! In this article, we have compiled a comprehensive guide on resolving this issue step by step.
From checking hardware connections to troubleshooting software configurations, this article aims to equip you with the necessary knowledge to tackle the “PC Turns On But No Display” error on Windows 11 and Windows 10 systems.
What Triggers the PC Turns On But No Display Issue?
Here are some common triggers that might cause the “PC Turns On But No Display” issue on Windows 11 and Windows 10:
- Loose Connections: Unstable or improperly connected cables between the monitor, graphics card, or motherboard.
- Faulty Hardware: Issues with the GPU (Graphics Processing Unit), RAM, CPU, or power supply unit can result in a lack of display output.
- Driver Problems: Outdated or corrupted display drivers can prevent the system from properly initializing the display.
- BIOS/UEFI Settings: Incorrect BIOS or UEFI settings might hinder the system from recognizing and utilizing the display hardware effectively.
- Overheating: Overheating components, especially the GPU or CPU, can trigger protective measures that prevent the display from functioning properly.
- Faulty Monitor or Cable: A malfunctioning monitor or a damaged video cable can lead to a lack of display despite the system powering on.
- Software Conflicts: Conflicts arising from recent software updates or installations can interfere with the display settings, causing no output on the screen.
- Hardware Incompatibility: Certain hardware combinations might not be compatible, leading to display issues upon system startup.
Addressing these potential triggers systematically can help diagnose and resolve the “PC Turns On But No Display” error on Windows 11 and Windows 10 systems.
How to Resolve the PC Turns ON But No Display Error on Windows?
Method 1: Test the Monitor
Navigating a “PC Turns On But No Display” scenario on Windows 11 or Windows 10 can be confounding. Here’s the first step to troubleshoot:
Step 1: Ensure all cables connecting the monitor to the PC are securely plugged in. Try different ports (HDMI, VGA, DisplayPort) if available.
Step 2: Verify that the monitor is receiving power and turned on. Look for indicator lights or try accessing the monitor’s menu or settings.

Step 3: Use a different video cable or connect the PC to another monitor or TV to rule out a faulty cable or monitor.
Step 4: Access the monitor’s input/source settings to ensure it’s set to the correct input where the PC is connected.
Step 5: If available, run any built-in diagnostic tests or reset the monitor to factory settings via its menu options.
By testing the monitor and its connections, you can determine if the issue lies with the display itself or with the PC’s hardware or software configuration.
Method 2: Restart your PC
When troubleshooting a “PC Turns On But No Display” issue on Windows 11 or Windows 10, sometimes the simplest fix can work wonders. Here’s where to begin:
- Force Shutdown: If your PC is unresponsive or stuck with no display, press and hold the power button for a few seconds to force a shutdown.

- Disconnect Power: Unplug the power cord and any external devices connected to the PC.
- Wait and Reconnect: Wait for about a minute, then reconnect all cables, including the power cord and peripherals.
- Power On: Turn on your PC and observe if the display issue persists.
Restarting your PC can sometimes resolve temporary glitches or software-related problems causing the “no display” error on Windows 11 or Windows 10 systems.
Method 3: Perform a Hard Reset
Performing a hard reset helps clear any lingering electrical charges and can often resolve minor hardware or software issues causing the “PC Turns On But No Display” error on Windows 11 or Windows 10. Here are the steps to perform a hard reset on Windows:
Step 1: Completely shut down your PC by pressing and holding the power button until it turns off.
Step 2: Unplug the power cord from the wall outlet and remove the battery if it’s a laptop. For a desktop, also switch off the PSU (Power Supply Unit).
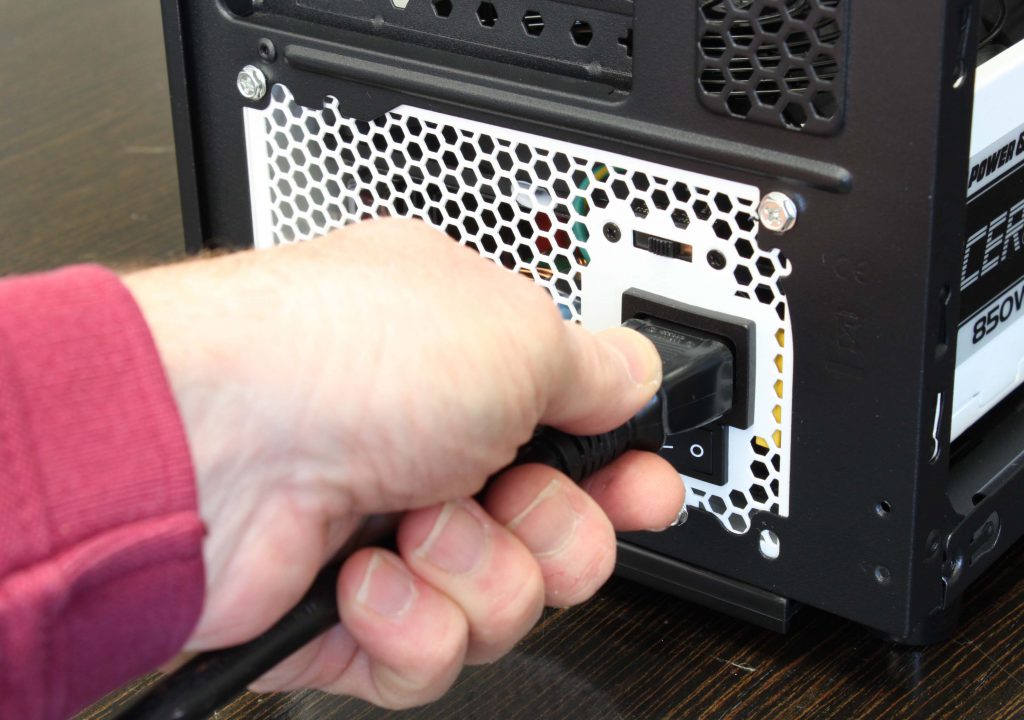
Step 3: Hold down the power button for 15-20 seconds to drain any residual power from the system.
Step 4: Reconnect the power sources, including the battery (if applicable), and turn on your PC.
Method 4: Clear the BIOS Memory
Clearing the BIOS memory using these steps can often alleviate configuration conflicts that lead to the “PC Turns On But No Display” error on Windows 11 or Windows 10 systems. Here are the steps to do so:
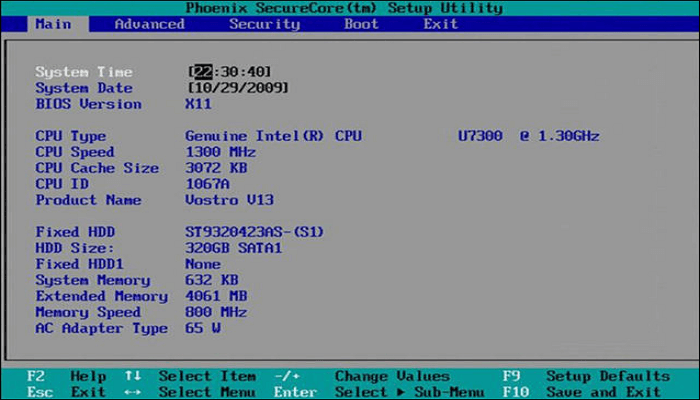
Step 1: Restart your PC and continuously press the designated key (commonly Del, F2, F10, or Esc) to access the BIOS/UEFI setup.
Step 2: Navigate through the BIOS menus to find the option to reset or clear the BIOS settings. Look for “Load Setup Defaults,” “Reset BIOS,” or “Clear CMOS.”
Step 3: Follow on-screen instructions or refer to your motherboard manual to perform the BIOS reset. This might involve selecting the reset option and confirming your choice.
Step 4: Once the BIOS is reset, save changes and exit the BIOS/UEFI setup. Restart your PC and check if the display issue is resolved.
Method 5: Check the Hardware Connections
When your computer powers up but displays nothing, hardware connections often hold the key to resolving the issue. Here’s a step-by-step guide to checking those connections and potentially fixing the “PC Turns On But No Display” error on Windows 11 or Windows 10.
Step 1: Ensure your PC is powered off completely. Disconnect all cables, including the power cord, monitor cable, keyboard, and any other peripherals connected to the PC.
Step 2: Inspect and firmly reattach all hardware connections. Check connections between the monitor and the PC, including the video cable, ensuring they are secure. Reconnect peripheral devices as well.
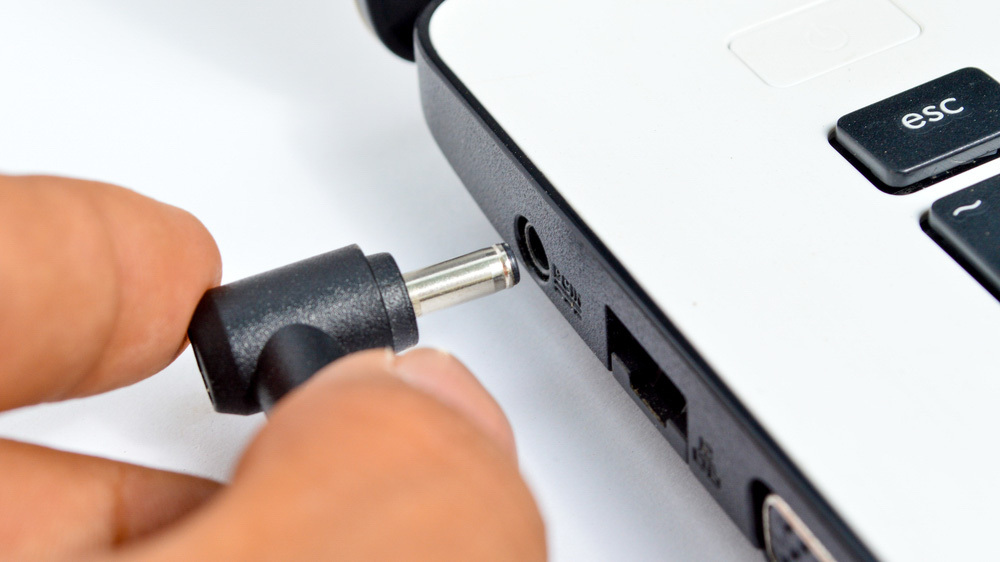
Step 3: Reconnect the power cord and turn on your PC. Check if the display issue has been resolved after reconnecting all hardware connections.
Verifying and securing hardware connections is crucial in addressing the “PC Turns On But No Display” error on Windows 11 or Windows 10 systems, as loose connections can often cause display problems.
Method 6: Review the LED Lights
When troubleshooting a computer displaying no visuals upon startup, paying attention to the LED indicators can offer valuable clues to pinpoint underlying hardware concerns. Here’s a guide to interpreting and utilizing LED patterns to resolve the “PC Turns On But No Display” issue on Windows 11 or Windows 10 systems.
Step 1: Take note of any LED lights on your PC. These could include power indicators, hard drive activity lights, or any specific LEDs related to your motherboard or GPU.

Step 2: Refer to your PC’s manual or manufacturer’s guide to understand the meaning behind the LED patterns. Different flashing or steady light combinations might signify specific hardware issues such as memory problems, GPU errors, or power supply issues.
Step 3: Based on the LED patterns and their meanings, troubleshoot the corresponding hardware component. For instance, if the LED pattern indicates a memory issue, reseat or test your RAM modules.
Reviewing LED lights can provide crucial insights into underlying hardware issues contributing to the “PC Turns On But No Display” error on Windows 11 or Windows 10, allowing targeted troubleshooting of specific components.
Method 7: Restart the Video Driver
When troubleshooting a display issue on your Windows 11 or Windows 10 PC, restarting the video driver can often address the “PC Turns On But No Display” error. Here’s a step-by-step guide to restarting the driver and potentially resolving the issue without a full system reboot.
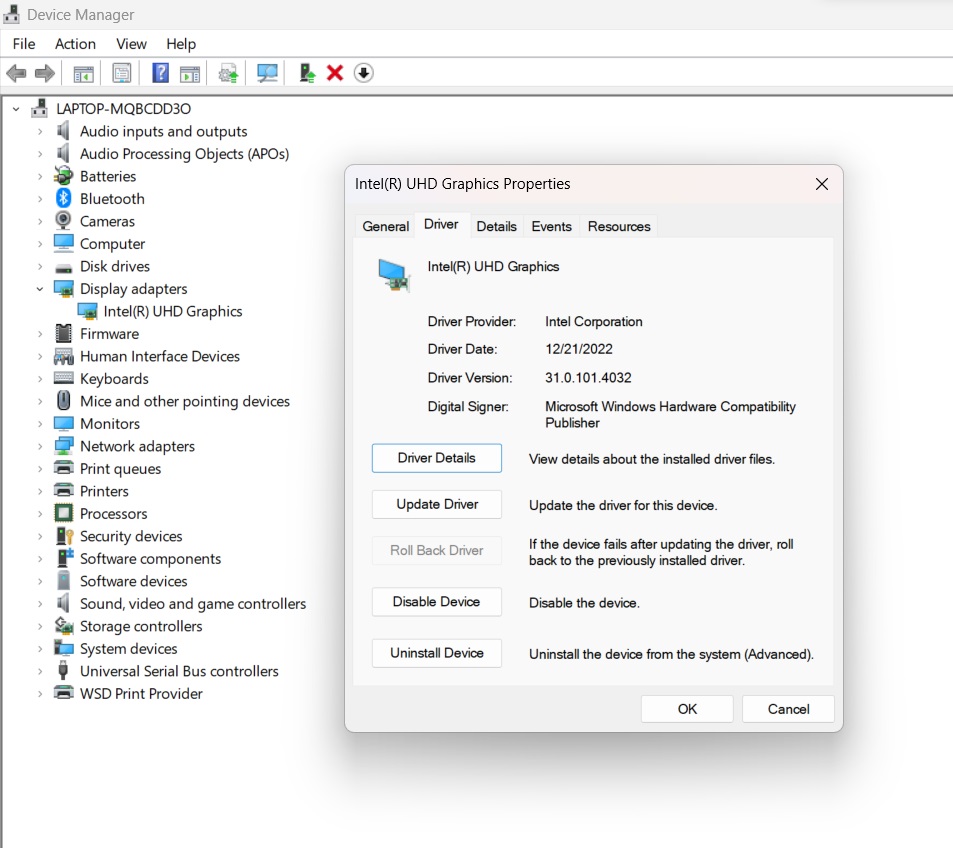
Step 1: Access Device Manager by right-clicking on the Start button and selecting “Device Manager” from the menu.
Step 2: Expand the “Display adapters” section within Device Manager to find your graphics card.
Step 3: Right-click on your graphics card and choose “Disable device.” Wait for a few moments, then right-click again and select “Enable device.”
Step 4: Restart your computer to implement the changes made to the video driver.
By restarting the video driver through Device Manager on Windows 11 or Windows 10, potential driver-related issues causing the “PC Turns On But No Display” error can often be resolved without requiring a full system reboot.
Method 8: Disconnect External Devices
To address the ‘PC Turns On But No Display’ issue on Windows 11 or Windows 10 systems, disconnecting external devices can be a vital step in troubleshooting. Here’s a step-by-step guide to resolve the problem by disconnecting peripherals.
Step 1: Turn off your computer completely and disconnect it from the power source.
Step 2: Unplug all external devices connected to your PC, including USB drives, external hard drives, printers, webcams, and any other peripherals.

Step 3: Only reconnect the essential components required for booting, such as the monitor, keyboard, and mouse. Leave other devices disconnected for now.
Step 4: Turn on your PC and check if the display issue persists with only the essential devices connected.
Disconnecting external devices helps eliminate potential conflicts or hardware issues causing the “PC Turns On But No Display” error on Windows 11 or Windows 10, allowing you to identify if any of the peripherals are contributing to the problem.
Method 9: Check for Overheating
Check if your PC components, especially the CPU and GPU, are overheating. Ensure fans are working properly, and clean out any dust blocking ventilation. Consider applying new thermal paste to the CPU if needed.
Method 10: Perform a System Restore
In troubleshooting the “PC Turns On But No Display” error on Windows 11 or Windows 10, employing a System Restore can often revert the system to a functional state. Here’s a step-by-step guide to performing a System Restore and potentially resolving the issue.
Step 1: Boot your PC and repeatedly press the “F8” or “Shift + F8” key during startup to access Advanced Startup Options. Alternatively, navigate through Settings > Update & Security > Recovery > Advanced Startup.
Step 2: In Advanced Startup Options, select “Troubleshoot” from the list of options.
Step 3: Choose “Advanced options,” then click on “System Restore.”
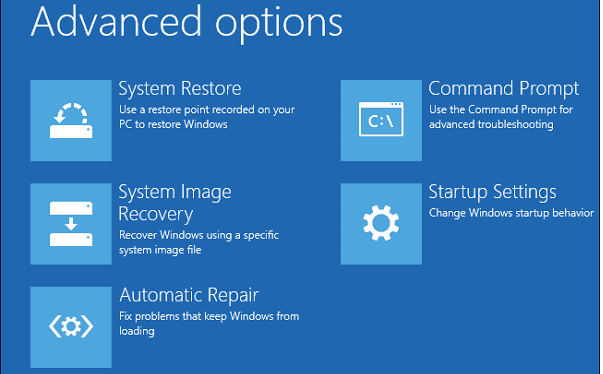
Step 4: Follow the prompts in the System Restore wizard. Select a restore point created before the issue occurred and proceed with the restoration process.
Step 5: After the restoration process is completed, restart your computer to apply the changes.
Performing a System Restore through these steps can potentially resolve the “PC Turns On But No Display” error on Windows 11 or Windows 10 by reverting the system to a previously functional state.
Conclusion
In conclusion, encountering the “PC Turns On But No Display” error on Windows 11 or Windows 10 can be frustrating, but there are various troubleshooting methods available. From checking hardware connections to updating drivers and performing system restores, this comprehensive guide offers a range of solutions to address this issue.
By systematically applying these methods, users can effectively diagnose and resolve the problem, restoring their systems to full functionality and enjoying a seamless computing experience. Remember, each step plays a vital role in identifying and resolving the underlying causes, empowering users to overcome the “no display” challenge and get their PCs back up and running smoothly.
FAQs:
Q1: Why does my PC turn on but show no display?
The “no display” issue can stem from various causes such as loose connections, faulty hardware components (like GPU or RAM), outdated drivers, overheating, or conflicts in BIOS/UEFI settings. Troubleshooting involves checking hardware connections, updating drivers, and diagnosing potential hardware faults.
Q2: Can a System Restore fix the “PC Turns On But No Display” problem?
Yes, a System Restore can potentially resolve the issue by reverting your system to a previous functional state. By choosing a restore point created before the display problem occurred, it can undo recent changes to drivers or system settings that might be causing the issue.
Q3: What should I do if disconnecting external devices doesn’t solve the display problem?
If disconnecting external devices doesn’t resolve the issue, try other troubleshooting methods such as updating graphics drivers, checking RAM modules, reviewing LED indicators for hardware clues, or performing a BIOS reset. These steps address various potential causes contributing to the “no display” error.
Popular Post
Recent Post

Advanced SystemCare: Tool To Clean Your PC
Your computer slows down over time. Files pile up, junk builds inside the system, and things start to feel sluggish. You open a browser, and it takes forever. Programs crash without warning. This is a sign that your PC needs a good cleanup. Many users ignore these signs. They think buying a new computer is […]

Top 10 PC Cleaning and Optimization Tools For Windows 11/10
Discover the best PC cleaning and optimization tools for Windows 11 and 10. Remove junk files, improve speed, and keep your PC healthy with trusted cleaners.

Clear Microsoft Teams Cache On Windows PC [Complete Guide]
Learn how to clear Teams cache on Windows PC with 3 easy methods. Fix slowdowns, glitches, and errors fast. A simple guide for every Windows 11 user.

How To Clear Browsing History on PC: Chrome, Edge, Firefox, Opera
Learn how to clear browsing history on PC across Chrome, Edge, Firefox, and Opera with easy steps, tips, pros, and FAQs.

Clear Cache and Cookies: Complete Guide For Windows 11/10
Learn how to clear cache and cookies on Windows 10 and 11. This complete guide covers Chrome, Edge, and Firefox with simple, step-by-step instructions for every user.

How To Clean PC Trackpad/Touchpad Without Damaging It
Learn how to clean PC trackpad and clean PC touchpad safely with simple steps. Improve performance, remove dirt, and keep your laptop surface smooth and responsive.

How To Clean Your GPU/Graphics Card [Complete Guide]
Introduction A graphics card is one of the most important parts of a computer. It handles visuals, gaming, video editing, and design work. Over time, dust builds up inside it. This dust blocks airflow and traps heat. When heat increases, performance drops. In some cases, the system may even crash. That is why learning how […]

How To Clean PC Power Supply Unit Safely Without Damaging
Follow simple, safe steps to clean your computer’s power supply unit. Improve cooling, reduce overheating, and protect your PC’s performance.

How To Clean a CPU Without Damaging It [Complete Guide]
Learn how to clean a CPU safely without damage. Follow simple steps, precautions, and methods to improve cooling, boost performance, and extend your computer’s life.

How To Clear Browser Cache On Windows 11/10 [Chrome, FireFox, Edge]
Learn how to clear browser cache on Windows 11 and 10. Follow simple steps to clean browser cache, fix slow browsing, and improve performance easily.
