How to Add Widgets to the Windows 11 Desktop?
Microsoft has introduced different functions available in the Windows software versions to improve the user experience. The Widgets panel, noticeable in the Windows 11 version, is similar but an upgrade from the Windows 10 News and Interests panel.
If you want to add widgets, Windows 11 allows you to do so easily in this panel. Users can search web browsers easily through this section, view images, check the weather, read news, and perform many other functions, all with a swipe or click.
It is possible for Windows users to smoothly add widgets to Windows 11 or customize the panel arrangement as needed. Learn how to handle either process through this detailed guide.
Ways to add and manage Widgets in Windows 11
There are different steps that you have to keep in mind when it comes to adding Windows 11 widgets on the desktop efficiently. We tried out many of these steps directly and have presented the sequence to follow for the varying processes here.
Solution 1: View the Widget Panel
Firstly, you should learn how to access the Widget panel so that you can widget the panel on your Windows 11 desktop as needed. This is accessible through the Taskbar, and you can find it in the shape of two rectangles stuck together. You can search for different widgets available under Microsoft or the Bing web search bar from this section.
How to proceed?
Step 1: To access this section, click on the Taskbar’s Widgets icon. On touchscreen-based laptops, you have to swipe to the right from the left side to access the panel.
Step 2: You can find the different widgets that appear in this section, like the Outlook-powered Calendar widget or the Weather widget. Scroll through the list to see real-time news updates and other sections.
Solution 2: Adding a New Widget
In the Widget panel, Windows typically showcases sections like sports information, current news broadcasts or updates, weather forecast, stock information, etc. The information can appear different for varying types of users in many parts of the world, personalized for their location.
Besides these preset ones, users have the option to add widgets to Windows 11. Examples of these features include Microsoft To Do, Outlook Calendar, Family Safety, and more.
How to proceed?
Step 1: On the Taskbar, click on the Taskbar icon.
Step 2: Tap on the Add widgets icon.
Step 3: Choose among the options to select the widget type you want to add and press the plus (+) icon beside it.
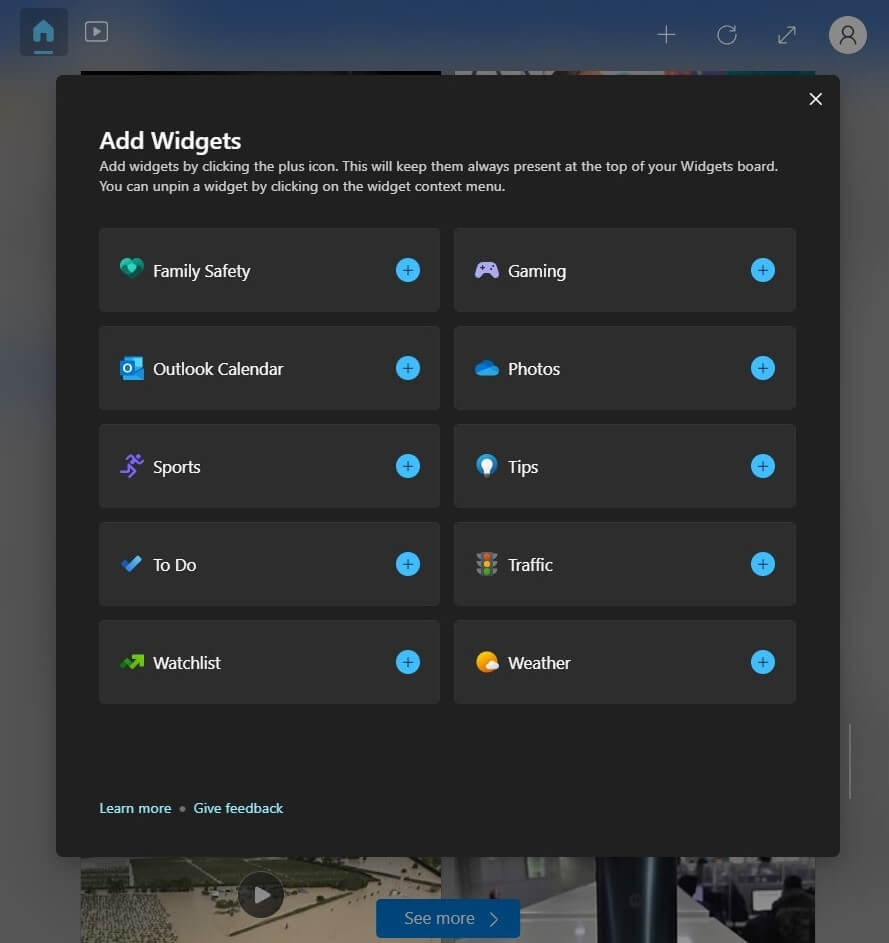
Step 4: Tap on the “Close Flyout” key to close the panel.
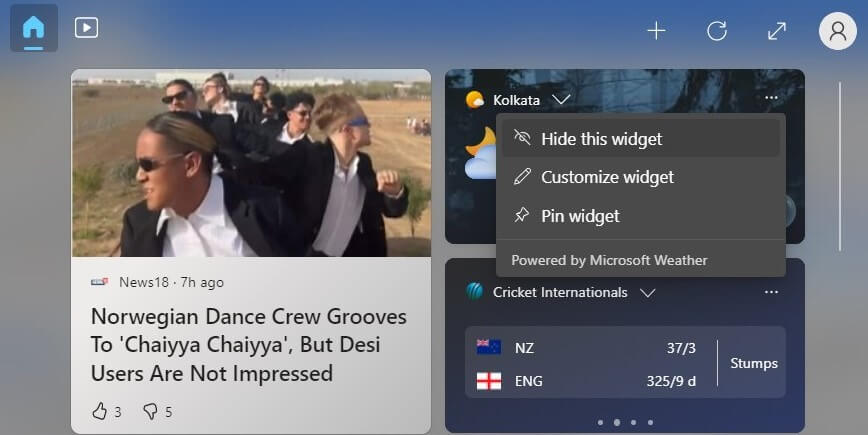
Solution 3: Hide or remove a widget
Windows users can hide the Windows 11 widgets on the desktop or remove them with specific steps. Later, if needed, it is possible to add the widget again or replace it with another, if necessary.
How to proceed?
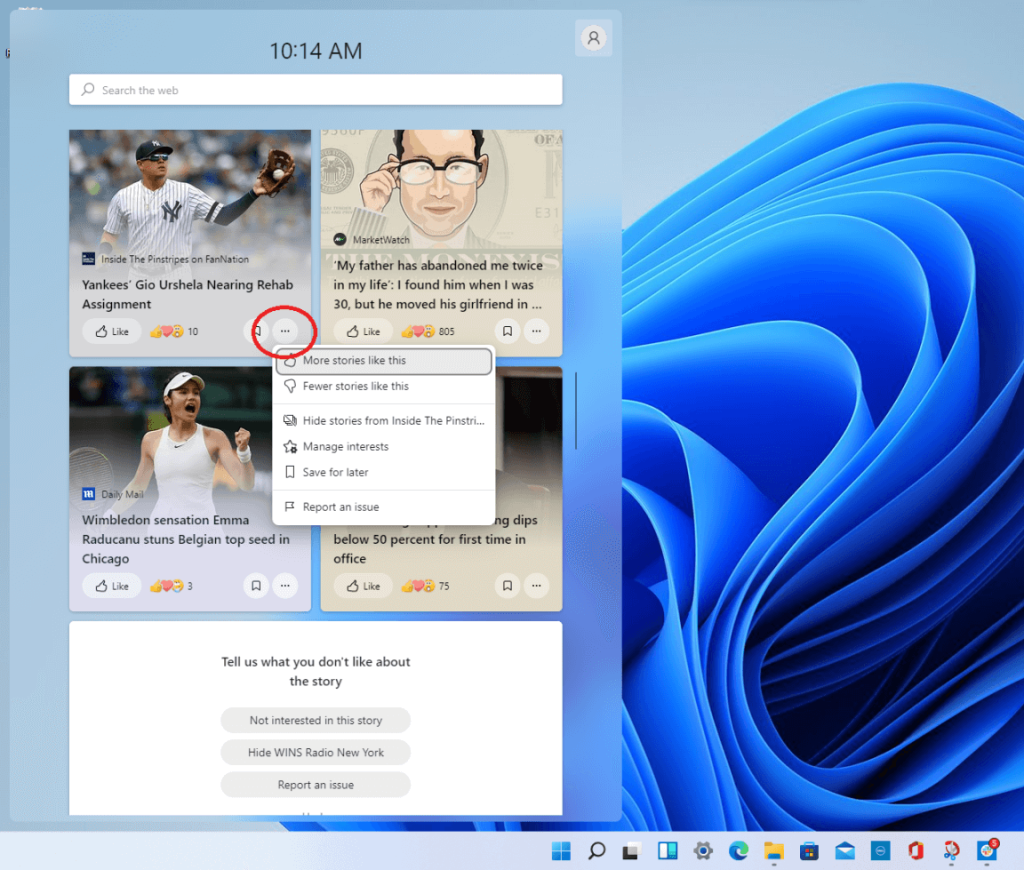
Step 1: Click the Widgets icon again to access the Windows 11 Widgets panel.
Step 2: Tap on the three-dotted icon for the widget on the next window that you will hide or remove.
Step 3: Then tap on Remove Widget or Hide this Widget.
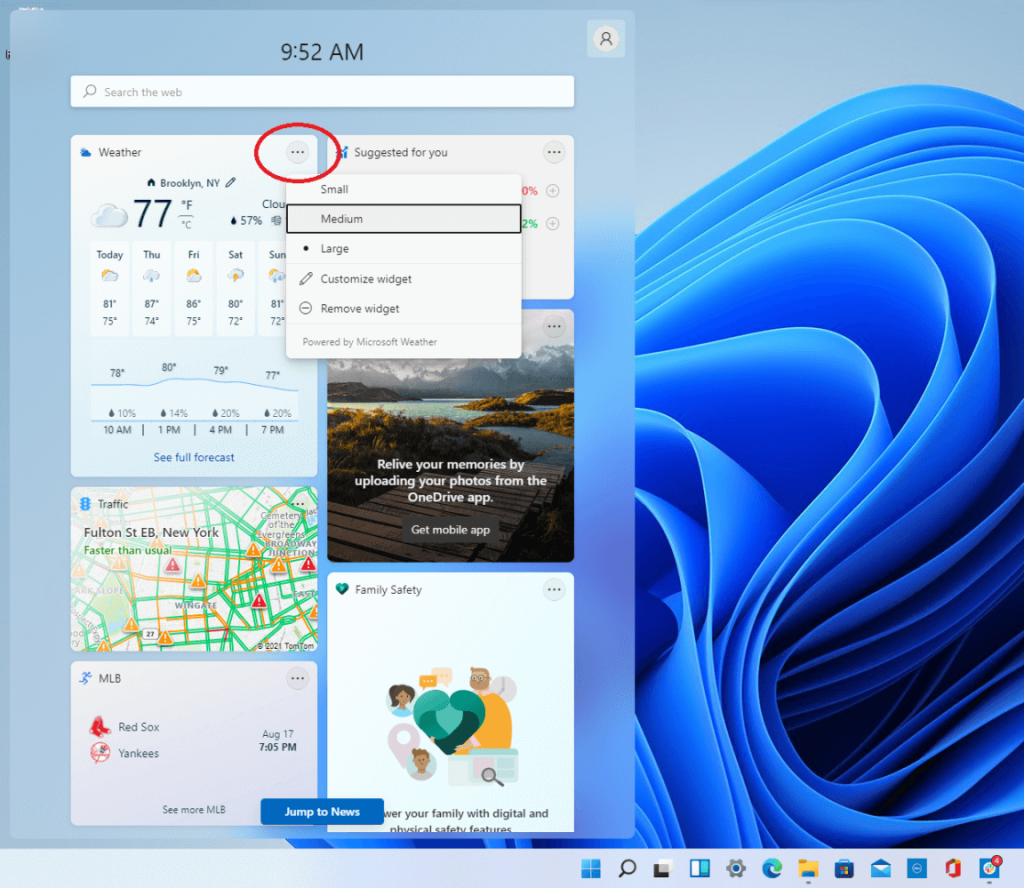
Solution 4: Change the Widget Size on Windows 11 Desktop
One of the customization options that Windows 11 users often focus on primarily is the size of the widget types on the panel. The default view of various unevenly shaped widgets does appear eye-catching. However, many users want to see one of the smaller-shaped widgets as the bigger slide or vice versa.
So, you can change the size of the Windows 11 widgets on the desktop between three options: large, medium, or small. Use the bigger option on the widget you want to show more information, and the smaller option for widgets they want less view of.
How to proceed?
Step 1: Tap the cursor on the Widgets icon on the Windows 11 taskbar.
Step 2: Go through the options to choose the widget whose size you want to adjust.
Step 3: Then click on the three-dotted icon beside it and choose between the size types.
Solution 5: Customize the widget look on Windows 11
Some of the widgets available in the Widgets panel have specific configurations that are already available. Users can also make changes to these pre-made settings, like the Traffic and Weather widgets.
For example, under the Sports widget, you can change the teams you want to view the stats for, the Traffic widget lets users adjust the location, and the Watchlist widget lets users pin the stock listings.
How to proceed?
Step 1: Choose the Widget icon on the Taskbar to access the panel.
Step 2: Click on the three-dotted icon beside the widget you will change.
Step 3: Tap on the Customize Widget option.
Step 4: Make changes as needed, like the location and units for Weather forecasting. Press Save to confirm.
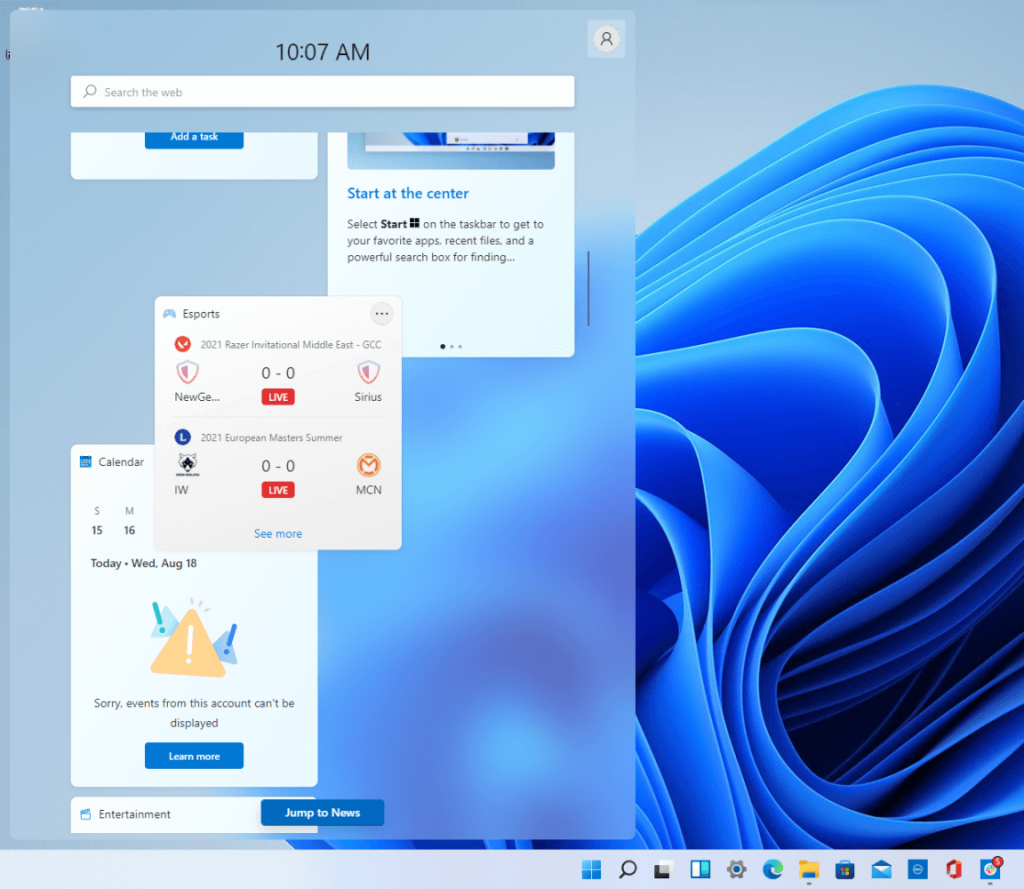
Solution 6: Move the widget spots in the Widgets panel
Users can rearrange the Windows 11 widgets on the desktop to make the widgets appear in an arrangement that is convenient for them. For example, if a person needs to see Traffic-related information, having the widget showcasing the latest news bulletin in the front is unsuitable.
So, it is best to reorganize the widget properly to different locations as needed. Drag to areas you will prefer until the final arrangement is user-friendly.
How to proceed?
Step 1: Go to the Widget panel through the double-rectangle icon.
Step 2: Hover the cursor at the top section of the widget until the cursor turns into a hand.
Step 3: Then, grab the widget and move it to another location. Drop it in place, and the surrounding widgets will rearrange accordingly.
Solution 7: Change the News Feed
You can also adjust the News Feed as you need through the Widget panel. The steps for this are simple and require you to close the news widget you want to hide.
How to proceed?
Step 1: Open the Widget panel through the icon and scroll through the news articles in the widget form all over the feed.
Step 2: Click the cross (X) button beside it to hide the news.
Step 3: In the next prompt, you will get many options, like “Hide Stories from…”, “Manage Interests”, and more. Choose as needed.
Solution 8: Pin the widget
If you want a widget to stay in place even as the other options update automatically, you can pin it in place. This mainly works for the utility widgets, like the weather forecast, sports information, and watchlist suggestion type widgets.
How to proceed?
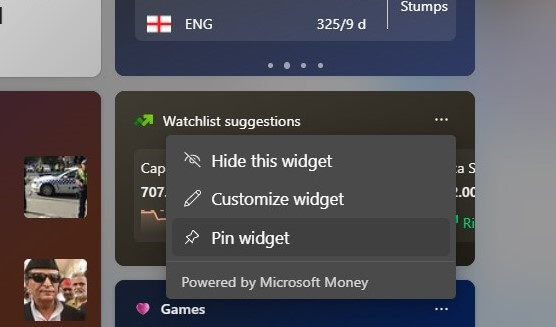
Step 1: Open the Widgets panel through the Taskbar.
Step 2: Click on the three-dotted icon on top of the widget you want to pin.
Step 3: Choose the “Pin this widget” option.
Conclusion
Adding widgets to the Windows 11 desktop interface is very simple. However, it is important for you to properly check and follow all of the customization steps and corrections to personalize the Widgets panel to your liking.
In this post, practice the methods mentioned on your device multiple times. Also, see varying arrangements before settling on the one you prefer as the final panel arrangement.
Popular Post
Recent Post

Advanced SystemCare: Tool To Clean Your PC
Your computer slows down over time. Files pile up, junk builds inside the system, and things start to feel sluggish. You open a browser, and it takes forever. Programs crash without warning. This is a sign that your PC needs a good cleanup. Many users ignore these signs. They think buying a new computer is […]

Top 10 PC Cleaning and Optimization Tools For Windows 11/10
Discover the best PC cleaning and optimization tools for Windows 11 and 10. Remove junk files, improve speed, and keep your PC healthy with trusted cleaners.

Clear Microsoft Teams Cache On Windows PC [Complete Guide]
Learn how to clear Teams cache on Windows PC with 3 easy methods. Fix slowdowns, glitches, and errors fast. A simple guide for every Windows 11 user.

How To Clear Browsing History on PC: Chrome, Edge, Firefox, Opera
Learn how to clear browsing history on PC across Chrome, Edge, Firefox, and Opera with easy steps, tips, pros, and FAQs.

Clear Cache and Cookies: Complete Guide For Windows 11/10
Learn how to clear cache and cookies on Windows 10 and 11. This complete guide covers Chrome, Edge, and Firefox with simple, step-by-step instructions for every user.

How To Clean PC Trackpad/Touchpad Without Damaging It
Learn how to clean PC trackpad and clean PC touchpad safely with simple steps. Improve performance, remove dirt, and keep your laptop surface smooth and responsive.

How To Clean Your GPU/Graphics Card [Complete Guide]
Introduction A graphics card is one of the most important parts of a computer. It handles visuals, gaming, video editing, and design work. Over time, dust builds up inside it. This dust blocks airflow and traps heat. When heat increases, performance drops. In some cases, the system may even crash. That is why learning how […]

How To Clean PC Power Supply Unit Safely Without Damaging
Follow simple, safe steps to clean your computer’s power supply unit. Improve cooling, reduce overheating, and protect your PC’s performance.

How To Clean a CPU Without Damaging It [Complete Guide]
Learn how to clean a CPU safely without damage. Follow simple steps, precautions, and methods to improve cooling, boost performance, and extend your computer’s life.

How To Clear Browser Cache On Windows 11/10 [Chrome, FireFox, Edge]
Learn how to clear browser cache on Windows 11 and 10. Follow simple steps to clean browser cache, fix slow browsing, and improve performance easily.
