How to use Open Shell in Windows 11?
Have you recently upgraded to Windows 11? You must have been trying hard to accustom yourself to the new sleeker design and advanced features. But are you facing issues in going through the icon-heavy taskbar of Windows 11?
What if we tell you that it is possible to bring back your favorite start menu on your new Windows 11 system? All you need is a program called Open Shell. Let us go through all the details about it and how to use Open Shell in Windows 11.
We’ll go through the detailed steps to download Open Shell and start using it on Windows 11 systems. Not to miss are the quick fixes if it is not working properly on your system. Starting with a quick definition to understand what Open Shell is all about.
Open Shell- An overview
Open Shell came as a replacement for the Classic Shell when it was discontinued in 2017. Open Shell has a pre-release beta available on GitHub, which is compatible with Windows 11. Hence, it allows seamless customization of the different user interface aspects of Windows 11.
Users can go for the simple start menu to launch programs, manage Windows settings, search files, and perform different functions on Windows 11 easily using Open Shell. Whether you want to bring the old Windows back to work and look, the Open Shell installer has already been downloaded by millions of Windows users. Let us now have a quick look at some of the top features of Open Shell.
Open Shell features
Some of the worthy features of Open Shell in Windows 11 include the following:
- It can change the Start menu look into Classic old, Classic two columns, and Windows 7 mode.
- It can replace the Start menu icon with any custom or already installed images on the system.
- It can change the Start menu behavior for left-click, right-click, and keyboard shortcuts.
- It can hide or unhide the Start menu items.
- It can apply a skin to the Start menu, change its transparency, reduce the glass color, and use small icons and large fonts for the menu.
- It can alter Taskbar’s color, text color, texture, look, and opacity.
- It can customize mouse behavior like left click, Shift + click, Windows key, Shift + Windows key, and Hover behaviors.
- It can define hotkeys for classic and Windows menus.
- It can change default shortcuts, power menu options, and Start menu behavior.
- It can toggle the power menu, jumplists, app shortcuts, recent programs, and suggestions.
Steps to download Open Shell in Windows 11
Before starting to use Open Shell, it is essential to download and install it in Windows 11 system. The quick steps for the same are:
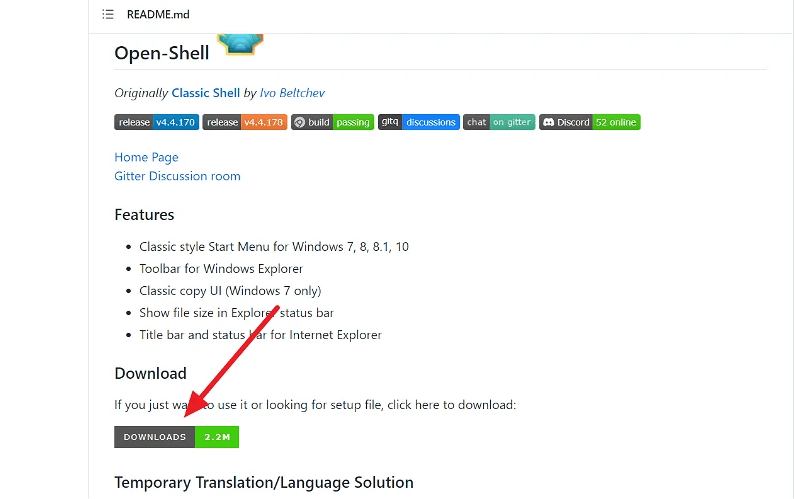
Step 1: Go to the link- https://github.com/Open-Shell/Open-Shell-Menu
Step 2: Go to the “Downloads” option on the page and select the “Downloads” button.
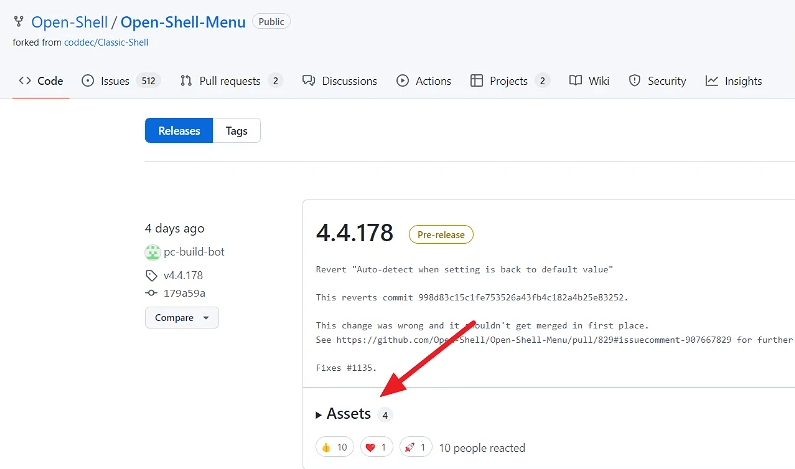
Step 3: You can see all the latest versions of the Open Shell, with the latest version at the top of the list.
Step 4: Select the “Assets” option of the latest version and click to reveal the download files.
Step 5: Now click on the setup link to download the Open Shell installer.

Step 6: Double-click on the EXE file to start the installation process.
Step 7: Click on the “More Info” option when the Windows 11 system gives the pop-up of “Windows protected your PC.”
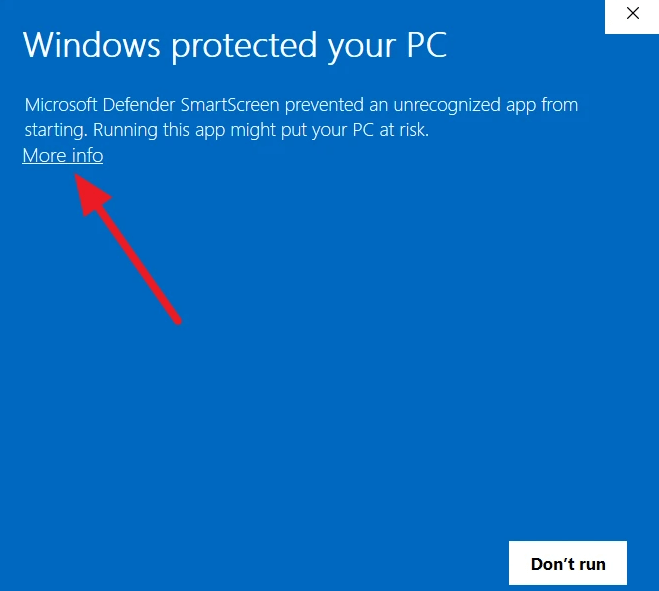
Step 8: Now, select the “Run anyway” option.
Step 9: Click on the “Next” option in the welcome wizard of Open Shell.
Step 10: Next, tick the box for the option “I accept the terms in the License Agreement.”
Step 11: Now, tick the box for the option “Create a start menu folder” and press “Next.”
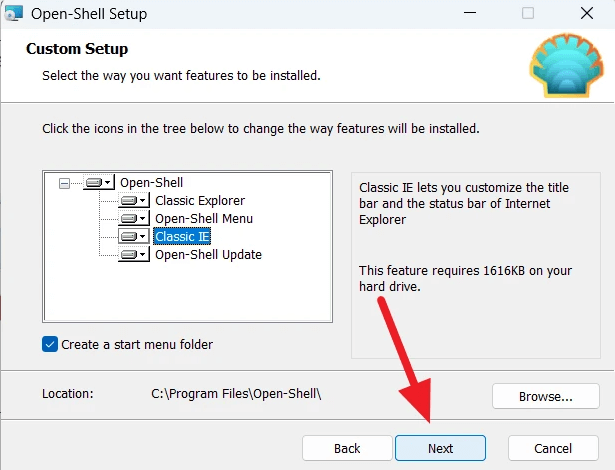
Step 12: Click on the “Install” option to start the Open Shell installation process.
Step 13: Complete the Open Shell installation process by selecting the “Finish” option.
Steps to use Open Shell in Windows 11
So, here you are at the detailed steps to use Open Shell in a Windows 11 system:
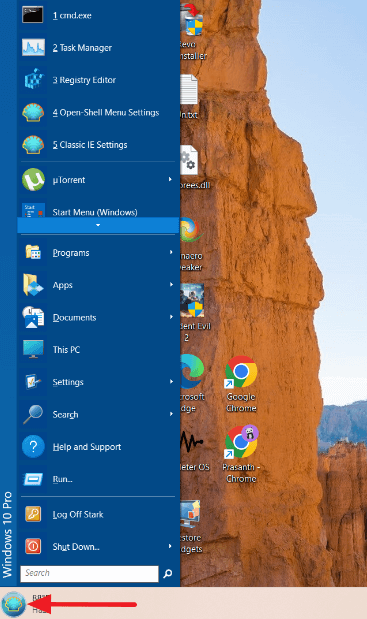
Step 1: Open the Start Menu on a Windows 11 system.
Step 2: Select the “Open Shell Menu Settings” option.

Step 3: The app will show different options for modifying, including the following:
- Search box
- Menu Look
- Skin
- Start Button
- Taskbar
- Windows 10 Settings
- Customize Start Menu
- Context Menu
- Sounds
- Language
- Start Menu Style
- Controls
- Special items
- Main Menu
- General Behavior
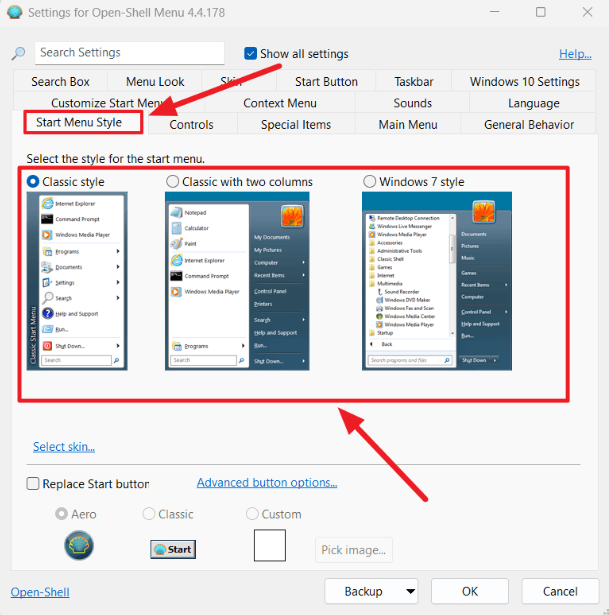
Step 4: We’ll select the “Start Menu Style” option and can select from the three available options- Classic style, Classic with two columns, and Windows 7 style.
Step 5: Now, tick the “Replace Start Button” option and then select from Aero, Classic, or Custom options. Once done, press “OK.”
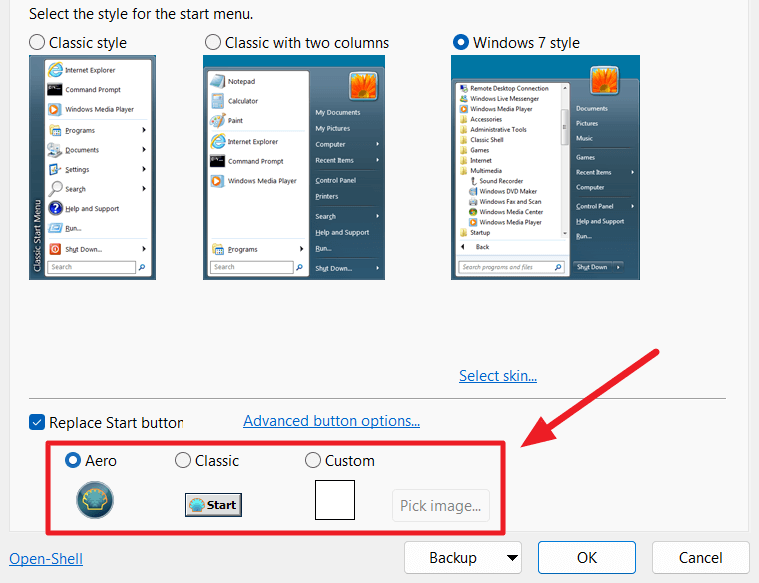
Step 6: The settings will be applied, and the selected Classic menu will start appearing on your Windows 11 system.
Open Shell is not working in Windows 11
After going through detailed steps to use Open Shell in Windows 11, the chances of unexpected problems can’t be ignored. There is no need to worry, as the following are the main solutions:
- Reinstall Open Shell
- Restart file explorer
- Update Windows
- Re-register the Shell experience
- Tweak registry settings
- Rebuild the Windows search index
Wrapping Up
Hope everything is clear to our readers about the detailed steps to use Open Shell in Windows 11. It allows users to bring back the custom start menu on Windows 11 systems. Users can go through the detailed guide mentioned above to use it on Windows 11. Further, the quick fixes can help solve the problems of Open Shell not working on your Windows 11.
Popular Post
Recent Post

Advanced SystemCare: Tool To Clean Your PC
Your computer slows down over time. Files pile up, junk builds inside the system, and things start to feel sluggish. You open a browser, and it takes forever. Programs crash without warning. This is a sign that your PC needs a good cleanup. Many users ignore these signs. They think buying a new computer is […]

Top 10 PC Cleaning and Optimization Tools For Windows 11/10
Discover the best PC cleaning and optimization tools for Windows 11 and 10. Remove junk files, improve speed, and keep your PC healthy with trusted cleaners.

Clear Microsoft Teams Cache On Windows PC [Complete Guide]
Learn how to clear Teams cache on Windows PC with 3 easy methods. Fix slowdowns, glitches, and errors fast. A simple guide for every Windows 11 user.

How To Clear Browsing History on PC: Chrome, Edge, Firefox, Opera
Learn how to clear browsing history on PC across Chrome, Edge, Firefox, and Opera with easy steps, tips, pros, and FAQs.

Clear Cache and Cookies: Complete Guide For Windows 11/10
Learn how to clear cache and cookies on Windows 10 and 11. This complete guide covers Chrome, Edge, and Firefox with simple, step-by-step instructions for every user.

How To Clean PC Trackpad/Touchpad Without Damaging It
Learn how to clean PC trackpad and clean PC touchpad safely with simple steps. Improve performance, remove dirt, and keep your laptop surface smooth and responsive.

How To Clean Your GPU/Graphics Card [Complete Guide]
Introduction A graphics card is one of the most important parts of a computer. It handles visuals, gaming, video editing, and design work. Over time, dust builds up inside it. This dust blocks airflow and traps heat. When heat increases, performance drops. In some cases, the system may even crash. That is why learning how […]

How To Clean PC Power Supply Unit Safely Without Damaging
Follow simple, safe steps to clean your computer’s power supply unit. Improve cooling, reduce overheating, and protect your PC’s performance.

How To Clean a CPU Without Damaging It [Complete Guide]
Learn how to clean a CPU safely without damage. Follow simple steps, precautions, and methods to improve cooling, boost performance, and extend your computer’s life.

How To Clear Browser Cache On Windows 11/10 [Chrome, FireFox, Edge]
Learn how to clear browser cache on Windows 11 and 10. Follow simple steps to clean browser cache, fix slow browsing, and improve performance easily.
